GENERAL INFORMATION
GENERAL INSTRUCTION
This publication is designed to help you the body repair technician with your specialized work. Vehicle bodywork has changed a great deal over the years. As vehicles have developed technically, vehicle bodywork has also had to meet new requirements with design, changes to reconcile apparently conflicting demands to name just a few examples:
- strength and safety ; low weight
- spaciousness ; good aerodynamices
- high quality ; low price
The durability and ease of repair of the bodywork also plays an important part.
Nowadays, the use of highly automated production equipment makes it possible to maintain the tightest tolerances and thus ensure a high level of quality.
When bodywork is damaged, the customer rightly expects it to be expertly repaired to the same quality standards.
At the same time, for his safety, the customer expects you to have comprehensive knowledge of materials, measuring and straightening methods, possible distortion, optimum corrosion prevention and much more besides.
This publication is designed to help you update your knowledge and give you an idea of what you require to rectify moderate or severe accident damage, for your own safety and for the satisfaction of your customers.
IMPORTANT SAFETY NOTICE
BEFORE BEGINNING WORK
- Disconnect the battery to reduce the possibility of fire caused by electrical shorts.
- Check for fuel leaks and repair as necessary.
- Remove the fuel tank and/or fuel lines if welding equipment is to be used near the fuel system.
- Before welding, sanding or cutting, protect carpets and seats with fire-proof covers.
- Follow standard safety practices when using toxic or flammable liquids.
- Use standard safety equipment when spraying paint, welding, cutting, sanding or grinding. Standard safety equipment includes.
- Respirator and filter masks: Designed to filter out toxic fumes, mist, dust or other airborn particles. Use a respirator or filter mask designed to protect you from the hazards of the particular job; some respirators, for example, are designed to filter out only dust and airborn particles, not toxic fumes.
- Safety goggles or glasses: Designed to protect your eyes from projectiles, dust particles or splashing liquid.
- Gloves: Rubber gloves protect against corrosive chemicals. Welding gloves protect against burns and abrasions caused by welding, sanding or grinding.
- Safety shoes: Non-slip soles protect against slipping. Metal toe inserts protect against falling objects.
- Ear plugs: Protect eardrums from harmful noise levels.
DURING WORK
- Do not smoke while working near the fuel system.
- Deposit gas or solvent-soaked shop towels in an approved container.
- Do not use an air hose to blow off brake assemblies: use only an approved vacuum cleaner, and wear an approved filter mask or respirator.
- Always attach a safety cable when using a hydraulic ram or a frame straightening table: do not stand in direct line with the chains used on such equipment.
BODY SAFETY
Modern stressed-skin bodies are designed so as to have a sturdy passenger cell protected by front and rear crumple zones.
- In an accident the crumple zones are designed to convert impact energy into deformation work.
- The shape, material and metal thickness must all be precisely matched.


- Many years of experience, refined computational methods and expensive series of crash tests mean that DAEWOO now builds bodies giving optimum deformation in the crumple zones in frontal or rear impacts.
When repairing body damage, it is therefore imperative to restore the original structure and strength in order to guarantee the safety of the occupants.
LOADS ON BODY PARTS
- The earlier practice of making a distinction between load bearing and non-loading bearing parts of vehicles with a chassis and body is no longer justified now. Every part, even the windows, contributes to the overall strength of the vehicle.
Therefore, with modern DAEWOO bodies, one talks of highly stressed and less highly stressed parts.
USE OF NEW HIGH-QUALITY MATERIALS
- The requirement for reduced body weight has lead to a reduction in the amount of steel used, e.g. through the use of thinner sheet steels. This has been achieved with HIGH STRENGTH SHEET STEELS, in spite of the need to meet higher body strength requirements at the same time. High strength steels have a tensile strength and a yield strength as much as 30% higher than conventional steel. These properties must not be destroyed when carrying out repairs, e.g. by using excessive heat.
CORROSION PROTECTION
- The durability of the bodywork, its associated long-term safety and retention of value largely depend on the corrosion protection given to the sheet metal. Here, DAEWOO takes a great deal of care in production.
- Therefore, this corrosion protection must be preserved or restored when repairs are carried out.
SUMMARY
- All DAEWOO vehicles are built to the highest standards in terms of styling and material properties.
- These high quality standards must be maintained when accident repairs are carried out.
- Mistakes made when carrying out repair operations such as straightening, welding sheet-metal parts, etc. not only produce visible defects, but may also compromise the safety of the vehicle.
- Mistakes made when restoring the corrosion protection compromise durability.
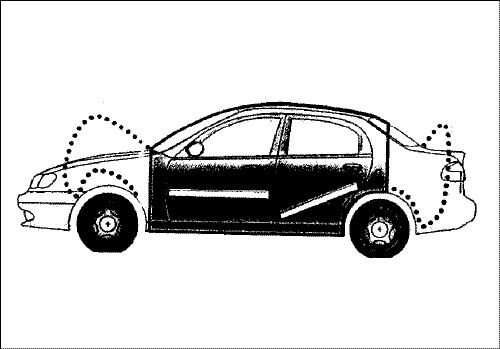
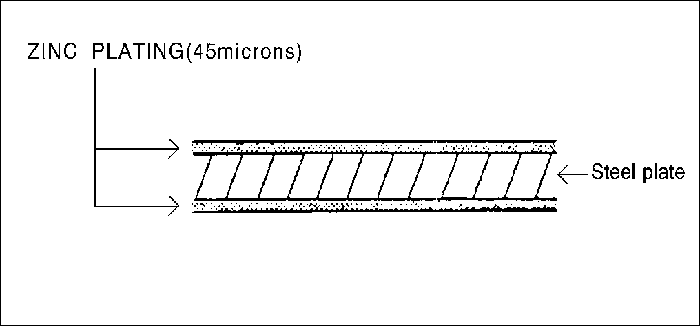
ZINC TREATED STEEL PLATE REPAIR
The zinc plated steel plate used in some panels of the EVANDA requires different repair techniques than ordinary steel plate.
- Before spot welding the zinc plated steel plate, remove the paint from both sides of the flange to be welded. Apply sealer to the flange after welding.
Caution : To prevent eye injury, wear goggles or safety glasses whenever sanding, cutting or grinding.
Note : Seal the sanded surfaces thoroughly to prevent rust.
- The electric continuity properties of zinc plated steel plate is different from ordinary steel plate. When spot welding, increase the current by 10-20%, or increase the resistance welding time.
- Increase the number of weld spots by 10-20% also.
Note : The MIG welding procedures for zinc plated steel plate are the same as for ordinary steel plate.
Caution : To prevent eye injury and burns when welding, wear an approved welding helmet, gloves and safety shoes.
- Before applying putty or body filler to the zinc plated steel plate, sand the zinc plating thoroughly to promote adhesion and prevent blistering.
Note : Use only epoxy-based putties and fillers on zinc plated steel plate.
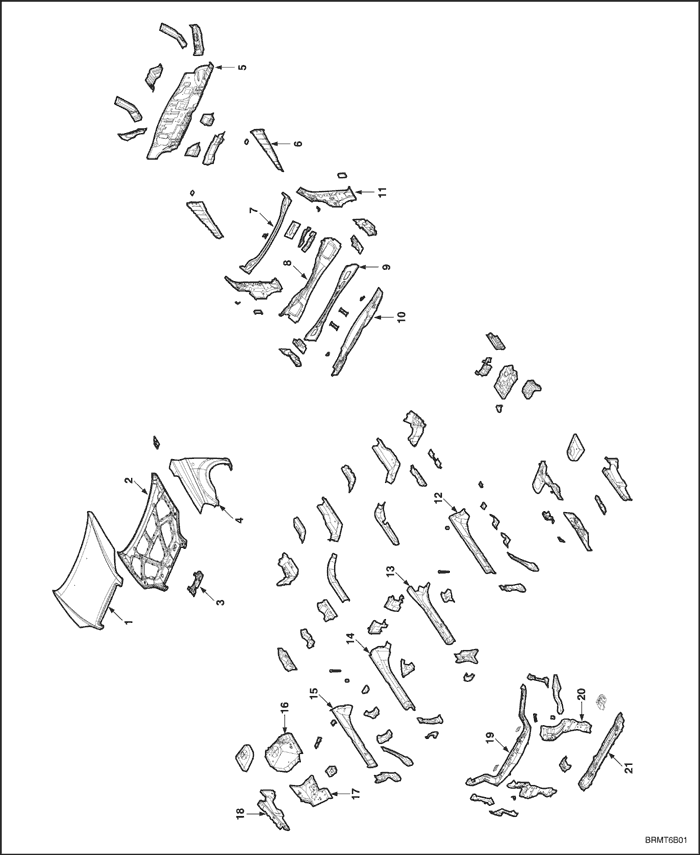
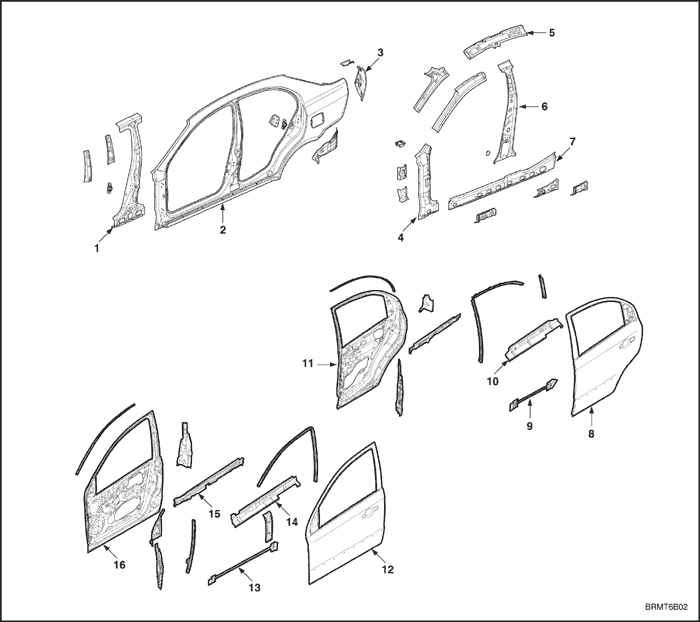
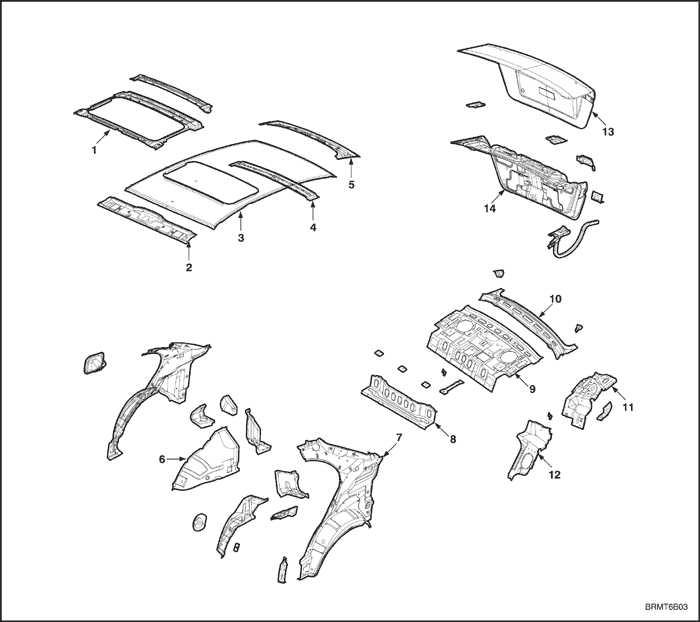
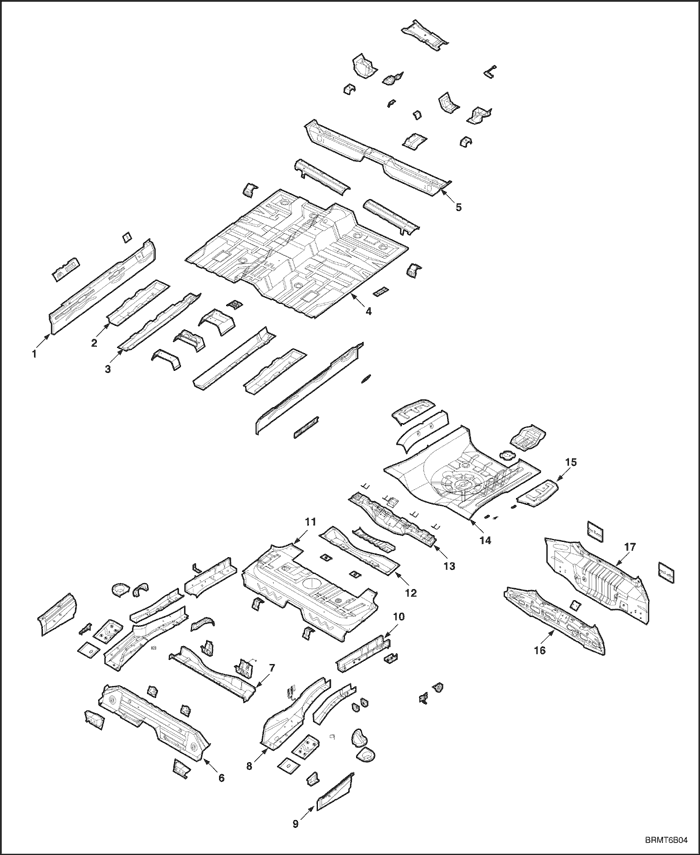
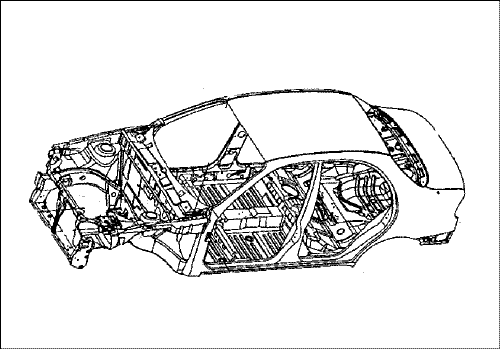
TECHNICAL ILLUSTRATION
- Hood Outer Panel
- Hood Inner Panel
- Hood Striker Reinforcement
- Fender
- Dash Panel
- Wheel House Brace
- Dash Top Panel
- Dash Upper Cross Member
- Dash Upper Bulkhead
- Dash Upper Panel
- Dash Side Panel
- Front Outer Longitudinal (LH)
- Front Inner Longitudinal (LH)
- Front Inner Longitudinal (RH)
- Front Outer Longitudinal (RH)
- Wheel House Rear Panel
- Wheel House Front Panel
- Wheel House Extension
- Radiator Upper Cross Member
- Headlamp Support Panel
- Radiator Lower Cross Member
- Center Pillar Reinforcement
- Side Outer Panel
- Taillamp Housing Panel
- Front Pillar Lower Reinforcement
- Roof Side Inner Panel
- Side Inner Center Panel
- Rocker Reinforcement
- Rear Door Outer Panel
- Rear Door Impact Beam
- Rear Door Outer Panel Reinforcement
- Rear Door Inner Panel
- Front Door Outer Panel
- Front Door Impact Beam
- Front Door Outer Panel Reinforcement
- Front Door Inner Panel Reinforcement
- Front Door Inner Panel
- Sunroof Frame
- Windshield Header Rail
- Roof Panel
- Roof Center Support
- Roof Inner Rear Frame
- Wheel House Inner Front Panel
- Side Inner Rear Panel
- Back Upper Front Frame
- Back Upper Panel
- Back Upper Rear Frame
- Back Upper Side Frame
- Retractor Rear Reinforcement
- Trunk Lid Outer Panel
- Trunk Lid Inner Panel
- Floor Side Panel
- Front Floor Longitudinal
- Tunnel Reinforcement
- Front Floor Panel
- Front Floor Front Cross Member
- Rear Floor Front Cross Member
- Rear Floor Center Cross Member
- Rear Longitudinal
- Rear Floor Side Panel
- Rear Longitudinal Extension
- Rear Floor Front Panel
- Rear Seat Support
- Rear Floor Upper Cross Member
- Rear Floor Rear Panel
- Rear Floor Rear Patch
- Back Lower Reinforcement
- Back Lower Panel
BODY REPAIR PROCEDURES
No. | Operation | Procedure | Remarks |
1 | Inspection | Inspect the damaged parts and the extent of damage and make plans for the repair. | . |
2 | Preparation | Prepare the new parts, special repair tools and others. | . |
3 | Removal | Remove the related parts for repair. | . |
4 | Pull out | Roughly pull out and straighten the damaged areas. | . |
5 | Cut and pry off | Cut off the damaged areas and drills on the spot weld nuggets and pry off the remaining spot weld flanges. | . |
6 | Peel off | Peel off the undercoat and sealer. | . |
7 | Molding | Mold damaged areas and even out the welding flanges and fill any holes. | . |
8 | Set the new parts | Grind both sides of the welding section and set the new parts and tack welds for temporary installation. | . |
9 | Inspection | Inspect the dimensions for correct position and preinstall the exterior parts and check the clearances and level differences. | . |
10 | Welding | Perform a trial welding and the main welding. | . |
11 | Finish | Finish the welding areas and even out the flanges for a close fit. | . |
12 | Sealing | Apply the sealer to the matching and over lapped surface. | . |
13 | Undercoating | Apply the undercoat to the required areas. | . |
14 | Painting | Apply the paint. | . |
15 | Deadener | Apply the deadener to the designated areas. | . |
16 | Anti-rust agents | Coating the anti-rust agents to the designated areas. | . |
17 | Installation | Install the related parts and rub in grease to the moving parts and replenish the cooling liquid, oil, aircon gas and others. | . |
18 | Check and adjust | Check all operations, wheel alignments, leaks, head lamp aim and others with the specified check sheet. | . |