Orlando |
||||||||
|
|
|
|||||||
| • | GM vehicles are designed to operate under normal environmental conditions. |
| • | The design criteria for sealing materials and components takes into consideration the sealing forces required to withstand the natural elements. These specifications cannot take into consideration any artificial conditions, i.e., high pressure car washes. |
| • | The water leak test procedure has been correlated to the natural elements and will determine the ability of a vehicle to perform under normal operating conditions. |
| • | The first step in diagnosing a leak is determining the conditions under which a leak occurs. If the general leak area can be found, the exact entry point can be isolated using a water hose or an air hose. Some trim panels or components may need to be removed in order to repair the leak. |
| • | If leaks are found around a door, door window, rear compartment lid or liftgate area this does not necessarily indicate a bad weatherstrip. An adjustment to these areas may resolve the condition. |
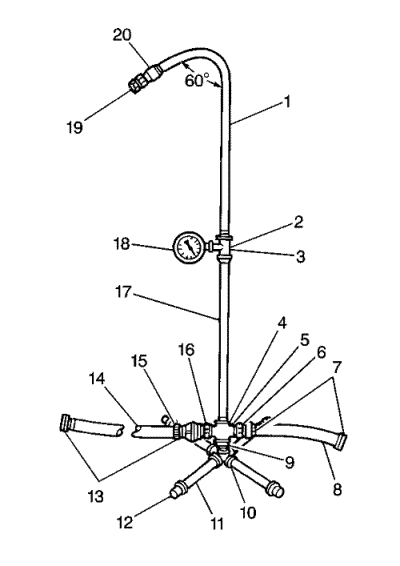
| (1) | Pipe (0.5 x 36 in) |
| (2) | Reducing Tee, Right Stand Only (0.5 x 0.5 x 0.25 in) |
| (3) | Coupling, Left Stand Only, (0.5 in) |
| (4) | Tee, Left Stand Only (0.5 in) |
| (5) | Cross, Right Stand Only (0.5 in) |
| (6) | Pipe to Hose Nipple, Right Stand Only (0.5 in) |
| (7) | Female Hose Coupling (5/8 in) |
| (8) | Input Hose, Right Stand Only (2.0 ft) (5/8 in diameter) |
| (9) | Close Nipple (0.5 in) |
| (10) | Cross (0.5 in) with Weld-On Cap (0.5 in) |
| (11) | Nipple (0.5 x 12 in) |
| (12) | Cap (0.5 in) |
| (13) | Female Hose Coupling (5/8 in) |
| (14) | Cross Hose (12 ft) (5/8 in diameter) |
| (15) | Hose Quick Connect |
| (16) | Pipe to Hose Nipple (0.5 in) |
| (17) | Pipe (0.5 x 60 in) |
| (18) | Water Pressure Gauge. Right Stand Only |
| (19) | Full Jet Spray Nozzle, No. 1/2GG-25 or Equivalent |
| (20) | Coupling (0.5 in) |
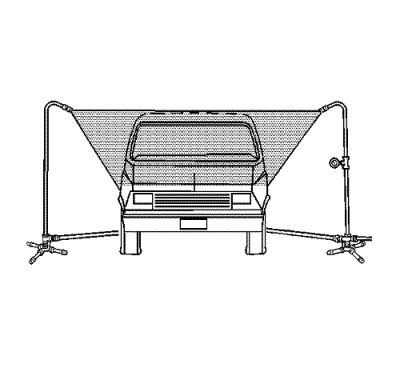
The water spray from the stands should overlap the vehicle as shown.
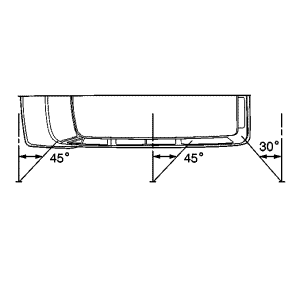
Aim the water towards the corner of the windscreen.
| © Copyright Chevrolet. All rights reserved |
| © Copyright Chevrolet. All rights reserved |


