Battery Replacement - Diesel
Special Tools
GE-49379 Battery Remover
For equivalent regional tools, refer to Special Tools
Removal Procedure
- Disconnect battery negative cable. Refer to
Battery Negative Cable Disconnection and Connection : without Start/Stop System .
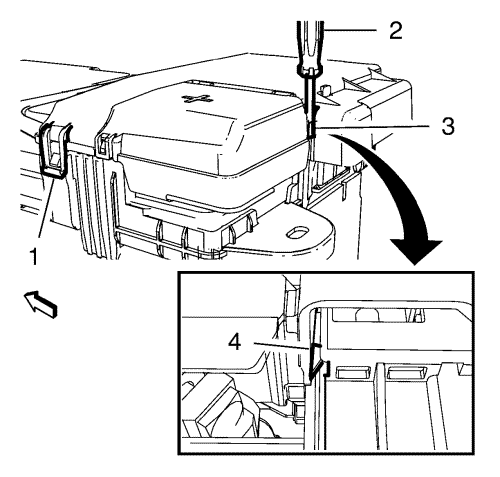
- Unlock the retaining tab (1) on the battery fuse box cover.
- Use a suitable screw driver (2) to unlock the clip (4) through the window (3).
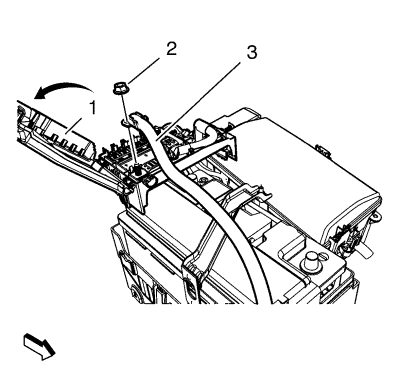
Note: Pull the battery fuse box housing. DO NOT pull the flap.
- Open the battery fuse box cover (1).
- Remove the positive battery cable to starter nut (2).
- Remove the positive battery cable to starter (3) from the battery.
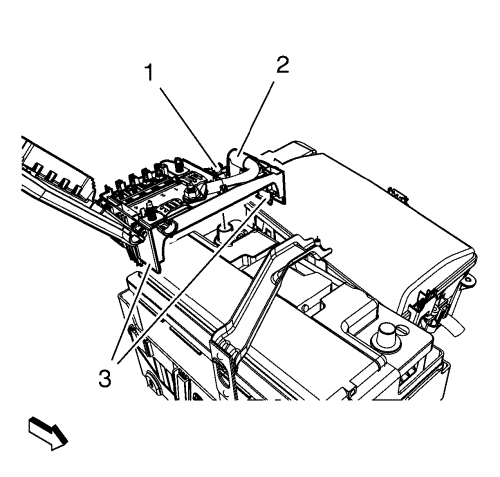
- Loosen the positive battery cable nut (1) on the battery.
- Remove the positive battery cable (2)
- Unlock the 2 retaining tabs (3) and remove positive battery cable cover.
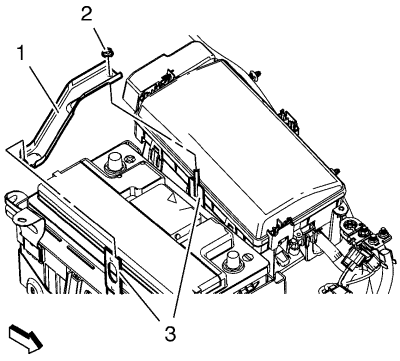
- Remove the battery hold down retainer nut (2).
- Remove the battery hold down retainer (1) from the battery tray (3).
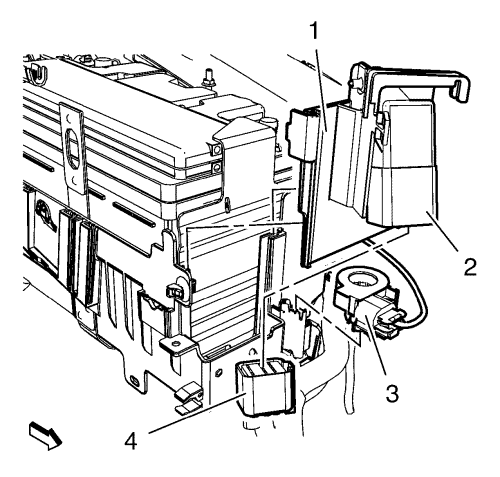
- Unclip the battery current sensor (3) from the battery tray.
- Disconnect the glow plug controller wiring harness plug (4).
- Remove the glow plug controller bracket (2) from the battery tray.
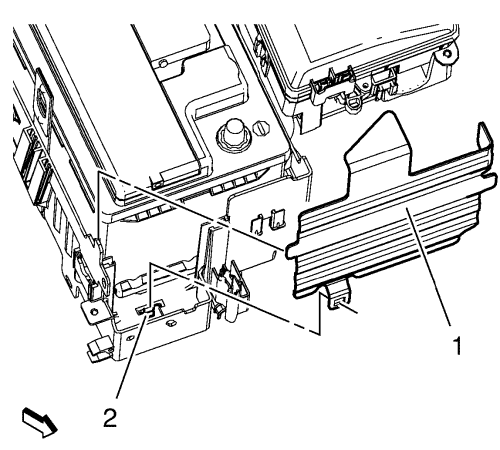
- Unlock the retaining tab (2) and remove the protector battery tray (1).
- Remove the battery with the GE-49379 remover .
Installation Procedure
- Install the battery with the GE-49379 remover .

- Install the protector battery tray (1).

- Install the glow plug controller bracket (2) at the battery tray.
- Connect the glow plug controller wiring harness plug (4).
- Clip in the battery current sensor (3) at the battery tray.

- Install the battery hold down retainer (1) at the battery tray (3).
Caution: Refer to Fastener Caution in the Preface section.
- Install the battery hold down retainer nut (2) and tighten to 9 N·m (80 lb in).

- Install the positive battery cable cover and lock the 2 retaining tabs (3).
- Install the positive battery cable (2).
- Tighten the positive battery cable nut (1) on the battery to 9 N·m (80 lb in).

- Install the positive battery cable to starter (3).
- Install the positive battery cable to starter nut (2) and tighten to 9 N·m (80 lb in).

- Close the battery fuse box cover and lock the retaining tabs (1) and (4).
- Connect battery negative cable. Refer to
Battery Negative Cable Disconnection and Connection : without Start/Stop System .
| © Copyright Chevrolet. All rights reserved |
| © Copyright Chevrolet. All rights reserved |


