To the top of the document
Orlando
   
GMDE Start Page Load static TOC Load dynamic TOC Help?

Cylinder Leakage Test - 1.6L LDE, LXV, 1.8L 2H0, LUW and LFH

Removal Procedure

  1. Open the bonnet.
  2. Raise and support the vehicle. Refer to Lifting and Jacking the Vehicle .
  3. Remove the front compartment splash shield. Refer to Front Compartment Splash Shield Replacement
  4. Lower the vehicle.
  5. Remove the timing belt upper front cover. Refer to Timing Belt Upper Front Cover Removal : LDE, LED, LFJ, LXV, 2H0, LUW, LFH .
  6. Remove the spark plugs. Refer to Spark Plug Replacement .
  7. Detach the engine wiring harness from intake manifold, cylinder head cover and engine wiring harness bracket.
  8. Remove the coolant expansion tank closure cap.
  9. Remove the oil dipstick.

  10. 1936993
  11. Set up the crankshaft.
  12. Move the crankshaft in the direction of the engine rotation to the first cylinder TDC position (mark 1).

  13. 1945804
  14. Apply guidance marks.
  15. Attach 3 markings (2) as an aid to one of the camshaft adjusters, each one offset by 90° to the marking applied (1).

Test Procedure

    Note: Follow manufacturer instructions.

  1. Calibrate the pressure loss tester and connect to the compressed air system.

  2. 1937002
  3. Install the pressure loss tester.
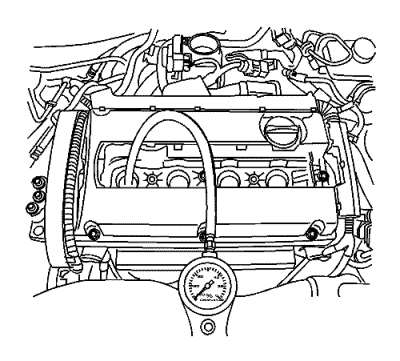
  4.    Note: Wheels must be in contact with the ground.

    • Engage first gear and apply the parking brake.
    • Install the connecting piece into the spark plug thread of cylinder number 1.
    • Apply compressed air to cylinder number 1.
  5. Inspect for Pressure Loss
  6. • Take pressure loss reading.
       - The maximum permissible pressure differential between cylinders is approximately 10 percent.
       - Maximum pressure loss of a cylinder is 25 percent.
    • Take note of any visible escape of compressed air.
      Intake manifold, exhaust manifold, crankcase
    • Take note of any bubble formation in the coolant compensation tank.
  7. Perform pressure loss test by analogy on cylinders 3, 4 and 2.

Installation Procedure

  1. Remove the pressure loss tester.
  2. Remove the connection piece from the spark plug thread.
  3. Put the vehicle in neutral.
  4. Insert the oil dipstick.
  5. Install the coolant expansion tank closure cap.
  6. Install the spark plugs. Refer to Spark Plug Replacement .
  7. Install the engine wiring harness to the intake manifold.
  8. Install the timing belt upper front cover. Refer to Timing Belt Upper Front Cover Installation : LDE, LED, LFJ, LXV, 2H0, LUW, LFH .
  9. Raise and support the vehicle.
  10. Install the front compartment splash shield. Refer to Front Compartment Splash Shield Replacement
  11. Lower the vehicle.
  12. Close the bonnet.


© Copyright Chevrolet. All rights reserved


© Copyright Chevrolet. All rights reserved