Piston, Connecting Rod, and Bearing Cleaning and Inspection
Special Tools
EN-45059 Torque Angle Sensor Kit
For equivalent regional tools, refer to Special Tools .
- Remove the sump. Refer to Sump Removal .
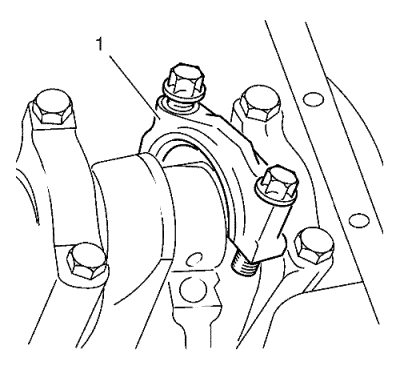
- Remove the connecting rod bearing cap (1).
| 2.1. | Mark the installation position (1) of the connecting rod bearing cap. |
| 2.3. | Degrease the connecting rod bearing cap and wet the connecting rod bearing clip with engine oil. |
Note: Do not rotate the crankshaft.
- Lay on plastigauge. Refer to Adhesives, Fluids, Lubricants, and Sealers .
Lay plastigage (flexible plastic thread) over the entire width of the connecting rod bearing journal.
- Install the connecting rod bearing cap.
Caution: Refer to Fastener Caution in the Preface section.
- Tighten the 2 bolts in three passes using the EN-45059 sensor kit :
| 5.1. | First pass tighten to 35 N·m (26 lb ft). |
| 5.2. | Second pass tighten to an additional 45° |
| 5.3. | Third pass tighten to an additional 15° |
- Remove the 2 bolts.
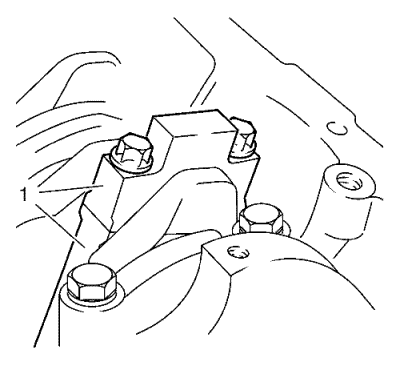
- Remove the connecting rod bearing cap (1).
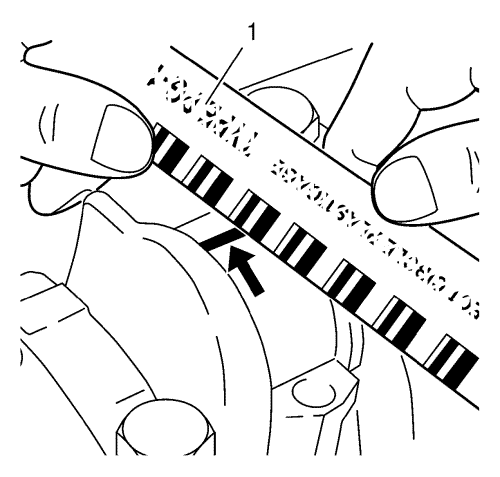
Note: When reading the value, do not confuse millimetres and inches on the measuring scale (1).
- Measure the connecting rod bearing play.
| • | Compare the width of the flattened plastic thread with the measuring scale. |
| • | Permissible connecting rod bearing play: 0.019-0.071 mm (0.0007-0.0028 in). |
Note: Check markings on parts.
- Install the connecting rod bearing cap.
| • | Wet the connecting rod bearing journal and con-rod bearing clips with engine oil. |
- Tighten the 2 bolts in three passes using the EN-45059 sensor kit :
| 10.1. | First pass tighten to 35 N·m (26 lb ft) |
| 10.2. | Second pass tighten to an additional 45° |
| 10.3. | Third pass tighten to an additional 15° |
- Install the oil pan. Refer to Sump Installation .
| © Copyright Chevrolet. All rights reserved |
| © Copyright Chevrolet. All rights reserved |


