Camshaft Position Actuator Adjuster Replacement
Special Tools
| • | EN-6340 Camshaft Adjuster Locking Tool |
| • | EN-6628-A Camshaft Locking Tool |
For equivalent regional tools, refer to Special Tools .
Removal Procedure
- Open the bonnet.
- Remove the air cleaner housing. Refer to
Air Cleaner Assembly Replacement : LDE, LXV, LUW, 2H0 and LFH .
- Remove the camshaft cover. Refer to
Camshaft Cover Replacement : 1.6L LDE, LXV, 1.8L 2H0, LUW and LFH .
- Remove the drive belt tensioner. Refer to Drive Belt Tensioner Replacement .
- Remove the timing belt. Refer to
Timing Belt Replacement : 1.6L LDE, LXV, 1.8L 2H0, LUW and LFH .
- Remove the timing belt idler pulley. Refer to Timing Belt Idler Pulley Removal .
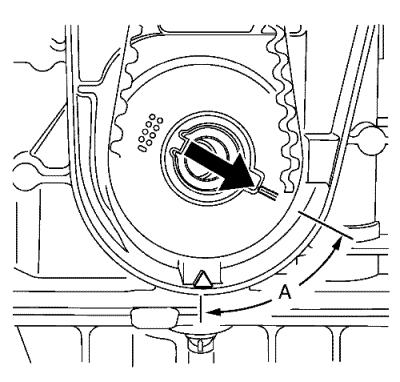
- Set the crankshaft in direction of engine rotation to 60° (a) before TDC. Use the EN-45059 meter and the crankshaft balancer bolt.
- Remove the crankshaft sprocket. Refer to Crankshaft Sprocket Removal .
- Lower the vehicle.
- Remove the engine mount bracket. Refer to Engine Mount Bracket Replacement .
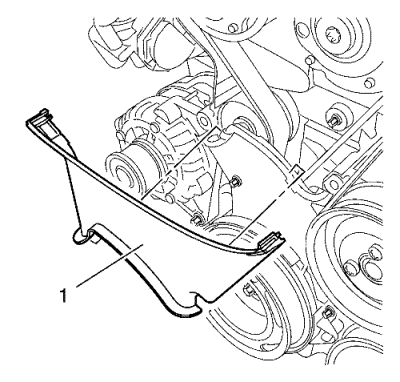
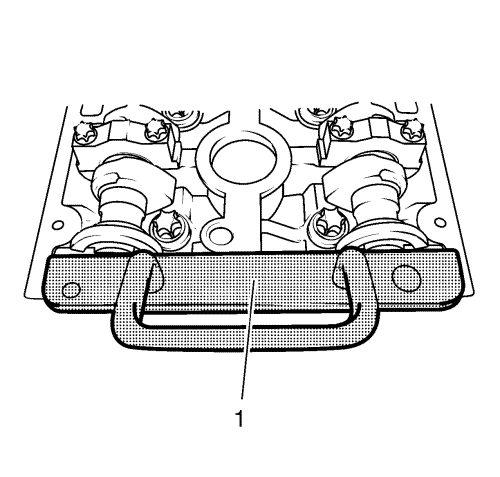
- Remove the center front timing belt cover from the rear timing belt cover at 2 locations.
- Remove the center front timing belt cover (1).
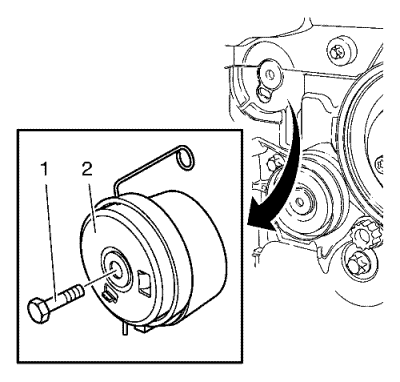
- Remove the tensioner bolt (1).
Note: Some engine oil will run out of the camshaft and the camshaft position actuator adjuster. That is the reason for the removal of the whole timing assembly.
- Remove the timing belt tensioner (2).
Note: Note the arrows.
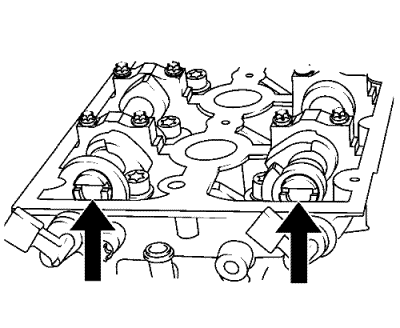
- Turn the camshaft by the hexagon until the groove on the end of the camshafts is horizontal.
- Install the EN-6628-A locking tool (1).
- Raise and support the vehicle. Refer to Lifting and Jacking the Vehicle
- Place a collecting basin underneath the vehicle.
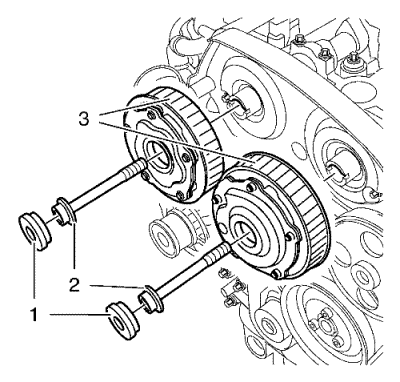
- Remove the camshaft position actuator adjuster closure bolt (1) of the intake camshaft position actuator adjuster and/or the exhaust camshaft position actuator adjuster (3).
- Remove and DISCARD the intake camshaft position actuator adjuster bolt and/or the exhaust camshaft position actuator adjuster bolt (2).
Note: A second person is required. Counterhold against the hexagon of corresponding camshaft with an open-ended wrench.
- Remove the intake camshaft position actuator adjuster and/or the exhaust camshaft position actuator adjuster (3).
Installation Procedure
Note: If the cover is contaminated with oil, you have to clean it close.
Note: A second person is required. Counterhold against the hexagon of corresponding camshaft with an open-ended wrench.
- Install intake camshaft position actuator adjuster and/or the exhaust camshaft position actuator adjuster (3).
- Install a NEW intake camshaft position actuator adjuster bolt and/or a NEW exhaust camshaft position actuator adjuster bolt (2).
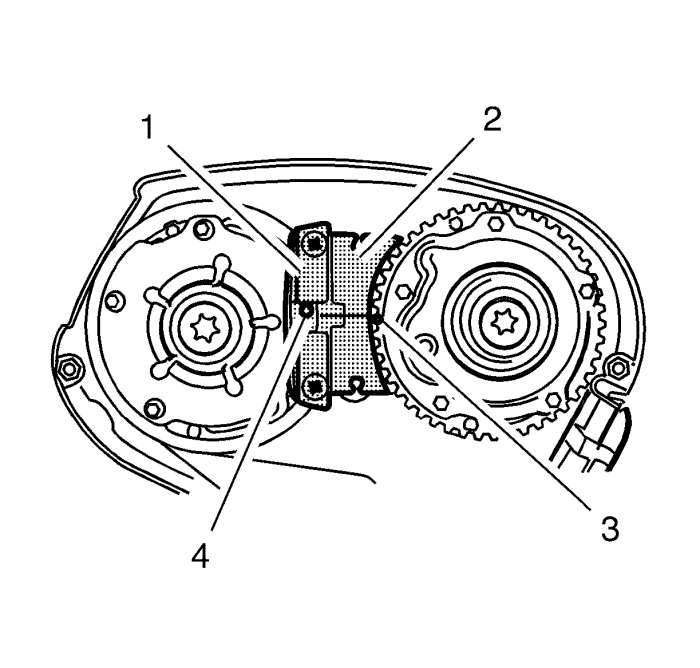
- Install the EN-6340 locking tool into the camshaft position actuator adjusters.
| | Note: The spot type marking (4) on the intake camshaft position actuator adjuster does not correspond to the groove of EN-6340-left during this process but must be somewhat above as shown. |
| 3.1. | Install the EN-6340-left locking tool (1) in the camshaft position actuator adjusters as shown. |
| | Note: The spot type marking (3) on the exhaust camshaft position actuator adjuster must correspond to the groove on EN-6340-right. |
| 3.2. | Install the EN-6340-right locking tool (2) in the camshaft position actuator adjusters as shown. |
Caution: Refer to Fastener Caution in the Preface section.
Caution: Refer to Torque-to-Yield Fastener Caution in the Preface section.
Note: A second person is required. Counterhold at the camshaft hexagon.
- Tighten the intake camshaft position actuator adjuster or exhaust camshaft position actuator adjuster bolts to 65 N·m (48 lb ft) + 120° + 15° use the EN-45059 meter .
Note: Install a NEW seal ring.
- Install camshaft closure bolt and tighten to 30 N·m (22 lb ft).
- Remove the EN-6628-A locking tool.
- Clean the timing belt tensioner thread.
- Install the timing belt tensioner (2) and tighten the NEW timing belt tensioner bolt (1) to 20 N·m (15 lb ft).
- Install the timing belt center front cover (1) to the timing belt rear cover at 2 locations.
- Install the engine mount bracket. Refer to Engine Mount Bracket Replacement .
- Raise the vehicle.
- Install the crankshaft sprocket. Refer to Crankshaft Sprocket Installation .
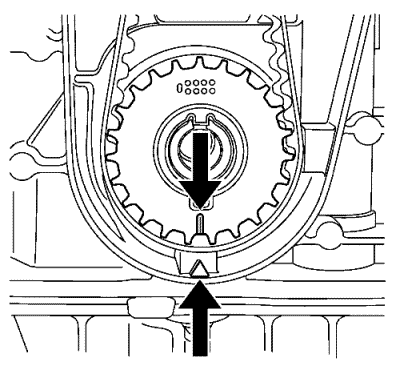
- Set the crankshaft in the direction of engine rotation to TDC. Use the crankshaft balancer bolt.
- Install the timing belt idler pulley. Refer to Timing Belt Idler Pulley Installation .
- Install the timing belt. Refer to
Timing Belt Replacement : 1.6L LDE, LXV, 1.8L 2H0, LUW and LFH .
- Install the drive belt tensioner. Refer to Drive Belt Tensioner Replacement .
- Install the camshaft cover. Refer to
Camshaft Cover Replacement : 1.6L LDE, LXV, 1.8L 2H0, LUW and LFH .
- Install the air cleaner housing. Refer to
Air Cleaner Assembly Replacement : LDE, LXV, LUW, 2H0 and LFH .
- Close the bonnet.
| © Copyright Chevrolet. All rights reserved |
| © Copyright Chevrolet. All rights reserved |


