To the top of the document
Orlando
   
GMDE Start Page Load static TOC Load dynamic TOC Help?

Engine Oil and Oil Filter Replacement - 1.6L LDE, LXV, 1.8L 2H0, LUW and LFH

Removal Procedure

  1. Open the bonnet.
  2. Place a collecting basin underneath.

  3. 2026824
  4. Remove the oil filter cap (1).
  5. Remove the oil filter cap seal (2)
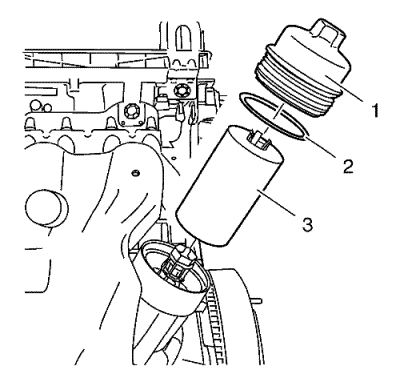
  6. Caution: This engine uses a special high performance oil filter. Use of any other filter may lead to filter failure and/or severe engine damage.

  7. Remove and properly dispose of the oil filter insert (3).
  8. Raise and support the vehicle. Refer to Lifting and Jacking the Vehicle .
  9. Remove the oil drain bolt.
  10. Drain the engine oil into collecting basin.

Installation Procedure

  1. Clean the oil drain bolt thread and the thread in the oil pan.
  2. Install a NEW seal to the oil drain bolt.
  3. Caution: Refer to Fastener Caution in the Preface section.

  4. Install the oil drain bolt to the oil pan and tighten to 14 N·m (124 lb in).
  5. Lower the vehicle.

  6. 2026824
  7. Install the NEW oil filter insert (3).
  8. Note: Coat the seal ring with NEW engine oil.

  9. Install the NEW oil filter cap seal (2)
  10. Caution: Over torquing the oil filter cap may cause damage to the oil filter cap resulting in an oil leak.

  11. Install the oil filter cap (1) and tighten to 25 N·m (18 lb ft).
  12. Caution: Using engine oils of any viscosity other than those viscosities recommended could result in engine damage.

    Note: Use specified volume of engine oil with the specified viscosity class.

    Note: Start the engine and allow it to run until the oil pressure control indicator goes off.

    Note: Inspect the engine oil level.

  13. Fill in NEW engine oil. Refer to Engine Mechanical Specifications : 1.8L 2H0 .
  14. Close the hood
  15. Reset the service interval indicator.


© Copyright Chevrolet. All rights reserved


© Copyright Chevrolet. All rights reserved