To the top of the document
Orlando
   
GMDE Start Page Load static TOC Load dynamic TOC Help?

Generator Replacement - 2.0L Diesel LNP

Removal Procedure

  1. Disconnect the battery negative cable. Refer to Battery Negative Cable Disconnection and Connection : without Start/Stop System .
  2. Raise and support the vehicle. Refer to Lifting and Jacking the Vehicle .
  3. Remove the front compartment insulator. Refer to Front Compartment Insulator Replacement .
  4. Remove the drive belt tensioner. Refer to Drive Belt Tensioner Replacement .
  5. Remove the transmission mount:
  6. • Automatic transmission, refer to Transmission Rear Mount Replacement : Electronic Power Steering  → Hydraulic Power Steering .
    • Manual gearbox, refer to Transmission Rear Mount Replacement : Hydraulic Power Steering .
  7. Unclip the engine wiring harness from the knock sensor 2 wiring harness plug brackets.

  8. 2506273
  9. Disconnect the generator wiring harness plug (1) from the generator .
  10. Fold the alternator cap (2) aside.
  11. Remove the alternator positive cable retaining nut (3).
  12. Remove the alternator positive cable (4) from the alternator.

  13. 2506274
  14. Remove the upper alternator retaining bolt (1).
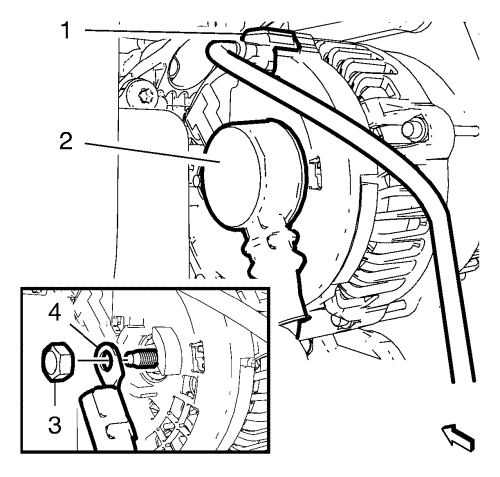
  15. Note: DO NOT pull the lower alternator retaining bolt completely out of the alternator mounting hole.

  16. Remove the lower alternator retaining bolt (3).
  17. Remove the alternator (2).

Installation Procedure


    2506274
  1. Install the alternator (2).
  2. Install the lower alternator retaining bolt (3).
  3. Install the upper alternator retaining bolt (1).
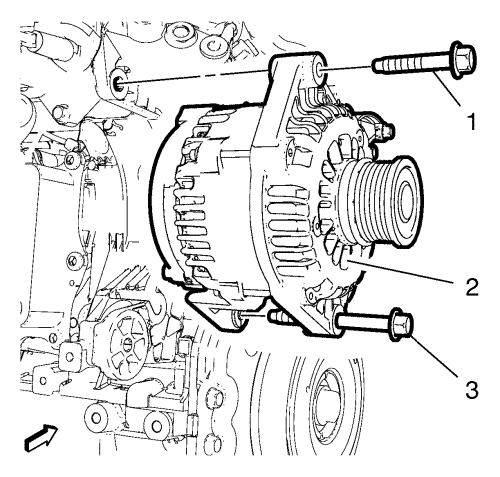
  4. Caution: Refer to Fastener Caution in the Preface section.

  5. Tighten the 2 alternator retaining bolts (1, 3) to 58 N·m (43 lb ft).

  6. 2506273
  7. Install the positive alternator cable (4) to the alternator.
  8. Install the alternator positive cable retaining nut (3) and tighten to 17 N·m (13 lb ft).
  9. Fold the alternator cap (2) to the alternator positive cable terminal.
  10. Connect the alternator wiring harness plug (1) to the alternator.
  11. Clip in the engine wiring harness to the knock sensor 2 wiring harness plug bracket.
  12. Install the transmission rear mount:
  13. • Automatic transmission, refer to Transmission Rear Mount Replacement : Electronic Power Steering  → Hydraulic Power Steering .
    • Manual gearbox, refer to Transmission Rear Mount Replacement : Hydraulic Power Steering .
  14. Install the drive belt tensioner. Refer to Drive Belt Tensioner Replacement .
  15. Install the front compartment insulator. Refer to Front Compartment Insulator Replacement .
  16. Lower the vehicle.
  17. Connect the battery negative cable. Refer to Battery Negative Cable Disconnection and Connection : without Start/Stop System .


© Copyright Chevrolet. All rights reserved


© Copyright Chevrolet. All rights reserved