Exhaust Front Pipe Replacement - 2.0L Diesel LNP
Warning: Refer to Exhaust Service Warning in the Preface section.
Warning: Refer to Protective Goggles and Glove Warning in the Preface section.
Caution: Do not bend the exhaust flex pipe more than 10 degrees in any direction. Bending of more than 10 degrees or twisting in a range of ±0.5 degrees will damage the exhaust flex decoupler.
Removal Procedure
- Raise and support the vehicle. Refer to Lifting and Jacking the Vehicle .
- Remove the front compartment insulator. Refer to Front Compartment Insulator Replacement .
- Support the exhaust system.
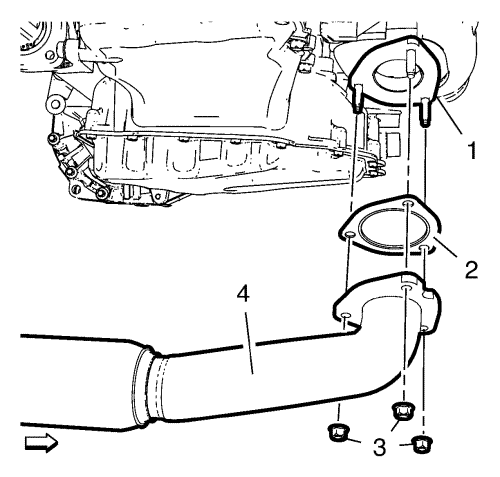
- Remove the 3 catalytic converter to exhaust front pipe nuts (3).
- Remove the exhaust front pipe (4) from the catalytic converter flange (1).
- Remove the gasket (2).
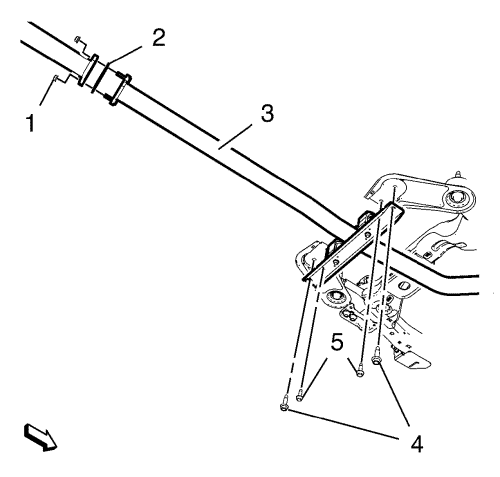
- Remove the 2 exhaust front pipe to intermediate pipe nuts (1).
- Remove and DISCARD the 2 drive frame bolts (4)
- Remove the 2 exhaust front pipe hanger bracket bolts (5).
- Remove the exhaust front pipe (3) and the gasket (2).
- Remove the exhaust front pipe hanger bracket from the exhaust front pipe. Refer to
Exhaust Pipe Front Hanger Bracket Replacement : 2.0L Diesel LNP .
Installation Procedure
- Install the exhaust front pipe hanger bracket to the exhaust front pipe. Refer to
Exhaust Pipe Front Hanger Bracket Replacement : 2.0L Diesel LNP .
- Install the exhaust front pipe (3) and a NEW gasket (2).
Warning: Refer to Torque-to-Yield Fastener Warning in the Preface section.
Caution: Refer to Fastener Caution in the Preface section.
- Install the 2 NEW drive frame bolts M10 (4) and tighten the bolts to 60 N·m +30° - 45° (44 lb ft +30° - 45°).
- Install the 2 exhaust front pipe to intermediate pipe nuts (1) and tighten the nuts to 17 N·m (13 lb ft).
- Install the 2 exhaust front pipe hanger bracket bolts M8 (5) and tighten the bolts to 22 N·m (17 lb ft).
- Install the exhaust front pipe (4) to the catalytic converter flange (1) with a NEW gasket (2).
- Install the 3 catalytic converter to exhaust front pipe nuts (3) and tighten the nuts to 22 N·m (16 lb ft).
- Install the front compartment insulator. Refer to Front Compartment Insulator Replacement .
- Lower the vehicle.
| © Copyright Chevrolet. All rights reserved |
| © Copyright Chevrolet. All rights reserved |


