Orlando
Knock Sensor 1 Replacement
Removal Procedure
Disconnect the battery negative cable. Refer to
Battery Negative Cable Disconnection and Connection
:
without Start/Stop System
.
Remove the engine sight shield. Refer to
Engine Sight Shield Replacement
.
Raise and support the vehicle. Refer to
Lifting and Jacking the Vehicle
.
Remove the front compartment insulator. Refer to
Front Compartment Insulator Replacement
.
Remove the starter. Refer to
Starter Replacement
:
2.0L Diesel LNP with MT
→
2.0L Diesel LNP with AT
→
1.6L LDE, LXV, 1.8L 2H0, LUW and LFH
.
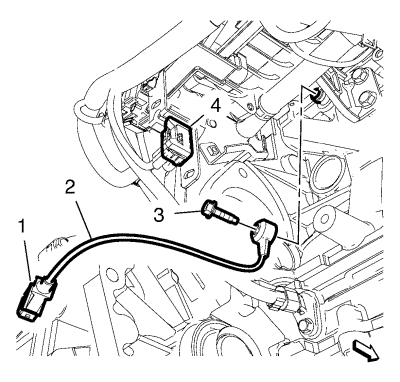
Remove the knock sensor wiring harness plug (1) from the wiring harness connector (4).
Remove the knock sensor bolt (3).
Remove the knock sensor (2).
Installation Procedure
Install the knock sensor (2).
Install the knock sensor bolt (3) and tighten to
25 N·m (18 lb ft)
.
Install the knock sensor wiring harness plug (1) to the wiring harness connector (4).
Install the starter. Refer to
Starter Replacement
:
2.0L Diesel LNP with MT
→
2.0L Diesel LNP with AT
→
1.6L LDE, LXV, 1.8L 2H0, LUW and LFH
.
Install the front compartment insulator. Refer to
Front Compartment Insulator Replacement
.
Lower the vehicle.
Install the engine sight shield. Refer to
Engine Sight Shield Replacement
.
Connect the battery negative cable. Refer to
Battery Negative Cable Disconnection and Connection
:
without Start/Stop System
.
© Copyright Chevrolet. All rights reserved
© Copyright Chevrolet. All rights reserved