Engine Coolant Fan Shroud Replacement - 2.0L Diesel LNP
Removal Procedure
- Drain the cooling system. Refer to Cooling System Draining and Filling .
- Remove the charge air cooler. Refer to
Charge Air Cooler Replacement : Diesel and LUJ with MT .
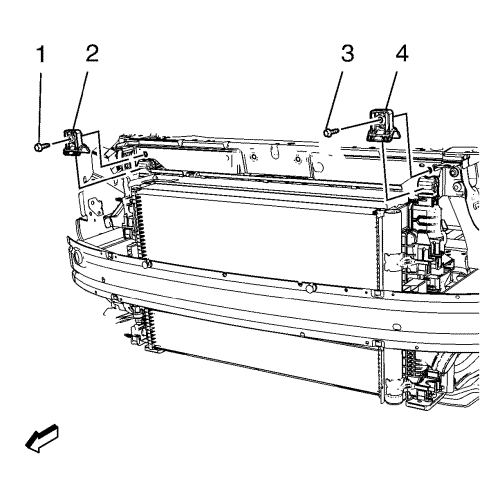
- Remove the 2 upper radiator bracket bolts (1, 3).
- Remove the 2 upper radiator brackets (2, 4).
- Remove the radiator outlet hose from the radiator. Refer to
Radiator Outlet Hose Replacement : 1.8L 2H0 → 2.0L Diesel LNP .
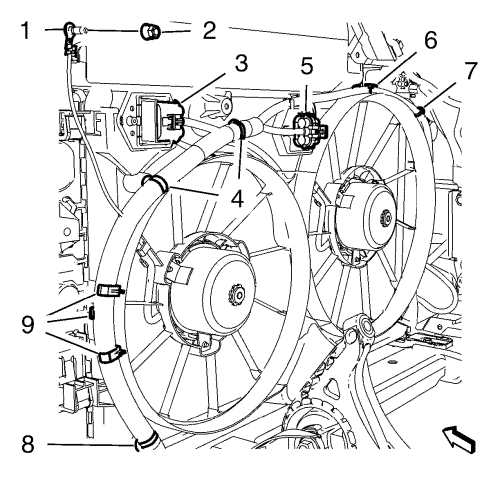
- Unclip the wiring harness clip (8) from the engine cooling fan cowl.
- Unclip the wiring harness from the engine coolant fan shroud holders (9) and hang the wiring harness aside.
- Disconnect the 2 engine cooling fan motor wiring harness plugs (3, 5).
- Unclip the wiring harness clip (4, 7) from the engine cooling fan cowl.
- Unclip the wiring harness from the engine cooling fan cowl holders (6).
- Hang the engine cooling fan cowl wiring harness aside.
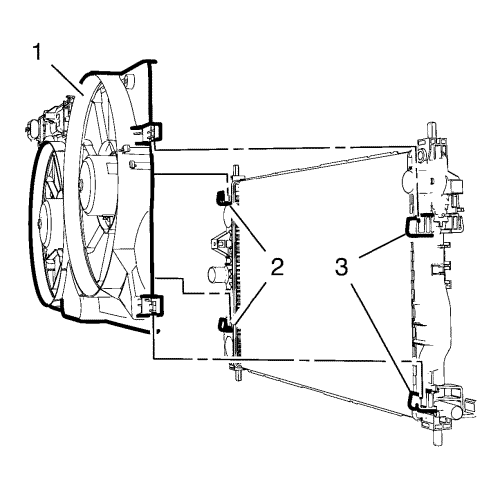
- Remove the engine coolant fan shroud (1) in top direction from the 4 radiator clips (2, 3).
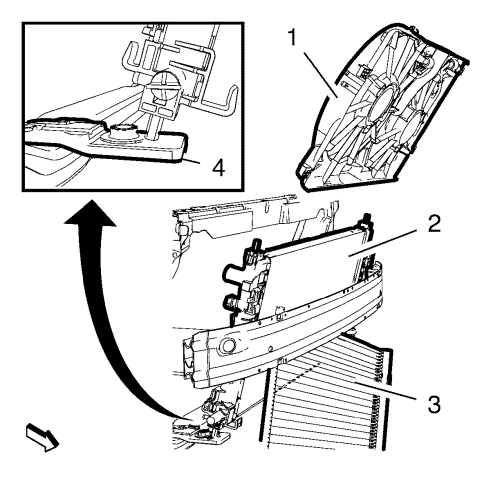
Note: Ensure that the air conditioning condenser (3) is secured with seat belts.
- Remove the radiator (2) from the radiator lower brackets (4) in top direction and tipping the radiator forward.
- Remove the engine coolant fan shroud (1) in top direction from the vehicle.
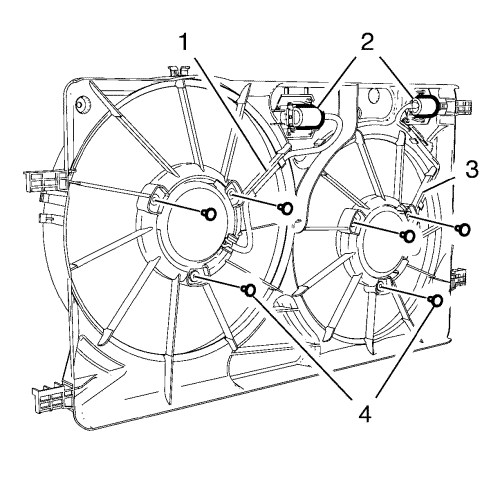
- Unclip the 2 engine cooling fan wiring harnesses (1, 3) from the engine cooling fan cowl.
- Unclip the 2 engine cooling fan connectors (2) from the engine cooling fan cowl.
- Remove the 6 engine cooling fan bolts (4) from the 2 engine cooling fans.
- Remove the 2 engine cooling fans from the engine cooling fan cowl.
Installation Procedure
- Install the 2 engine cooling fans to the engine cooling fan cowl.
Caution: Refer to Fastener Caution in the Preface section.
- Install the 6 engine cooling fan bolts (4) to the 2 engine cooling fans and tighten to 4 N·m (35 lb in).
- Clip the 2 engine cooling fan connectors (2) into the engine cooling fan cowl.
- Clip in the 2 engine cooling fan wiring harnesses (1, 3) to the engine cooling fan cowl.
- Install the engine coolant fan shroud (1) to the vehicle.
- Install the radiator (2) to the radiator lower brackets.
- Install the engine coolant fan shroud (1) to the 4 radiator clips (2, 3).
- Install and position the engine cooling fan cowl wiring harness.
- Clip in the wiring harness to the engine cooling fan cowl holders (6).
- Clip the wiring harness clip (4, 7) into the engine cooling fan cowl.
- Connect the 2 engine cooling fan motor wiring harness plugs (3, 5).
- Clip the wiring harness into the engine coolant fan shroud holders (9).
- Clip the wiring harness clip (8) into the engine coolant fan shroud.
- Install the radiator outlet hose to the radiator. Refer to
Radiator Outlet Hose Replacement : 1.8L 2H0 → 2.0L Diesel LNP .
Caution: Refer to Fastener Caution in the Preface section.
- Install the 2 upper radiator brackets (2, 4).
- Install the 2 upper radiator bracket bolts (1, 3) and tighten to 22 N·m (16 lb ft).
- Install the charge air cooler. Refer to
Charge Air Cooler Replacement : Diesel and LUJ with MT .
- Fill the cooling system. Refer to Cooling System Draining and Filling .
| © Copyright Chevrolet. All rights reserved |
| © Copyright Chevrolet. All rights reserved |


