Remove the charge air cooler outlet front hose from the charge air cooler outlet front hose bracket. Remove the charge air cooler outlet front hose from the charge air cooler outlet rear hose and hang it aside. Refer to
Charge Air Cooler Outlet Hose Replacement : LNP and Manual Transmission → LNP and Automatic Transmission .
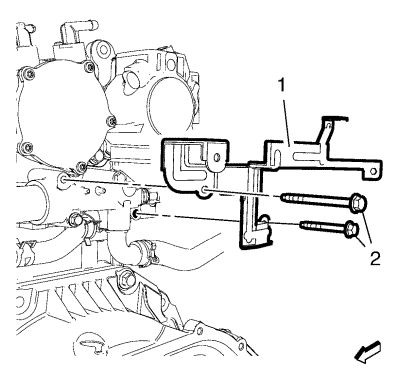
Unclip the 2 engine wiring harness retaining clips from the engine wiring harness bracket.
Remove the 2 engine wiring harness bracket and engine water outlet adaptor bolts (2) from the engine water outlet adaptor.
Remove the engine wiring harness bracket (1) from the engine water outlet adaptor.
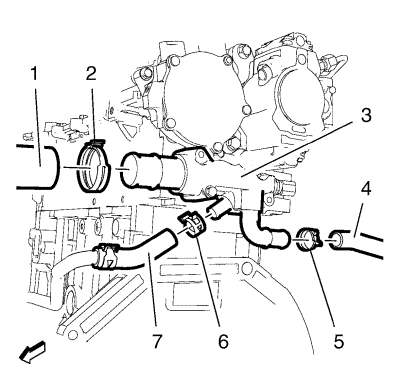
Remove the radiator inlet hose (1) with the radiator inlet hose clip (2) from the engine water outlet adaptor (3).
Remove the heater inlet hose (4) with the heater inlet hose clip (5) from the engine water outlet adaptor (3).
Remove the thermostat bypass hose (7) with the thermostat bypass hose clip (6) from the engine water outlet adaptor (3).
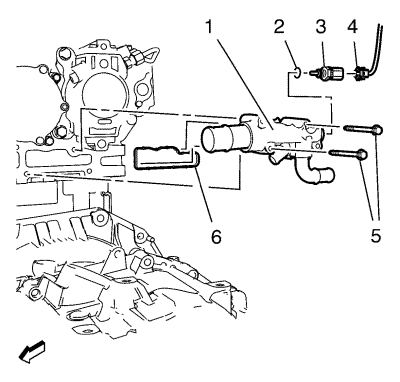
Disconnect the engine coolant temperature sensor wiring harness plug (4) from the engine coolant temperature sensor (3).
Remove the 2 engine water outlet adaptor bolts (5).
Remove the engine water outlet adaptor (1) and the engine water outlet adaptor gasket (6) from the engine.
Remove the engine coolant temperature sensor (3) and the engine coolant temperature sensor seal ring (2) from the engine water outlet adaptor (1).
Pre-install the engine coolant temperature sensor (3) with a NEW engine coolant temperature sensor seal ring (2) to the engine water outlet adaptor (1) and tighten the sensor to 13 N·m (115 lb in).
Install the engine water outlet adaptor (1) with a NEW engine water outlet adaptor gasket (6) to the engine.
Install the 2 engine water outlet adaptor bolts (5) to the engine water adaptor (1) and tighten to 10 N·m (89 lb in).
Connect the engine coolant temperature sensor wiring harness plug (4) to the engine coolant temperature sensor (3).
Install the thermostat bypass hose (7) with the thermostat bypass hose clip (6) to the engine water outlet adaptor (3).
Install the heater inlet hose (4) with the heater inlet hose clip (5) to the engine water outlet adaptor (3).
Install the radiator inlet hose (1) with the radiator inlet hose clip (2) to the engine water outlet adaptor (3).
Install the engine wiring harness bracket (1) to the engine water outlet adaptor.
Install the 2 engine wiring harness bracket and engine water outlet adaptor bolts (2) to the engine water outlet adaptor and tighten to 10 N·m (89 lb in).
Clip the 2 engine wiring harness retaining clips into the engine wiring harness bracket.
Install the charge air cooler outlet front hose to the charge air cooler outlet front hose bracket. Install the charge air cooler outlet front hose to the charge air cooler outlet rear hose. Refer to
Charge Air Cooler Outlet Hose Replacement : LNP and Manual Transmission → LNP and Automatic Transmission .