Fuel Tank Replacement
Special Tools
EN-48279 Main Fuel Pump Locking Ring Remover/Installer
For equivalent regional tools, refer to Special Tools .
Removal Procedure
Warning: Refer to Petrol/Petrol Vapours Warning in the Preface section.
- Disconnect the battery negative cable. Refer to
Battery Negative Cable Disconnection and Connection : without Start/Stop System .
- Drain the fuel tank. Refer to Fuel Tank Draining .
- Raise and support the vehicle. Refer to Lifting and Jacking the Vehicle .
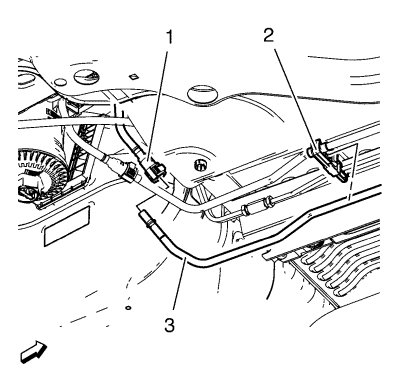
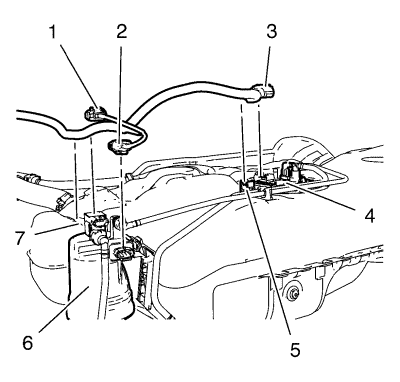
- Disconnect the fuel return pipe (3) from the fuel return pipe connector (1). Refer to Plastic Collar Quick Connect Fitting Service .
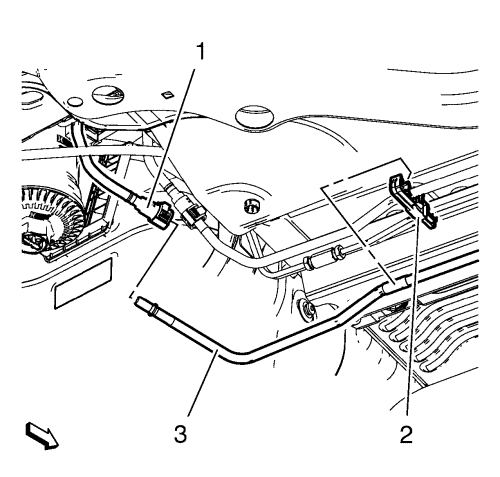
- Disconnect the fuel feed pipe (3) from the fuel feed pipe connector (1). Refer to Plastic Collar Quick Connect Fitting Service .
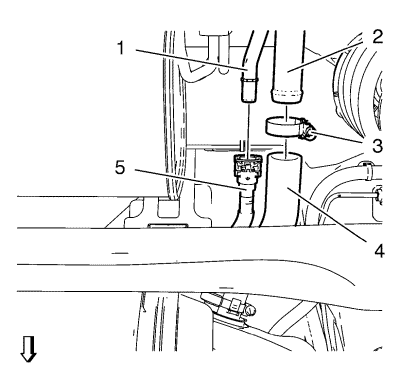
- Disconnect the fuel tank fill EVAP emission pipe quick connect fitting (5) from the fuel tank vent pipe (1). Refer to Plastic Collar Quick Connect Fitting Service .
- Loosen the fuel filler pipe clamp (3).
- Remove the fuel filler hose (4) from the fuel filler pipe (2).
- Place a suitable adjustable jack under the fuel tank.
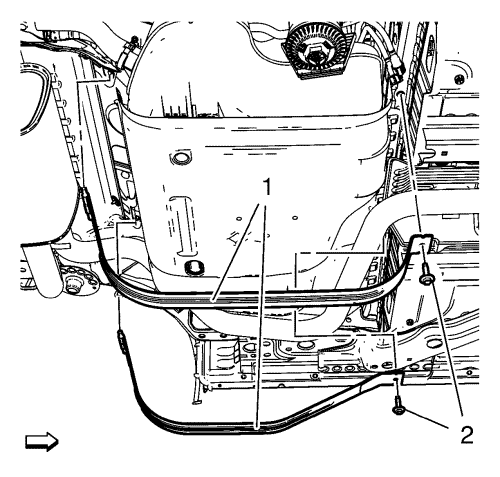
- Remove the 2 fuel tank strap bolts (2).
- Remove the 2 fuel tank straps (1).
- Lower the fuel tank slowly down to a height where the fuel pump wiring harness plug (3) is accessible.
- Disconnect the fuel pump wiring harness plug (3) from the fuel pump module (4).
- Disconnect the 2 fuel filter wiring harness plugs (1) and (2) from the fuel filter (6).
- Unclip the wiring harness from the clip (5) and (7).
- Lower the fuel tank.
Disassembly Procedure
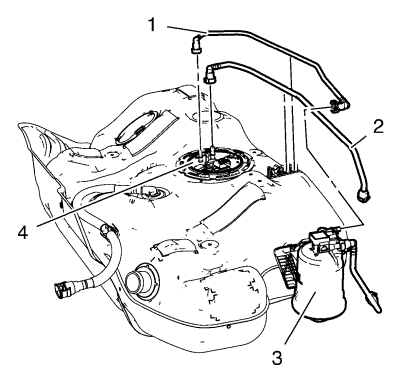
- Remove the fuel feed pipe (1) from fuel tank fuel pump module (4) and fuel filter housing (3). Refer to Plastic Collar Quick Connect Fitting Service .
- Remove the fuel return pipe (2) from fuel tank fuel pump module (4). Refer to Plastic Collar Quick Connect Fitting Service .
- Install the EN-48253 remover/installer to the fuel pump module lock ring.
Note: Do NOT use impact tools. Significant force will be required to release the lock ring. The use of a hammer and screwdriver is not recommended. Secure the fuel tank in order to prevent fuel tank rotation.
- Using the EN-48253 remover/installer and a long breaker-bar, rotate the lock ring in an anticlockwise direction in order to unlock the lock ring.
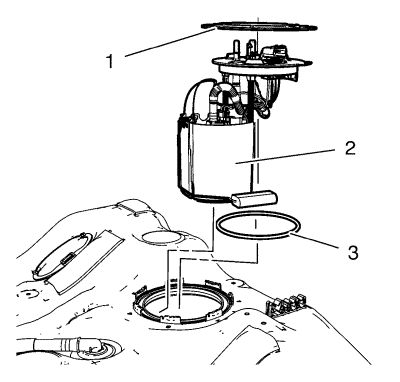
- Remove the fuel pump module lock ring (1).
- Remove the fuel pump module (2).
Note: Lift the fuel pump module up slightly.
- Remove and discard the fuel pump module seal (3).
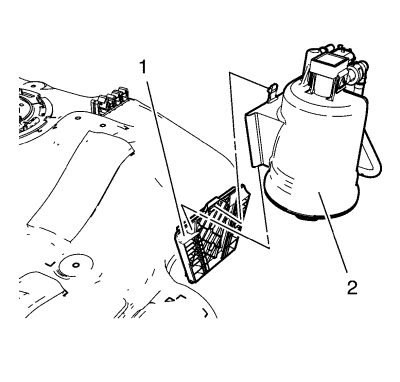
- Remove the fuel filter (2) from the fuel filter bracket (1).
- Remove the fuel tank heat shield. Refer to
Fuel Tank Heat Shield Replacement : 2.0L Diesel LNP .
Assembly Procedure
- Install the fuel tank heat shield. Refer to
Fuel Tank Heat Shield Replacement : 2.0L Diesel LNP .
- Install the fuel filter (2) at the fuel filter bracket (1).
- Install a NEW fuel pump module seal (3).
- Install the fuel pump module (2).
- Install the fuel pump module lock ring (1).
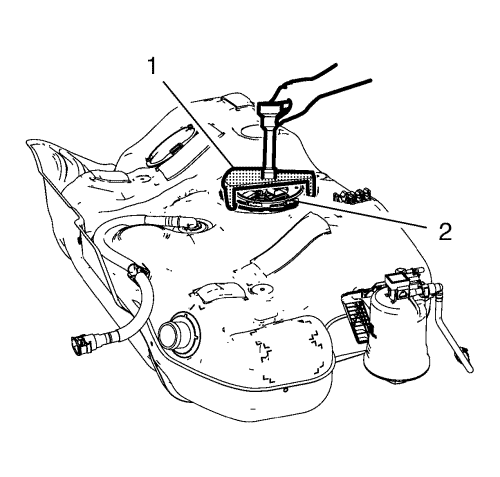
- Install the EN-48253 remover/installer (1) to the fuel pump module lock ring (2).
Note: Do NOT use impact tools. Significant force will be required to release the lock ring. The use of a hammer and screwdriver is not recommended. Secure the fuel tank in order to prevent fuel tank rotation.
- Using the EN-48253 remover/installer and a long breaker-bar, rotate the lock ring in a clockwise direction in order to lock the lock ring.
- Install the fuel return pipe (2) to the fuel tank fuel pump module (4). Refer to Plastic Collar Quick Connect Fitting Service .
- Install the fuel feed pipe (1) to the fuel tank fuel pump module (4) and fuel filter housing (3). Refer to Plastic Collar Quick Connect Fitting Service .
Installation Procedure
- Raise the fuel tank with a suitable adjustable jack to a height where the fuel pump wiring harness plug (3) is accessible.
- Clip in the wiring harness to the clip (5) and (7).
- Connect the fuel pump wiring harness plug (3) to the fuel pump module (4).
- Connect the 2 fuel filter wiring harness plugs (1) and (2) to the fuel filter (6).
- Install the 2 fuel tank straps (1).
Caution: Refer to Fastener Caution in the Preface section.
- Install the 2 fuel tank strap bolts (2) and tighten to 23 N·m (17 lb ft).
- Install the fuel filler hose (4) to the fuel filler pipe (2).
- Install the fuel filler pipe clamp (3).
- Connect the fuel tank fill EVAP emission pipe quick connect fitting (5) to the fuel tank vent pipe (1). Refer to Plastic Collar Quick Connect Fitting Service .
- Connect the fuel feed pipe (3) to the fuel feed pipe connector (1). Refer to Plastic Collar Quick Connect Fitting Service .
- Connect the fuel return pipe (3) to the fuel return pipe connector (1). Refer to Plastic Collar Quick Connect Fitting Service .
- Lower the vehicle.
- Connect the battery negative cable. Refer to
Battery Negative Cable Disconnection and Connection : without Start/Stop System .
| © Copyright Chevrolet. All rights reserved |
| © Copyright Chevrolet. All rights reserved |


