Auxiliary Heater Core Replacement
Removal Procedure
- Disconnect the negative battery cable. Refer to Battery Negative Cable Disconnection and Connection .
- Remove instrument panel compartment assembly. Refer to Instrument Panel Compartment Replacement .
- Remove instrument panel lower trim panel. Refer to Instrument Panel Lower Trim Panel Replacement - Right Side .

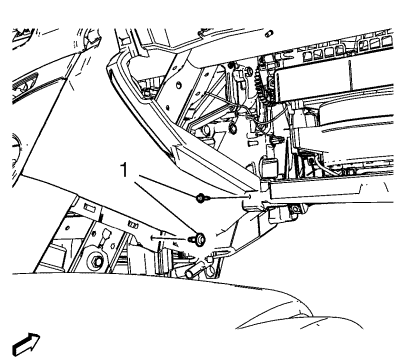
- Remove the 2 instrument panel bolts (1).

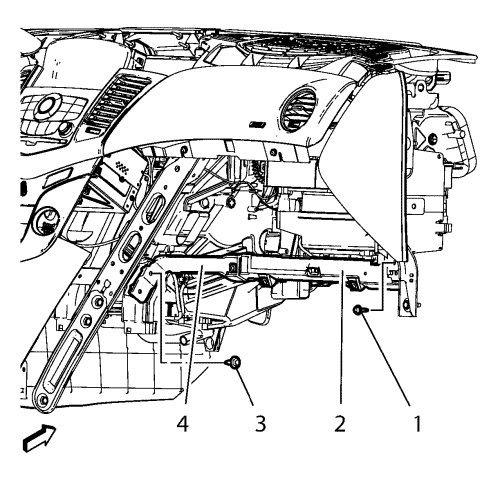
Note: Pull back the instrument panel compartment (4) from the instrument panel compartment bracket just far enough to gain access to the instrument panel compartment lower bracket bolt (3).
- Remove instrument panel compartment lower bracket (2).
Remove instrument panel compartment lower bracket bolts (1, 3).

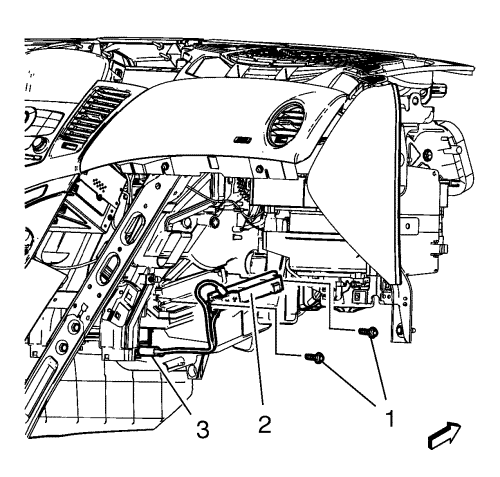
- Remove auxiliary heater core (2).
| • | Remove the 2 auxiliary heater core bolts (1). |
| • | Disconnect auxiliary heater core wiring harness plug . |
Installation Procedure

Caution: Refer to Fastener Caution in the Preface section.
- Install auxiliary heater core (2).
| • | Install the 2 auxiliary heater core bolts (1) and tighten to 2.5 N·m (22 lb in). |
| • | Connect auxiliary heater core wiring harness plug. |

Note: Pull back the instrument panel compartment (4) from the instrument panel compartment bracket just far enough to gain access to the instrument panel compartment lower bracket bolt (3).
- Install instrument panel compartment lower bracket (2).
Install instrument panel compartment lower bracket bolts (1, 3) and tighten to 9 N·m (80 lb in).

- Install the 2 instrument panel bolts (1) and tighten to 2.5 N·m (22 lb in).
- Install instrument panel lower trim panel. Refer to Instrument Panel Lower Trim Panel Replacement - Right Side .
- Install instrument panel compartment assembly. Refer to Instrument Panel Compartment Replacement .
- Connect the negative battery cable. Refer to Battery Negative Cable Disconnection and Connection .
| © Copyright Chevrolet. All rights reserved |


