Crankshaft and Bearing Cleaning and Inspection
Special Tools
| • | EN-45059 Torque Angle Sensor Kit |
For equivalent regional tools, refer to
Special Tools : 1.6L LXT .
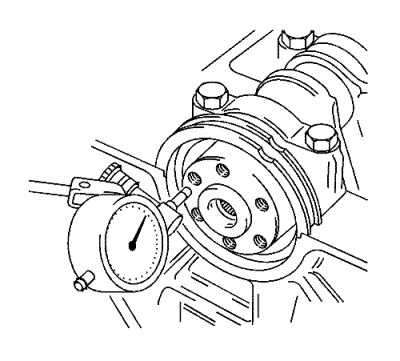
Crankshaft End Play, Check

Note : Crankshaft attached with crankshaft bearing caps.
- Install the GE-571-B gauge.
| • | Install in the holder on the front of the engine block. |
| • | Place the dial gauge plunger against the crankshaft and adjust. |
- Measure the longitudinal play of the crankshaft.
| • | Move the crankshaft in the longitudinal direction. |
| • | Permissible crankshaft end play: 0.100–0.202 mm (0.0039–0.0080 in) |
- Remove the GE-571-B gauge.
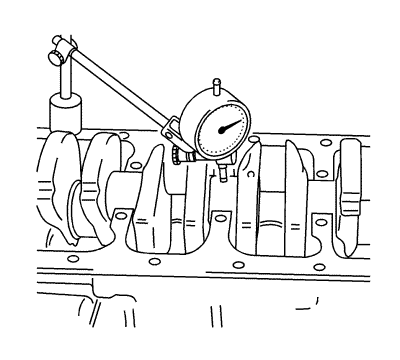
Crankshaft Out-of-Round, Check

Note: Crankshaft removed.
- Insert the crankshaft in the engine block.
- Install the GE-571-B gauge.
| 2.1. | Attach to the bracket on the engine block. |
| 2.2. | Place the dial gauge plunger against the crankshaft bearing journal and adjust. |
- Check the rotational play of the crankshaft.
| • | Turn the crankshaft evenly. |
| • | Maximum permissible rotational play: 0.03 mm (0.001 in). |
- Remove the GE-571-B gauge.
Check Crankshaft Bearing Clearance (With Plastigage)

Note:
| • | Do not rotate the crankshaft. |
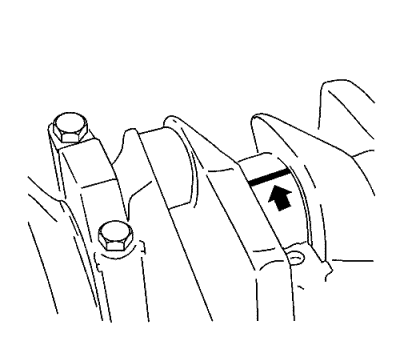
- Lay on Plastigage. Refer to Adhesives, Fluids, Lubricants, and Sealers or the recommended plastigage.
Lay out Plastigage (flexible plastic thread) around the entire width of the big end bearing journal (arrow).
Caution: Refer to Fastener Caution in the Preface section.
Note:
| • | Note the correct tightening sequence. |
| • | The bolts can be reused for checking the crankshaft bearing play. |
- Install the crankshaft bearing cap. Tighten the 2 crankshaft bearing cap bolts in 3 passes. Use the EN-45059 sensor kit:
| • | First pass to 50 N·m (37 lb ft) |
- Remove the 2 crankshaft bearing cap bolts.

Note: When reading the value, do not confuse millimetres and inches on the measuring scale.
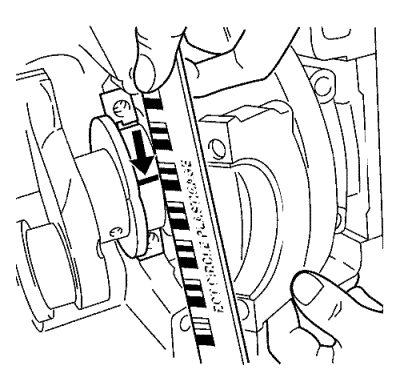
- Measure the crankshaft bearing play.
| • | Compare the width of the flattened plastic thread (arrow) to the measuring scale. |
| • | Permissible crankshaft bearing play: 0.005–0.059 mm (0.0002–0.0023 in). |
Check Crankshaft Bearing Clearance (With Micrometer Gauge Internal Measuring Device)
Caution: Refer to Fastener Caution in the Preface section.
Note:
| • | Note the correct tightening sequence. |
| • | The bolts can be reused for checking the crankshaft bearing play. |
- Install the crankshaft bearing cap with the crankshaft bearing clips to the cylinder block.
Tighten the 2 crankshaft bearing cap bolts in 3 passes. Use the EN-45059 sensor kit:
| 1.1. | First pass to 50 N·m (37 lb ft) |

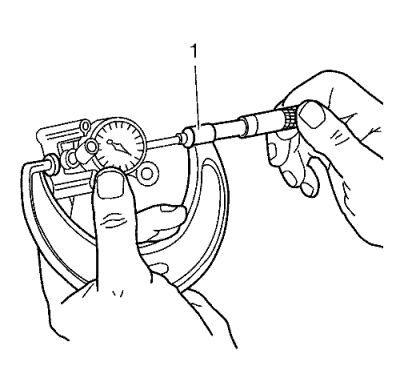
- Install the inner plunger and calibrate with the micrometer gauge.thinsp;(1).

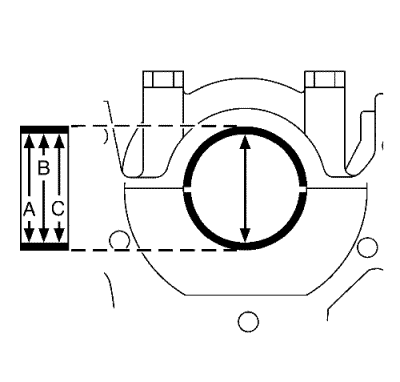
- Measure the crankshaft bearing diameter at 3 points.
Measure at points A, B and C with the internal measuring device.
Calculate the average crankshaft bearing diameter.
Formula: A + B + C /3.

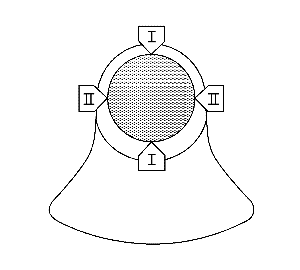
- Measure the crankshaft bearing journal diameter at 2 points.
Measure at points I and II with the micrometer gauge.
- Calculate the average crankshaft bearing journal diameter.
Formula: I + II/2.
- Determine the crankshaft bearing play.
Calculation formula: average crankshaft bearing diameter minus average crankshaft bearing journal diameter.
- Nominal-Actual comparison.
Permissible crankshaft bearing play: 0.005–0.059 mm (0.0002–0.0023 in).
| © Copyright Chevrolet. All rights reserved |
