Fuel Tank Vent Pipe Replacement - LDE with Electrical Power Steering
Special Tools
CH-807 Closure Plugs
For equivalent regional tools, refer to Special Tools .
Removal Procedure
Warning: Refer to Petrol/Petrol Vapours Warning in the Preface section.
- Disconnect the battery negative cable. Refer to Battery Negative Cable Disconnection and Connection .
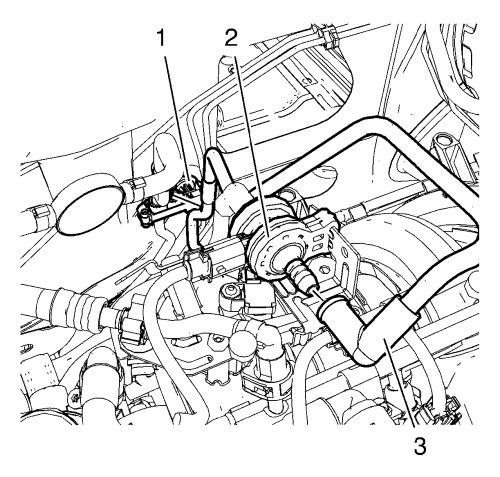
- Remove the fuel tank vent pipe (3) from the evaporative emission canister purge solenoid valve (1).
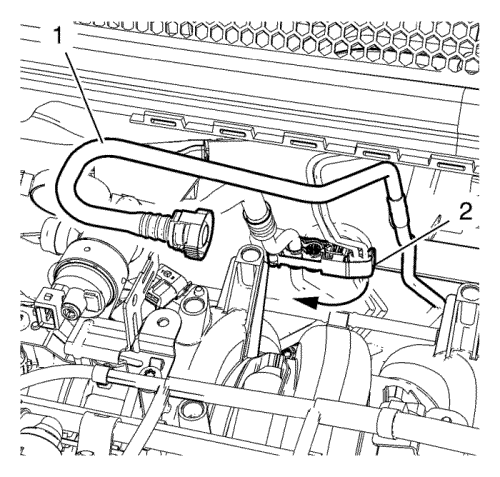
- Open the upper bulk head clip (2).
- Remove the fuel tank vent pipe (1) from the upper bulkhead clip.
- Raise and support the vehicle. Refer to Lifting and Jacking the Vehicle .
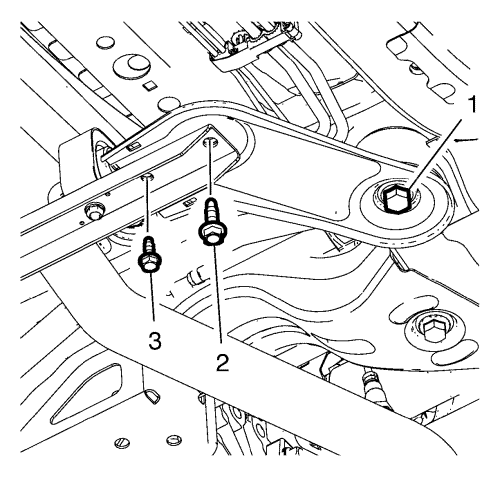
- Remove and DISCARD the exhaust front hanger bracket bolt (3).
- Remove and DISCARD the frame reinforcement bolt (2).
- Loosen the drive train and front suspension frame bolt (1).
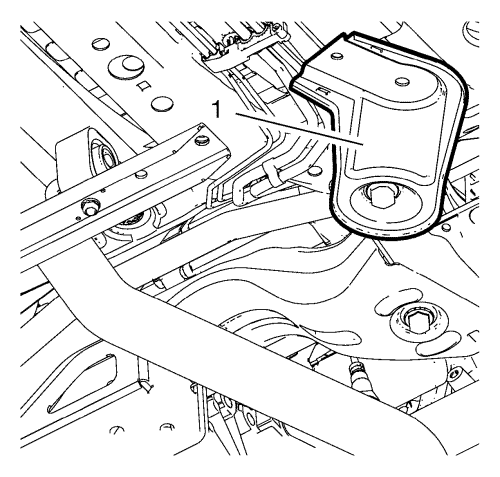
- Rotate the right frame reinforcement (1) to a position shown to get access to the fuel pipes.
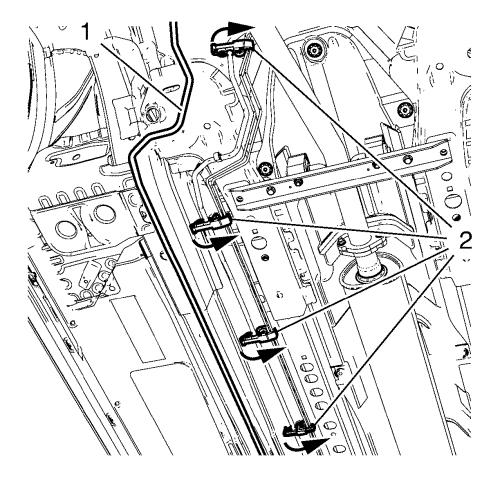
- Open the 4 fuel pipe clips (2).
- Remove the lower bulk head clip.
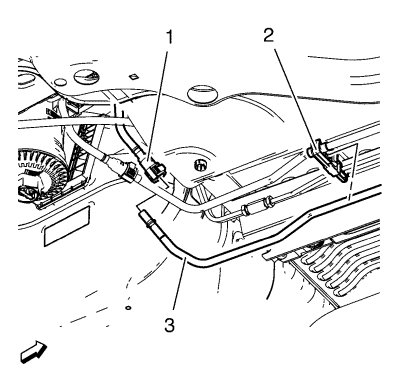
- Disconnect the evaporative emission canister fuel vent pipe connector (1) from the fuel tank vent pipe (3). Refer to Plastic Collar Quick Connect Fitting Service .
- Close the fuel tank vent pipe and emission canister fuel vent pipe with CH-807 plugs.
- Open the fuel pipe clip (2) and remove the fuel tank vent pipe.
Installation Procedure

- Install and position the fuel tank vent pipe (3) and close the fuel pipe clip (2).
- Remove the CH-807 plugs from the emission canister fuel vent pipe and the fuel tank vent pipe.
- Connect the emission canister fuel vent pipe (1) to the fuel tank vent pipe (3). Refer to Plastic Collar Quick Connect Fitting Service .

- Install the lower bulk head clip.
- Close the 4 fuel pipe clips (2).

- Rotate the right frame reinforcement to its original position.
- Install the exhaust front hanger bracket bolt (3).
- Install the frame reinforcement bolt (2).
Caution: Refer to Fastener Caution in the Preface section.
Caution: Refer to Torque-to-Yield Fastener Caution in the Preface section.
- Tighten the NEW exhaust front hanger bracket bolt (3) to 22 N·m (16 lb ft).
- Tighten the NEW frame reinforcement bolt (2) to 60 N·m (44 lb ft).
- Tighten the drivetrain and front suspension frame bolt (1) to 160 N·m (118 lb ft).
- Lower the vehicle.

- Install the fuel tank vent pipe (1) to the upper bulkhead clip.
- Close the upper bulk head clip (2).

- Install the fuel tank vent pipe (3) to the evaporative emission canister purge solenoid valve (2).
- Connect the battery negative cable. Refer to Battery Negative Cable Disconnection and Connection .
| © Copyright Chevrolet. All rights reserved |


