Charge Air Cooler Outlet Hose Replacement - 2.0L Diesel LNP - AT
Removal Procedure
- Remove the engine sight shield. Refer to Engine Sight Shield Replacement .
- Remove the battery tray. Refer to Battery Tray Replacement .
- Remove the engine control module. Refer to Engine Control Module Replacement .
- Remove the radiator surge tank. Refer to Radiator Surge Tank Replacement .
- Unclip the engine wiring harness retaining clip from the charge air cooler outlet front hose.
- Unclip the transmission vent hose from the charge air cooler outlet front hose.
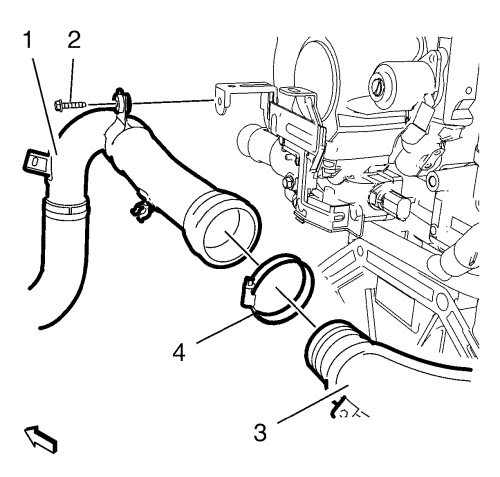
- Remove the charge air cooler outlet front hose bracket bolt (2).
- Loosen the charge air cooler outlet front hose to rear hose clip (4).
- Detach the charge air cooler outlet front hose (1) along with the clamp (4) from the charge air cooler outlet rear hose (3).
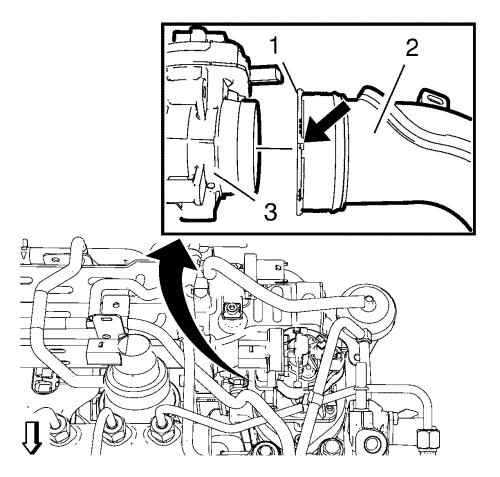
- Unclip the 2 wiring harness retaining clips from the charge air cooler outlet rear hose (2).
- Place a suitable tool at the rebate (1) and rotate the lock ring anti-clockwise.
- Detach the charge air cooler outlet rear hose (2) from the throttle body (3).
- Remove the charge air cooler outlet rear hose (2).
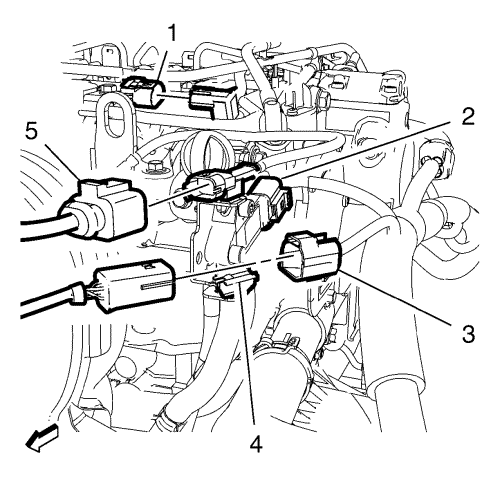
- Disconnect the exhaust temperature sensor wiring harness plug (5).
- Unclip the heated oxygen sensor wiring harness plug (3) from the retainer clip (4) and disconnect the heated oxygen sensor wiring harness plug (3).
- Disconnect the exhaust pressure differential sensor hose wiring harness plug (2).
- Unclip the engine wiring harness retaining clip from the charge air cooler outlet front hose.
- Unclip the transmission vent hose from the charge air cooler outlet front hose.
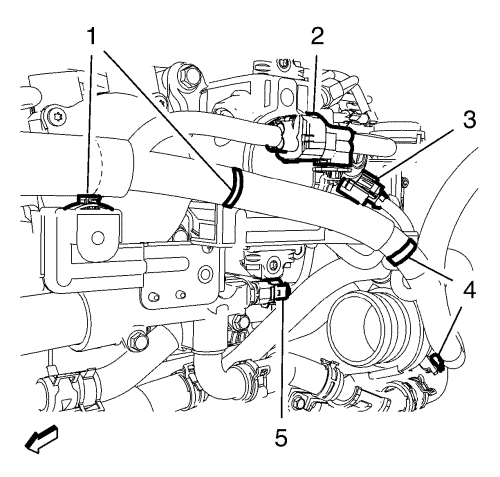
- Unclip the 2 wiring harness clips (1) from the wiring harness bracket.
- Remove the upper radiator brackets. Refer to Radiator Support Bracket Replacement .
- Remove the inlet air duct. Refer to Inlet Air Duct Replacement .
- Remove the left radiator protector fender from the radiator.
- Remove the charge air cooler inlet and outlet hose from the charge air cooler.
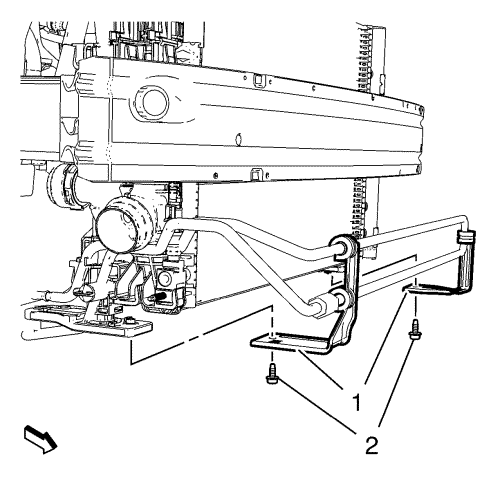
- Remove the 2 power steering fluid cooling pipe loop bracket bolts (2).
- Hang the power steering fluid cooling loop pipe aside.
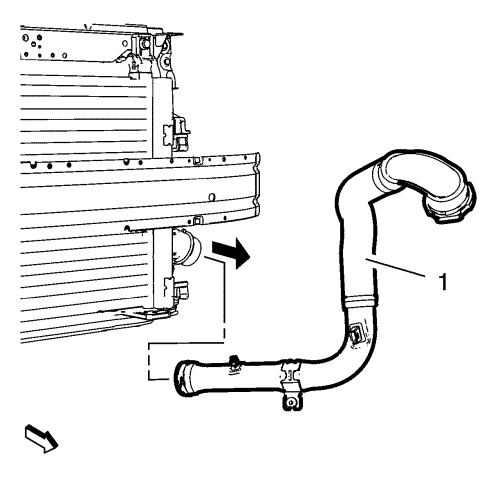
Note: Move the radiator forward to remove the charge air cooler outlet hose.
- Remove the charge air cooler outlet hose (1) downwards from the vehicle.
Installation Procedure

Note: Move the radiator forward to install the charge air cooler outlet hose.
- Position the charge air cooler outlet hose (1) to the vehicle.
Caution: Refer to Fastener Caution in the Preface section.

- Install the power steering fluid cooling loop pipe.
- Install the 2 power steering fluid cooling loop pipe bracket bolts (2) and tighten to 9 N·m (80 lb in).
- Install the charge air cooler inlet and outlet hose to the charge air cooler.
- Install the left radiator protector wing to the radiator.
- Install the upper radiator brackets. Refer to Radiator Support Bracket Replacement .
- Install the inlet air duct. Refer to Inlet Air Duct Replacement .

Note: Make sure that the retaining ring is locked.
- Install the charge air cooler outlet rear hose (2) to the throttle body (3).
- Clip in the 2 wiring harness retaining clips to the charge air cooler outlet rear hose (2).

- Install the charge air cooler outlet front hose (1) along with the clamp (4) to the charge air cooler outlet rear hose (3).
- Install the charge air cooler outlet front hose bracket bolt (2) and tighten to 9 N·m (80 lb in).
- Tighten the charge air cooler outlet front hose to rear hose clip (4) to 4 N·m (35 lb in).

- Clip in the 2 wiring harness clips (1) to the wiring harness bracket.

- Connect the exhaust temperature sensor wiring harness plug (5).
- Clip the heated oxygen sensor wiring harness plug (3) to the retainer clip (4) and connect the heated oxygen sensor wiring harness plug (3).
- Connect the exhaust pressure differential sensor hose wiring harness plug (3).
- Clip in the engine wiring harness retaining clip to the charge air cooler outlet front hose.
- Clip in the transmission vent hose to the charge air cooler outlet front hose.
- Install the radiator surge tank. Refer to Radiator Surge Tank Replacement .
- Install the engine control module. Refer to Engine Control Module Replacement .
- Install the battery tray. Refer to Battery Tray Replacement .
- Install the engine sight shield. Refer to Engine Sight Shield Replacement .
| © Copyright Chevrolet. All rights reserved |


