To the top of the document
Orlando
   
GMDE Start Page Load static TOC Load dynamic TOC Help?

3-5-Reverse and 4-5-6 Clutch Fluid Seal Ring Replacement - Gen 1


1891328

Callout

Component Name

Special Tools

DT-46620 Seal Installer

For equivalent regional tools, refer to Special Tools .
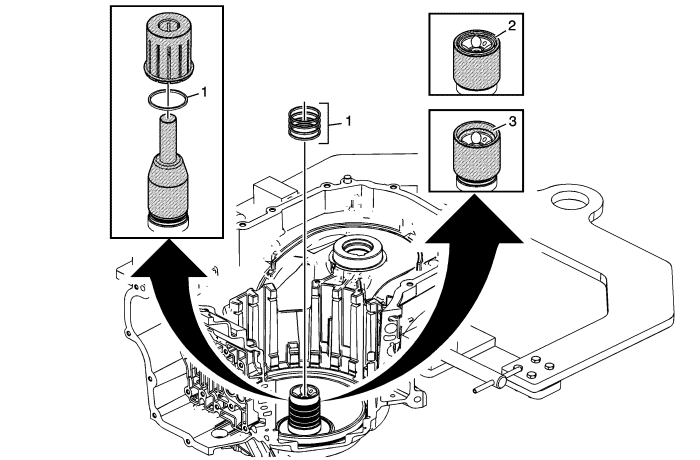
1

3-5 Reverse and 4-5-6 Clutch Fluid Seals (Qty: 4)

Procedure

  1. Place DT-46620-3 which is part of DT-46620 seal installer over the case hub and adjust it so that only the bottom seal ring is exposed.
  2. Place a NEW fluid seal ring onto DT-46620-3 which is part of DT-46620 seal installer.
  3. Use DT-46620-2 which is part of DT-46620 seal installer to push the fluid seal ring down over DT-46620-3 which is part of DT-46620 seal installer into the hub ring groove.
  4. Repeat the above steps to install all 4 seal rings, adjusting DT-46620-3 which is part of DT-46620 seal installer to the appropriate ring groove.

2

Small Chamfer Up

Caution: Do not force the seal installer down over the seals as this will roll and damage the seals. The large chamfer is designed to fit over the over stretched seal. Use a hand to help shrink the seal if the seal installer is difficult to install over the seal rings.

Procedure

Install DT-46620-1 which is part of DT-46620 seal installer with the large chamfer end down over the fluid seal rings and leave DT-46620-1 which is part of DT-46620 seal installer on the seals for at least 60 seconds.

3

Large Chamfer Up

Procedure

  1. Install DT-46620-1 which is part of DT-46620 seal installer with the small chamfer end facing down for at least 60 seconds. This will properly size the bottom seal ring.
  2. Leaving DT-46620-1 which is part of DT-46620 seal installer on the fluid seal rings for an extended period of time could cause a fluid leak on the initial clutch piston circuit until the seal rings warm up and expand to the proper dimension.


© Copyright Chevrolet. All rights reserved


© Copyright Chevrolet. All rights reserved