Control Solenoid Valve and Transmission Control Module Assembly Replacement
Removal Procedure
- Remove the transmission control valve body cover. Refer to
Control Valve Body Cover Replacement : 2.0L Diesel LNP → except 2.0L Diesel LNP .
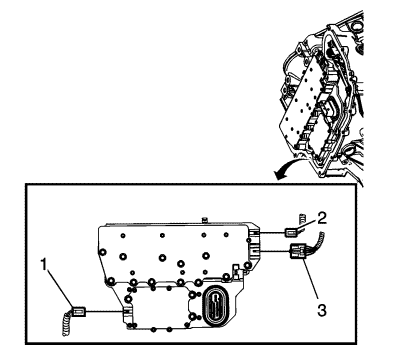
- Disconnect the output speed sensor electrical connector (2).
- Disconnect the shift position switch electrical connector (3).
- Disconnect the input speed sensor electrical connector (1).
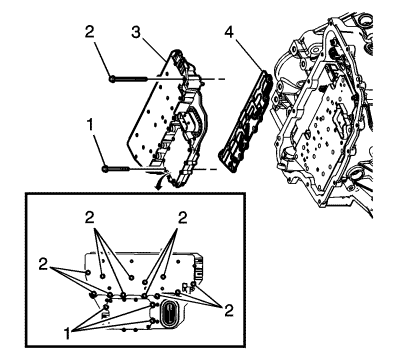
- Remove the 3 control valve body bolts (1) M5 x 40.5.
- Remove the 12 control valve body bolts (2) M6 x 97.
- Remove the control solenoid valve assembly (3) with transmission control module.
Caution: Use care when removing or installing the filter plate assembly. A broken or missing retaining tab may not adequately secure the filter plate to the control solenoid valve assembly, resulting in possible damage or contamination.
- Remove the control solenoid valve assembly filter plate (4). Discard the filter plate. It is not reusable.
- Inspect the pressure switch seals for damage or contamination. Replace the control solenoid valve assembly as necessary.
- Inspect the channel plate bolt pass through holes for damage or burnelling. Any damage could cause leaking. Replace as necessary.
Installation Procedure
Caution: Use care when removing or installing the filter plate assembly. A broken or missing retaining tab may not adequately secure the filter plate to the control solenoid valve assembly, resulting in possible damage or contamination.
- Install a NEW control solenoid valve assembly filter plate (4) to prevent fluid leaks past the fluid seals.
- Install the control solenoid valve assembly (3) with transmission control module.
- Hand start the control valve body bolts (1, 2).
Caution: Refer to Fastener Caution in the Preface section.
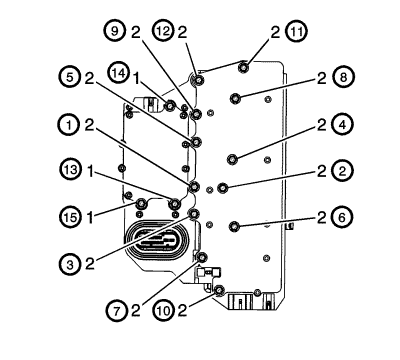
- Secure the 12 control valve body bolts (2) M6 x 97 and tighten in sequence to 12 N·m(106 lb in).
- Secure the 3 control valve body bolts (1) M5 x 40.5 and tighten in sequence to 8 N·m(71 lb in).
- Connect the input speed sensor electrical connector (1).
- Connect the output speed sensor electrical connector (2).
- Install the transmission control valve body cover. Refer to
Control Valve Body Cover Replacement : 2.0L Diesel LNP → except 2.0L Diesel LNP .
- After repairs, refer to Control Module References for programming and set up procedures.
- Perform the transmission adaptive values learn. Refer to Transmission Adaptive Values Learn .
| © Copyright Chevrolet. All rights reserved |
| © Copyright Chevrolet. All rights reserved |


