Timing Belt Tensioner Replacement - 1.6L LDE, LXV, 1.8L 2H0, LUW and LFH
Special Tools
| • | EN-6333 Timing Belt Tensioner Locking Pin |
| • | EN-6340 Camshaft Locking Tool |
| • | EN-6625 Crankshaft Locking Device |
For equivalent regional tools, refer to Special Tools .
Removal Procedure
- Open the bonnet.
- Remove the air cleaner assembly. Refer to
Air Cleaner Assembly Replacement : LDE, LXV, LUW, 2H0 and LFH .
- Remove the timing belt upper front cover. Refer to
Timing Belt Upper Front Cover Removal : LDE, LED, LFJ, LXV, 2H0, LUW, LFH .
- Raise and support the vehicle. Refer to Lifting and Jacking the Vehicle .
- Remove the front compartment splash shield. Refer to Front Compartment Splash Shield Replacement .
- Remove the drive belt tensioner. Refer to Drive Belt Tensioner Replacement .
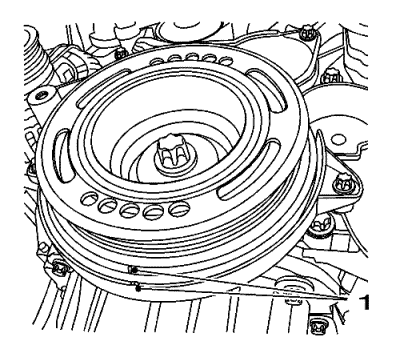
- Set the crankshaft balancer in direction of engine rotation until the markings (1) line up with the cylinder 1 at TDC.
- Remove the crankshaft balancer. Refer to
Crankshaft Balancer Replacement : MT - D16, D20 → LXV, LXT, 2H0, LUW - AT .
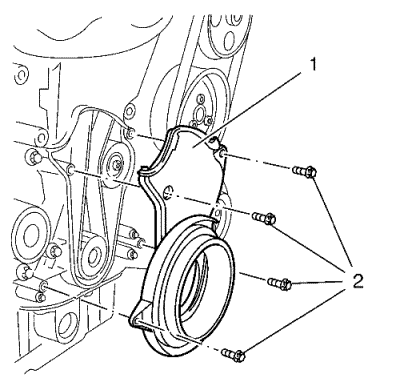
- Remove the 4 lower timing belt cover bolts (2).
- Remove the lower timing belt cover (1).
- Lower the vehicle.
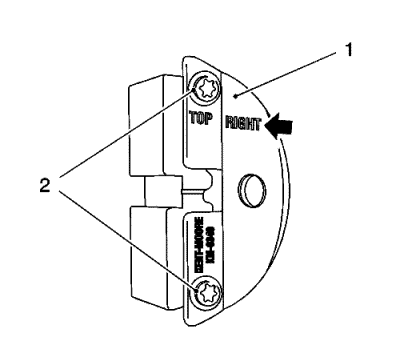
Note: The right half of the EN-6340 locking tool can be recognised by the lettering "right", arrow, on the tool.
- Prepare the right half of the EN-6340 locking tool.
| 12.1. | Remove the 2 bolts (2). |
| 12.2. | Remove the front panel (1) from the EN-6340 locking tool - right. |
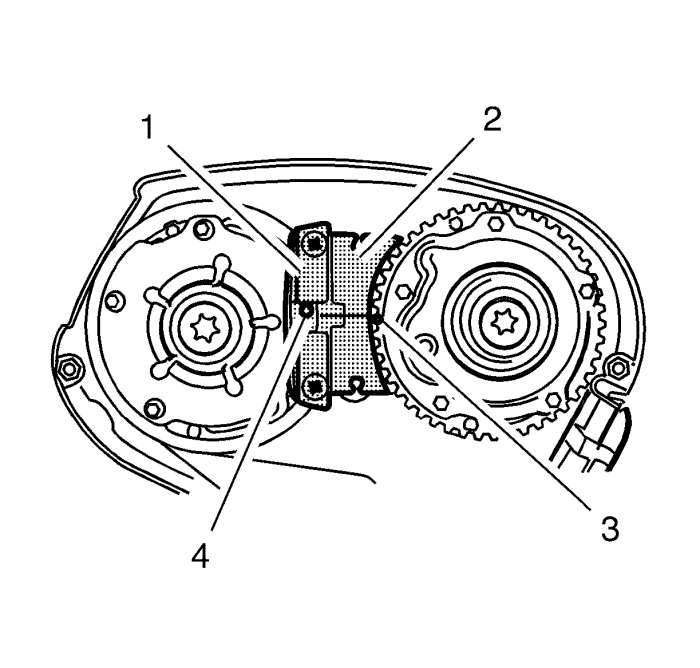
- Install the EN-6340 locking tool into the camshaft adjusters.
| | Note: The spot type marking (4) on the inlet camshaft adjuster does not correspond to the groove of EN-6340-left during this process but must be somewhat above as shown. |
| • | Install the EN-6340 locking tool - left (1) in the camshaft adjusters as shown. |
| | Note: The spot type marking (3) on the exhaust camshaft adjuster must correspond to the groove on EN-6340-right. |
| • | Install EN-6340 locking tool - right (2) in the camshaft adjusters as shown. |
- Raise the vehicle.
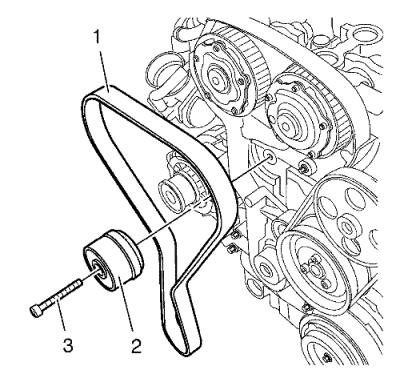
- Apply tension to the drive belt tensioner (2) in the direction of the arrow, using an Allen key (1).
- Install the EN-6333 locking pin (3).
- Lower the vehicle.
- Remove the engine mount bracket. Refer to Engine Mount Bracket Replacement .
- Remove the timing belt centre front cover. Refer to Timing Belt Centre Front Cover Removal .
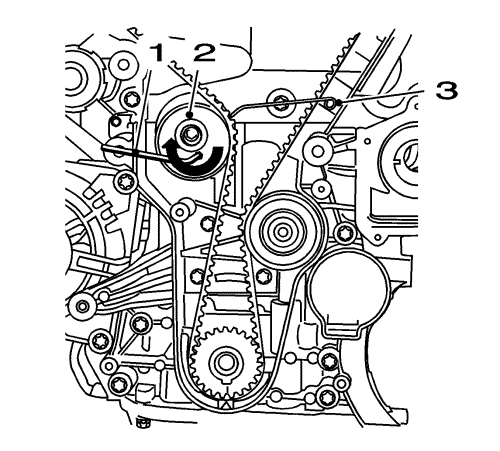
Note: Note the direction of the belt, if the timing belt will be reused.
- Remove the timing belt (1).
- Remove and DISCARD the timing belt tensioner bolt (3).
- Remove the timing belt tensioner (2).
Installation Procedure
- Re-cut the timing belt tensioner thread.
- Install the timing belt tensioner (2).
Note: Service may offer bolts that are not microencapsulated. If this is the case apply thread lock agent to the bolt.
- If fastener is microencapsulated, install a NEW timing belt tensioner bolt (3). DO NOT reuse the old bolt.
Caution: Refer to Fastener Caution in the Preface section.
- Tighten the timing belt tensioner bolt to 20 N·m (15 lb ft).
- Install the timing belt (1).
- Guide the timing belt past the tensioner and place it on the crankshaft sprocket wheel.
- Place the timing belt on the exhaust and inlet camshaft position actuator adjusters.
- Install the engine mount bracket. Refer to Engine Mount Bracket Replacement .
- Install the timing belt centre front cover. Refer to Timing Belt Centre Front Cover Installation .
- Raise the vehicle.
- Apply tension to the drive belt tensioner (2) in the direction of the arrow, using an Allen key (1).
- Remove the EN-6333 locking pin (3).
Note: The timing belt tensioner moves automatically to the correct position.
- Release tension on timing belt tensioner.
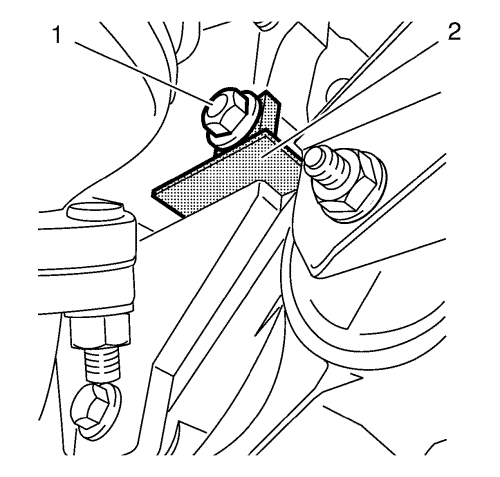
- Remove fastener (1).
- Remove EN-6625 locking device (2) to block the crankshaft.
- Lower the vehicle.
- Remove EN-6340 locking tool.
- Check the timing
| | Note: Note the marking at the camshaft sprockets. |
| • | Turn the crankshaft 720° in the direction of engine rotation by the bolt on the crankshaft balancer. |
| | Note: The spot type marking (4) on the inlet camshaft adjuster does not correspond to the groove of EN-6340-left during this process but must be somewhat above as shown. |
| • | Install EN-6340-left locking tool (1) into the camshaft adjusters as shown. |
| | Note: The spot type marking (3) on the exhaust camshaft adjuster must correspond to the groove on EN-6340-right. |
| • | Install EN-6340-right locking tool (2) into the camshaft adjusters as shown. |
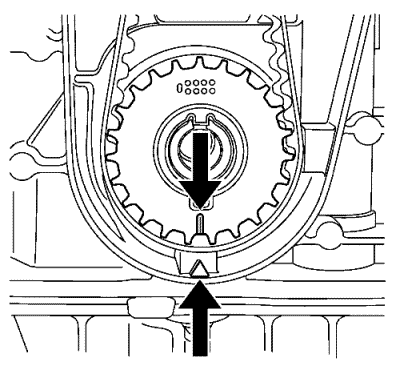
Note: The crankshaft sprocket and oil pump housing must align.
- Check the crankshaft position.
- Lower the vehicle.
- Remove the EN-6340 locking tool.
- Raise the vehicle.
- Install the lower timing belt cover (1).
Caution: Refer to Fastener Caution in the Preface section.
- Install the 4 lower timing belt cover bolts (2) and tighten to 6 N·m (53 lb in).
- Install the crankshaft balancer. Refer to
Crankshaft Balancer Replacement : MT - D16, D20 → LXV, LXT, 2H0, LUW - AT .
- Install the drive belt tensioner. Refer to Drive Belt Tensioner Replacement .
- Install the front compartment splash shield. Refer to Front Compartment Splash Shield Replacement .
- Lower the vehicle.
- Install the timing belt upper front cover. Refer to
Timing Belt Upper Front Cover Replacement : 1.6L LDE, LXV, 1.8L 2H0, LUW and LFH .
- Install the air cleaner assembly. Refer to
Air Cleaner Assembly Replacement : LDE, LXV, LUW, 2H0 and LFH .
- Close the bonnet.
| © Copyright Chevrolet. All rights reserved |
| © Copyright Chevrolet. All rights reserved |


