Rear Axle Replacement
Special Tools
EN-50187 Rear Axle Supporter
For equivalent regional tools, refer to Special Tools .
Removal Procedure
- Release the handbrake lever boot from the floor console and loosen the adjusting nut enough to completely relieve tension on the handbrake cable.
- Raise and support the vehicle. Refer to Lifting and Jacking the Vehicle .
- Remove the rear tire and wheel assemblies. Refer to Tire and Wheel Removal and Installation .
- Disconnect the handbrake cables from the equaliser and remove three handbrake cable clamps for both of the cables. Refer to Handbrake Cable Replacement .
- Remove both of the rear wheel speed sensors, if equipped with ABS. Refer to Rear Wheel Speed Sensor Replacement .
- Disconnect the rear wheel cylinder pipes from the rear brake hose. Refer to Rear Brake Hose Replacement .
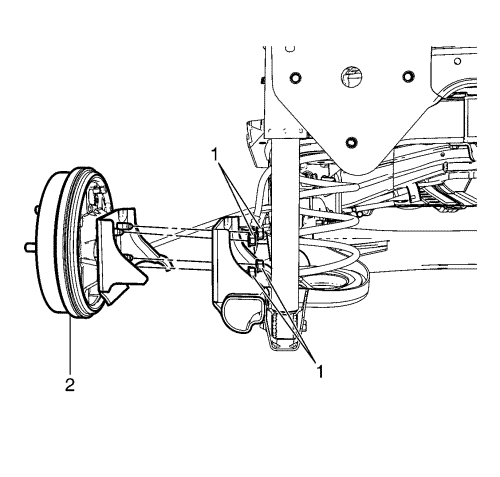
- Remove the wheel bearing/hub and spindle assembly to rear axle retaining nuts (1) from both sides.
- Remove the wheel bearing/hubs, the brakes and backing plates as an assembly (2) from the rear axle.
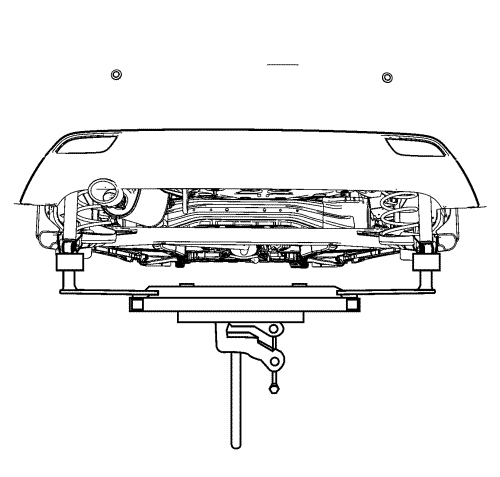
- Install the DT-50187 supporter to a hydraulic jack stand and support the rear axle with the two rear adaptors of the DT-50187 supporter.
- Remove both of the shock absorber strut to rear axle retaining bolts from the rear axle. Refer to Shock Absorber Replacement .
- Lower the hydraulic jack stand and remove the rear springs from the both sides.
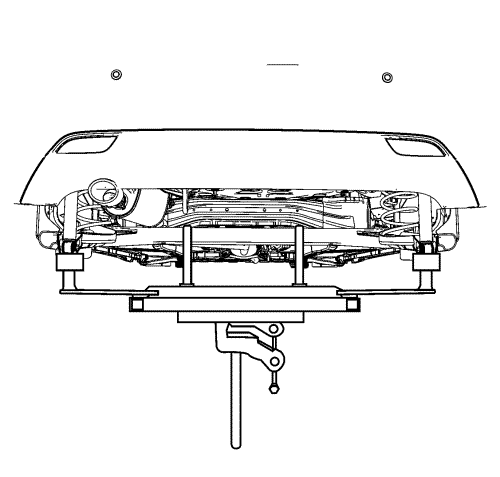
- Position the hydraulic jack stand with the DT-50187 supporter to the rear axle and support it with all adaptors of the DT-50187 supporter.
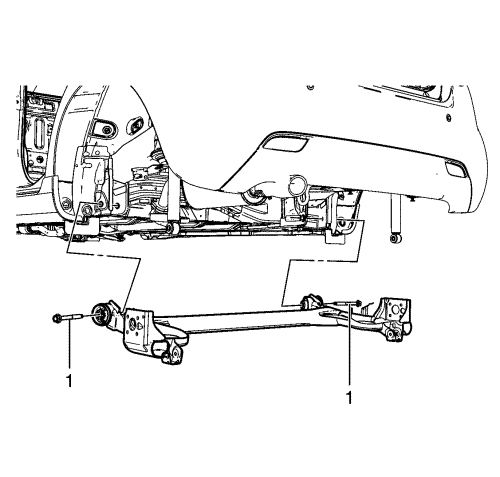
- Remove the rear axle to body retaining bolts (1).
- Slowly lower the hydraulic jack stand to remove the rear axle from the vehicle.
- Remove the rear coil spring lower insulators from the axle.
- Remove the rear axle from the hydraulic jack stand with the DT-50187 supporter.
Installation Procedure
- Place the rear axle on the hydraulic jack stand with DT-50187 supporter.
- Install the rear coil spring lower insulators to the rear axle.
- Using the hydraulic jack stand, raise the rear axle to the correct position.
- Hand tighten all rear axle to body retaining bolts (1).
Note: The rear axle to body retaining bolts must be tightened with the axle at the correct suspension height.
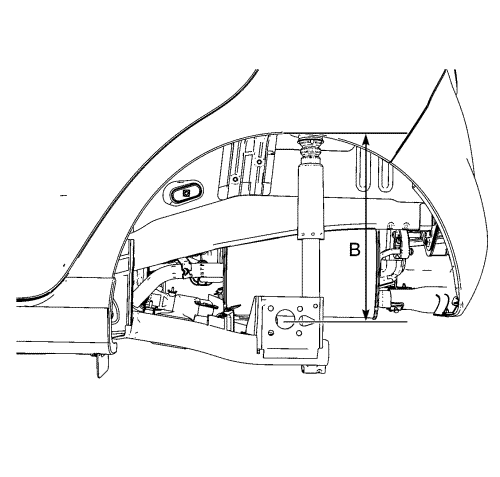
- Using the two rear adaptors of the DT-50187 supporter and the hydraulic jack stand, raise the rear axle to the proper suspension height specification (B: 357.2 mm, 14.06 in) by measuring the vertical distance between the centre of wheel and bottom edge of the wheel housing.
Caution: Refer to Fastener Caution in the Preface section.
- Tighten completely the axle to body retaining bolts to 170 N·m (125 lb ft).
- Lower the hydraulic jack stand.
- Install the rear springs.
- Support the rear axle with the two rear adaptors of the DT-50187 supporter, and install the shock absorber strut to rear axle retaining bolts to the rear axle. Refer to Shock Absorber Replacement .
- Lower the hydraulic jack stand and remove the DT-50187 supporter.
- Install the wheel bearing/hubs, the brakes and backing plates as an assembly to the rear axle.
- Install the wheel bearing/hub and spindle assembly to rear axle retaining nuts (1) to both sides.
- Install the rear wheel cylinder pipes to the rear brake hose. Refer to Rear Brake Hose Replacement .
- Install both of the rear wheel speed sensors, if equipped with ABS. Refer to Rear Wheel Speed Sensor Replacement .
- Connect the handbrake cables to the equaliser and install three handbrake cable clamps for both of the cables. Refer to Handbrake Cable Replacement .
- Adjust the handbrake cable tension. Refer to Parking Brake Adjustment .
- Install handbrake lever boot.
- Bleed the hydraulic brake system. Refer to
Hydraulic Brake System Bleeding : Pressure → Manual .
- Install the rear tire and wheel assemblies. Refer to Tire and Wheel Removal and Installation .
- Verify the rear wheel alignment. Refer to Wheel Alignment Specifications .
- Lower the vehicle.
| © Copyright Chevrolet. All rights reserved |


