Transmission Replacement
Special Tools
DT-49070 Converter Bolt Remover/Installer
For equivalent regional tools, refer to Special Tools .
Removal Procedure
- Raise and support the vehicle. Refer to Lifting and Jacking the Vehicle .
- Drain the transmission fluid. Refer to Transmission Fluid Replacement .
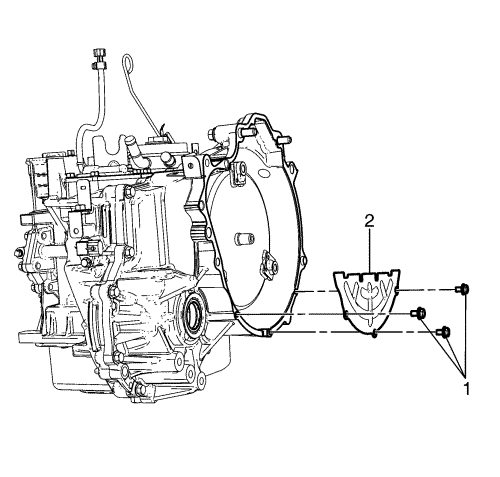
- Remove the torque converter cover plate bolts (1).
- Remove the torque converter cover plate (2).
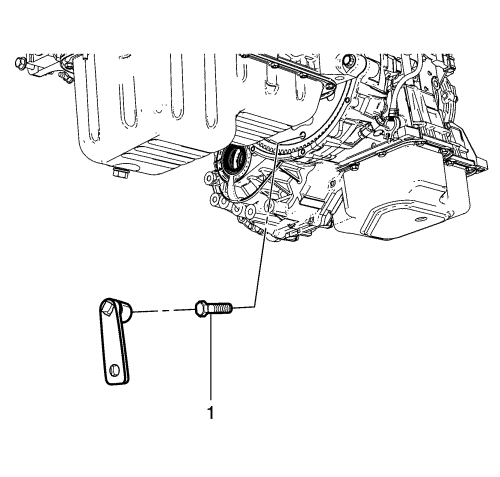
- Remove the torque converter bolts (1) using the DT-49070 remover/installer.
- Separate the front wheel drive shaft from the wheel hub. Refer to Front Wheel Drive Shaft Replacement .
- After removing the related parts for the powertrain assembly removal, remove the powertrain assembly from the vehicle. Refer to
Engine Replacement : with Engine Lifting Device and MT → with CH-49289 and CH-49290 → with EN-49802 and EN-50176 .
- Disconnect the air conditioning compressor and condenser hose from the air conditioning condenser. Refer to Air Conditioning Compressor and Condenser Hose Replacement .
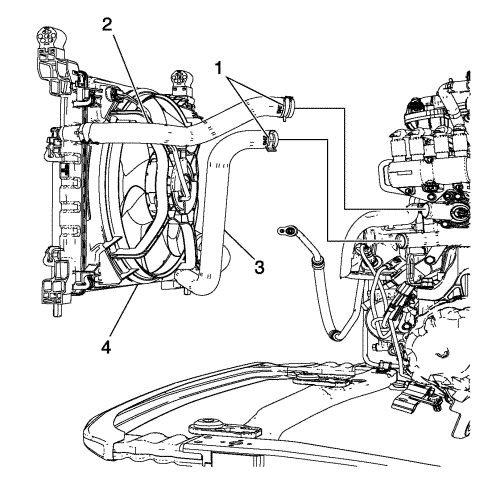
- Remove the radiator inlet and outlet hose clamp (1).
- Disconnect the radiator inlet and outlet hoses (2, 3) and remove the radiator and condenser assembly (4).
- Disconnect the transmission wiring harness electrical connector and oxygen sensor electrical connectors.
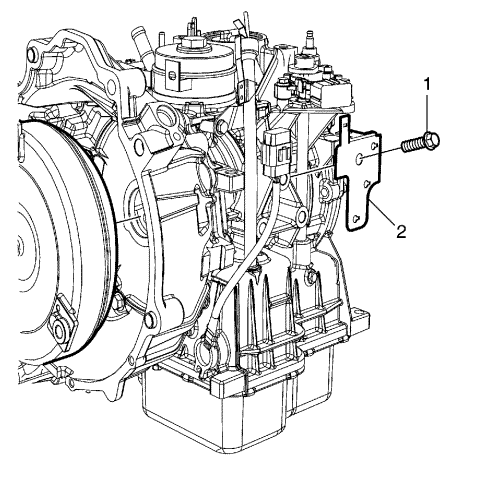
- Remove the terminal connector bracket bolt (1) and the bracket (2).
- Disconnect the input speed sensor electrical connector.
- Disconnect the output speed sensor electrical connector.
- Remove the crankshaft position sensor. Refer to Crankshaft Position Sensor Replacement .
- Remove the bracket bolts (1, 2) and the brackets (3, 4).
- Separate the wiring harness from the transmission.
- Disconnect the oil cooler hoses from the transmission oil cooler. Refer to Fluid Cooler Outlet Hose Replacement and Fluid Cooler Inlet Hose Replacement .
- Remove the transmission rear mount bracket. Refer to Transmission Mount Bracket Replacement - Rear .
- Remove the front wheel drive shaft from the transmission. Refer to Front Wheel Drive Shaft Replacement .
- Remove the starter. Refer to Starter Replacement .
- Remove the transmission upper bolts (1).
- Remove the transmission lower bolt (2).
- Remove the transmission lower nut (3).
- Separate the transmission from the engine.
Installation Procedure
- Install the transmission to the engine.
Caution: Refer to Fastener Caution in the Preface section.
- Install the transmission lower nut (3) and tighten to 61 N·m (44 lb ft).
- Install the transmission lower bolt (2) and tighten to 61 N·m (44 lb ft).
- Install the transmission upper bolts (1) and tighten to 61 N·m (44 lb ft).
- Install the starter. Refer to Starter Replacement .
- Install the front wheel drive shaft to the transmission. Refer to Front Wheel Drive Shaft Replacement .
- Install the transmission rear mount bracket. Refer to Transmission Mount Bracket Replacement - Rear .
- Connect the oil cooler hoses from the transmission oil cooler. Refer to Fluid Cooler Outlet Hose Replacement and Fluid Cooler Inlet Hose Replacement .
- Position the wiring harness into the transmission.
- Install the transmission case side bracket (3), the bracket bolt (1) and tighten to 13 N·m (115 lb in).
- Install the converter housing side bracket (4), the bracket bolt (2) and tighten to 44 N·m (33 lb ft).
- Install the crankshaft position sensor. Refer to Crankshaft Position Sensor Replacement .
- Connect the output speed sensor electrical connector.
- Connect the input speed sensor electrical connector.
- Install the terminal connector bracket (2), the terminal connector bracket bolt (1) and tighten to 44 N·m (33 lb ft).
- Connect the transmission wiring harness electrical connector and oxygen sensor electrical connectors.
- Install the radiator and condenser assembly (4) and connect the radiator inlet and outlet hoses (2, 3).
- Install the radiator inlet and outlet hose clamp (1).
- Connect the air conditioning compressor and condenser hose to the air conditioning condenser. Refer to Air Conditioning Compressor and Condenser Hose Replacement .
- Install the powertrain assembly to the vehicle and then install the related parts. Refer to
Engine Replacement : with Engine Lifting Device and MT → with CH-49289 and CH-49290 → with EN-49802 and EN-50176 .
- Install the front wheel drive shaft to the wheel hub. Refer to Front Wheel Drive Shaft Replacement .
Note: Ensure that new torque converter bolt with white sealant should be installed first and then 2 new torque converter bolts with orange sealant should be installed.
- Install NEW torque converter bolts (1) using the DT-49070 remover/installer and tighten to 45 N·m (33 lb ft).
- Install the torque converter cover plate (2).
- Install the torque converter cover plate bolts (1) and tighten to 10 N·m (89 lb in).
- Fill the transmission with fluid. Refer to Transmission Fluid Replacement .
| © Copyright Chevrolet. All rights reserved |


