Engine Block Cleaning and Inspection
Special Tools
EN-45059 Torque Angle Sensor Kit
For equivalent regional tools, refer to Special Tools .
Cleaning Procedure
- Remove any old thread sealant, gasket material or sealant.
- Clean all the following areas with solvent:
- Clean all threaded and through holes with solvent.
Warning: Refer to Safety Glasses and Compressed Air Warning in the Preface section.
- Dry the engine block with compressed air.
Visual Inspection
- Inspect the crankshaft bearings journals for damage or spun bearings. The crankshaft bearing journals are not repairable, if the crankshaft bearing journals are damaged the engine block assembly must be replaced.
- Inspect all sealing and mating surfaces for damage, repair or replace the engine block assembly if necessary.
- Inspect all threaded and through holes for damage or excessive debris.
- Inspect all bolts for damage, if damaged replace with NEW bolts only.
- Inspect the cylinder walls for cracks or damage. The cylinder sleeves are not serviced separately, if the cylinders are damaged the cylinder block assembly must be replaced.
- Inspect the engine block for cracks. Do not repair any cracks. If cracks are found, the cylinder block assembly must be replaced.
Measuring Procedure
Engine Block Flatness Inspection

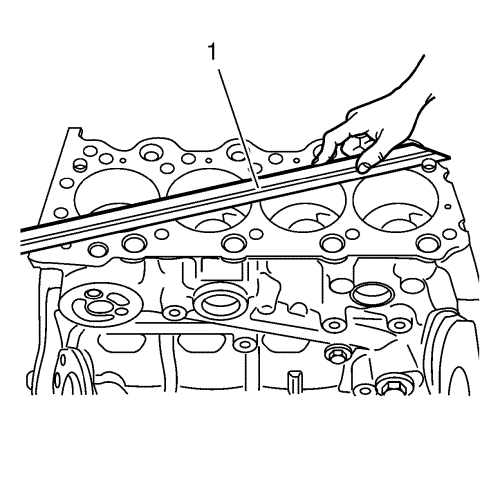
- Inspect the engine block as shown for distortion. Use a straightedge (1).

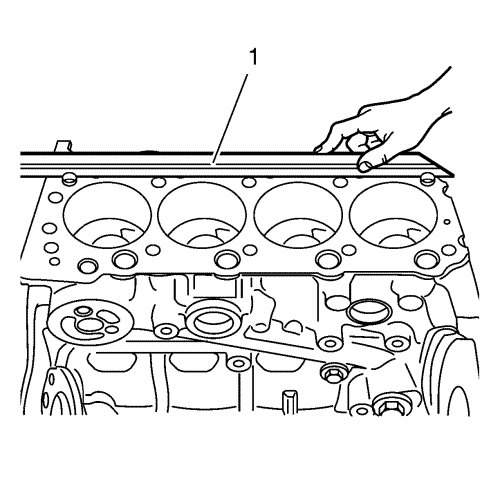
- Inspect the engine block as shown for deflection. Use a straightedge (1).
Crankshaft Bearing Clearance (With Micrometer Gauge Internal Measuring Device)
- Install the crankshaft bearings and the crankshaft bearing caps.
Caution: Refer to Fastener Caution in the Preface section.
Note: The old bolts can be reused for the measuring procedure.
- Tighten the crankshaft bearing cap bolts in the following sequence:
| 2.1. | Tighten the crankshaft bearing cap bolts to 39N·m (29 lb ft). |
| 2.2. | Tighten the bolts to an additional 60°. |

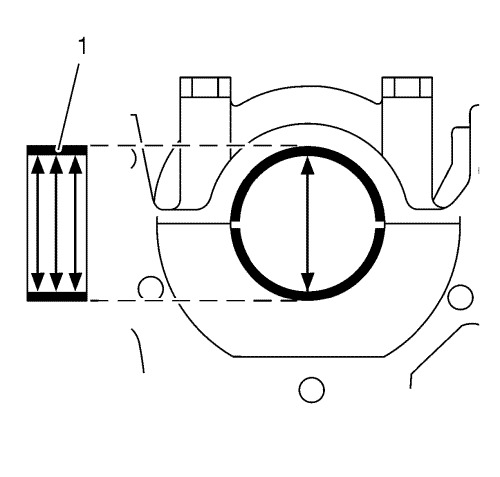
- Measure the crankshaft bearing diameter at 3 points as shown (1). Use an internal measuring device.
- Calculate the average crankshaft bearing diameter.
Formula: 1. result + 2. result + 3. result / 3

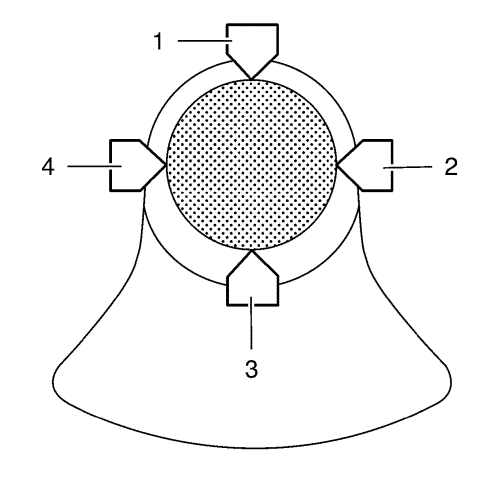
- Measure the crankshaft bearing journal diameter at 2 points between 1 and 3 and between 2 and 4. Use a micrometer gauge.
- Calculate the average crankshaft bearing journal diameter.
Formula: 1. result + 2. result / 2.
- Substract the average crankshaft bearing journal diameter from the average crankshaft bearing diameter in order to determine the crankshaft bearing clearance.
The clearance should be 0.030 mm - 0.058 mm (0.0012 in - 0.0023 in).
| © Copyright Chevrolet. All rights reserved |
