To the top of the document
Orlando
   
GMDE Start Page Load static TOC Load dynamic TOC Help?

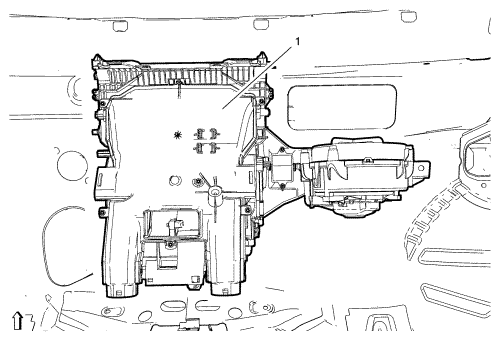
Heater and Air Conditioning Evaporator Case Replacement


2372959

Callout

Component Name

Preliminary Procedures

  1. Loosen air conditioning evaporator hose from air conditioning evaporator thermal expansion valve. Refer to Air Conditioning Evaporator Hose Assembly Replacement : 2.0L Diesel LNP → 1.6L LDE, LLU, LXV, 1.8L 2H0 and LFH → 2.4L LAF .
  2. Remove the instrument panel tie bar. Refer to Instrument Panel Tie Bar Replacement .

1

Heater and Air Conditioning Evaporator Case

Procedure

  1. Remove the air conditioning (A/C) module wiring harness. Refer to Air Conditioning Module Wiring Harness Replacement : Right Hand Drive → Left Hand Drive .
  2. Remove the air inlet housing. Refer to Air Inlet Housing Replacement
  3. Remove the inside air temperature sensor - left side lower. Refer to Inside Air Temperature Sensor Replacement - Left Side Lower : Right Hand Drive → Left Hand Drive .
  4. Remove the temperature valve actuator. Refer to Temperature Valve Actuator Replacement : Right Hand Drive → Left Hand Drive .
  5. Remove the mode control cam. Refer to Mode Control Cam Replacement : Right Hand Drive → Left Hand Drive .
  6. Remove the inside air temperature sensor - left side upper. Refer to Inside Air Temperature Sensor Replacement - Left Side Upper : Right Hand Drive → Left Hand Drive .
  7. Remove the air conditioning refrigerant temperature sensor - right hand side. Refer to Air Conditioning Refrigerant Temperature Sensor Replacement - Right Side : Right Hand Drive → Left Hand Drive .
  8. Remove the blower motor control module. Refer to Blower Motor Control Module Replacement : Left Hand Drive → Right Hand Drive .
  9. Remove the heater core. Refer to Heater Core Replacement .


© Copyright Chevrolet. All rights reserved