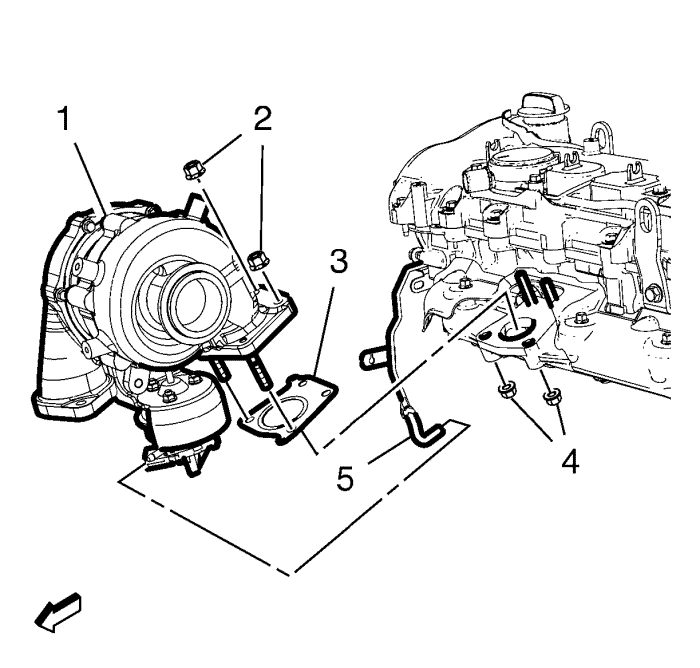
Turbocharger Replacement
Removal Procedure
Warning: Always wear protective goggles and gloves when removing exhaust parts as falling rust and sharp edges from worn exhaust components could result in serious personal injury.
Caution: Do not bend the exhaust flex decoupler more than 3 degrees in any direction. Movement of more than 3 degrees will damage the exhaust flex decoupler.
- Disconnect battery negative cable. Refer to
Battery Negative Cable Disconnection and Connection : without Start/Stop System
- Remove the engine sight shield. Refer to Engine Sight Shield Replacement .
- Remove the air cleaner outlet duct. Refer to Air Cleaner Outlet Duct Replacement .
- Remove the turbocharger heat shield. Refer to Turbocharger Heat Shield Replacement .
- Remove the turbocharger coolant return pipe. Refer to
Turbocharger Coolant Return Pipe Replacement : 2.0L Diesel LNP .
- Remove the turbocharger oil feed pipe. Refer to Turbocharger Oil Feed Pipe Replacement .
- Remove the charge air cooler inlet air hose. Refer to
Charge Air Cooler Inlet Hose Replacement : 2.0L Diesel LNP .
- Remove the exhaust particulate filter. Refer to
Exhaust Particulate Filter Replacement : 2.0L Diesel LNP .
- Remove the turbocharger coolant feed pipe. Refer to
Turbocharger Coolant Feed Pipe Replacement : 2.0L Diesel LNP .
- Disconnect the exhaust temperature sensor position 1 wiring harness plug. Refer to Exhaust Temperature Sensor Replacement - Position 1 .

- Remove the charge air control vacuum hose (5) from the turbocharger (1).
- Disconnect turbocharger wastegate actuator wiring harness plug.
- Remove the turbocharger oil return pipe. Refer to Turbocharger Oil Return Pipe Replacement .
- Remove the 4 exhaust turbocharger inlet pipe nuts (2, 4).
- Remove the turbocharger (1).
- Remove the turbocharger gasket (3).
- Remove the exhaust temperature sensor position 1 from the turbocharger. Refer to Exhaust Temperature Sensor Replacement - Position 1 .
Installation Procedure
- Install the exhaust temperature sensor position 1 to the turbocharger. Refer to Exhaust Temperature Sensor Replacement - Position 1 .

- Install the turbocharger (1) to the exhaust manifold. Use a NEW gasket (3).
Caution: Refer to Fastener Caution in the Preface section.
- Install the exhaust turbocharger inlet pipe nuts (2, 4) and tighten to 30 N·m (22 lb ft).
- Install the turbocharger oil return pipe. Refer to Turbocharger Oil Return Pipe Replacement .
- Connect the turbocharger wastegate actuator wiring harness plug.
- Install the charge air control vacuum hose (5) to the turbocharger (1).
- Connect the exhaust temperature sensor position 1 wiring harness plug. Refer to Exhaust Temperature Sensor Replacement - Position 1 .
- Install the turbocharger coolant feed pipe. Refer to
Turbocharger Coolant Feed Pipe Replacement : 2.0L Diesel LNP .
- Install the exhaust particulate filter. Refer to
Exhaust Particulate Filter Replacement : 2.0L Diesel LNP .
- Install the charge air cooler inlet air hose. Refer to
Charge Air Cooler Inlet Hose Replacement : 2.0L Diesel LNP .
- Install the turbocharger oil feed pipe. Refer to Turbocharger Oil Feed Pipe Replacement .
- Install the turbocharger coolant return pipe. Refer to
Turbocharger Coolant Return Pipe Replacement : 2.0L Diesel LNP .
- Install the turbocharger heat shield. Refer to Turbocharger Heat Shield Replacement .
- Install the air cleaner outlet duct. Refer to Air Cleaner Outlet Duct Replacement .
- Install the engine sight shield. Refer to Engine Sight Shield Replacement .
- Connect battery negative cable. Refer to
Battery Negative Cable Disconnection and Connection : without Start/Stop System .
| © Copyright Chevrolet. All rights reserved |

