To the top of the document
Orlando
   
GMDE Start Page Load static TOC Load dynamic TOC Help?

Engine Coolant Thermostat Housing Replacement — 2.0L Diesel LNP

Removal Procedure


    2512569
  1. Unclip the 3 wiring harness clips (2).
  2. Remove the engine wiring harness bracket nut (3).
  3. Remove the engine wiring harness bracket (1).
  4. Raise and support the vehicle. Refer to Lifting and Jacking the Vehicle .
  5. Place collecting basin underneath.
  6. Drain the cooling system. Refer to Cooling System Draining and Filling .
  7. Lower the vehicle.

  8. 2027554
  9. Loosen the radiator inlet hose clamp (4).
  10. Remove the radiator inlet hose (3) from the engine coolant thermostat (5).

  11. 2027531
  12. Remove the throttle body heater inlet hose (2) from the engine coolant thermostat (1).
  13. Remove the heater inlet hose from the engine coolant thermostat housing. Refer to Heater Inlet Hose Replacement : 2.4L LAF → 2.0L Diesel LNP → 1.8L 2H0 and LFH .
  14. Remove the heater outlet hose from the engine coolant thermostat housing. Refer to Heater Outlet Hose Replacement : 2.4L LAF → 2.0L Diesel LNP → 1.8L 2H0 and LFH .

  15. 2028128
  16. Disconnect the engine coolant temperature sensor connector (1).
  17. Remove the 2 engine oil cooler pipe bolts (6).
  18. Note: Pull the engine oil cooler pipe out of the engine oil cooler.

  19. Remove the engine oil cooler pipe (5).
  20. Remove the engine oil cooler pipe seals (4, 7).
  21. Remove the 4 engine coolant thermostat housing bolts (3).
  22. Remove the thermostat housing (2).
  23. Remove the thermostat housing seal (8).

Installation Procedure

  1. Clean sealing surface.

  2. 2028128
  3. Install a NEW engine coolant thermostat housing seal (8).
  4. Install the engine coolant thermostat housing (2).
  5. Caution: Refer to Fastener Caution in the Preface section.

    Note: Carefully install the 4 bolts until the engine coolant thermostat housing is in contact with the cylinder head.

  6. Install the 4 engine coolant thermostat housing bolts (3) and tighten to 2 N·m (18 lb in).
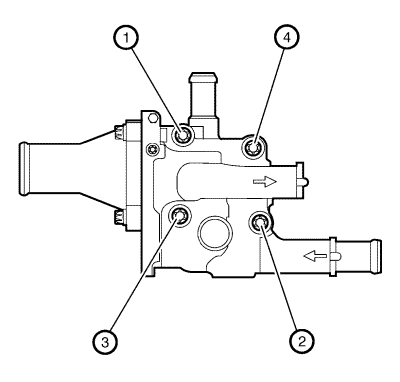
  7. 2028129

    Caution: Following the proper fastener tightening sequence and torque is essential. Failure to do so may fracture the thermostat housing.

  8. Tighten the 4 engine coolant thermostat housing bolts to 8 N·m (71 lb in) in sequence (1-2-3-4).
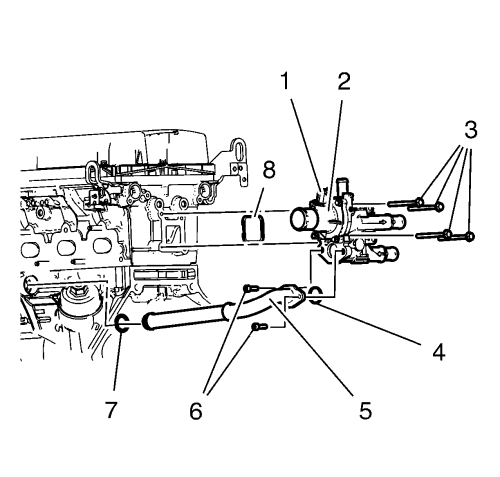
  9. 2028128
  10. Install NEW engine oil cooler pipe seals (4, 7).
  11. Note: Push the engine oil cooler pipe into the engine oil cooler.

  12. Install the engine oil cooler pipe (5).
  13. Install the 2 engine oil cooler pipe bolts (6) and tighten to 8 N·m (71 lb in).
  14. Install the heater outlet hose to the engine coolant thermostat housing. Refer to Heater Outlet Hose Replacement : 2.4L LAF → 2.0L Diesel LNP → 1.8L 2H0 and LFH .
  15. Install the heater inlet hose to the engine coolant thermostat housing. Refer to Heater Inlet Hose Replacement : 2.4L LAF → 2.0L Diesel LNP → 1.8L 2H0 and LFH .
  16. Connect the engine coolant temperature sensor connector (1).
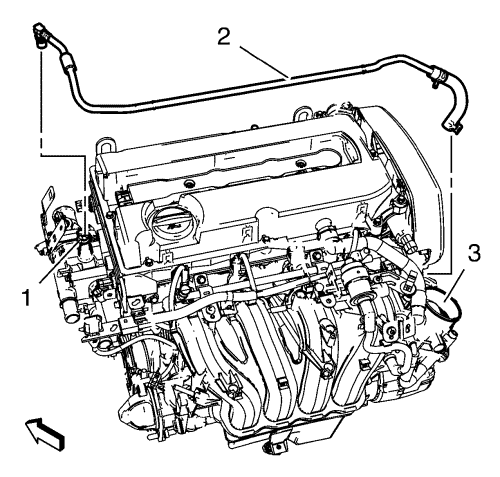
  17. 2027531
  18. Install the throttle body heater inlet hose (2) to the engine coolant thermostat housing (1).
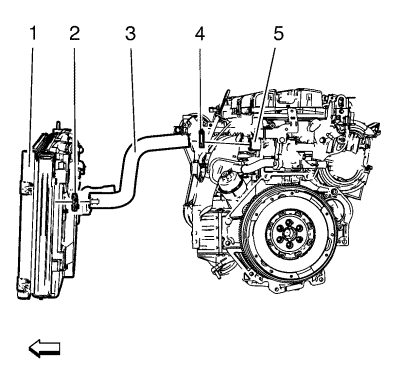
  19. 2027554
  20. Install the radiator inlet hose (3) to the engine coolant thermostat (5).
  21. Install the radiator inlet hose clamp (4).
  22. Fill the cooling system. Refer to Cooling System Draining and Filling .
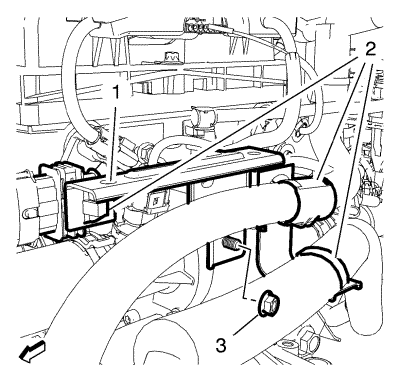
  23. 2512569
  24. Install the engine wiring harness bracket (1).
  25. Install the engine wiring harness bracket nut (3) and tighten to 6 N·m (53 lb in).
  26. Clip in the 3 wiring harness clips (2).


© Copyright Chevrolet. All rights reserved