Piston, Connecting Rod, and Bearing Replacement
Special Tools
| • | EN-43953 Ring Compressor |
| • | EN-43966-1 Connecting Rod Guides |
For equivalent regional tools, refer to Special Tools .
Removal Procedure
- Remove the cylinder head. Refer to Cylinder Head Replacement .
- Remove the sump. Refer to Sump Replacement .
- Rotate the crankshaft to a position where the connecting rod fasteners are the most accessible.
- Mark the connecting rod and cap with the cylinder position. Also mark their orientation. This will ensure the caps and connecting rods are re-assembled properly.
- Remove any ridge at the top of the cylinder bore to avoid damage to the piston ring lands.

- Remove the 4 bearing cap bolts (3) and the 2 bearing caps (2) and remove and DISCARD the lower bearing (1).
- Install the EN-43966-1 guides on the connecting rod threads before removing the piston and connecting the rod assembly.
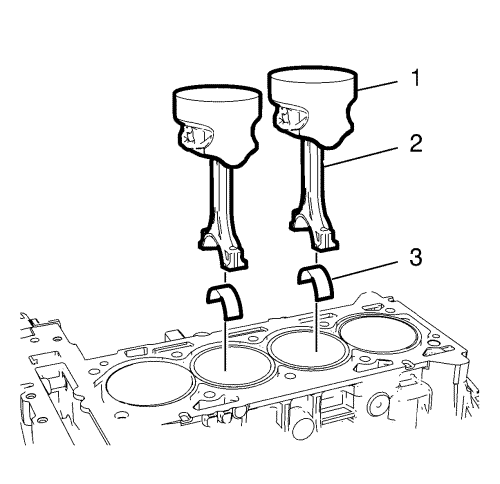
- Remove the piston (1) with the connecting rod (2) and remove and DISCARD the upper bearing (3).
- Remove the EN-43966-1 guides .
Installation Procedure
- Install the EN-43966-1 guides on the connecting rod threads. This protects the crankshaft journal during piston and connecting rod installation.
- Install the EN-43953 compressor to the piston and the connecting rod to the correct bore.
- Install the piston (1) with the connecting rod (2) and the NEW upper bearing (3).
- Hold the EN-43953 compressor against the engine block until all the rings have entered the cylinder bore.
- Remove the EN-43966-1 guides .
Note: Ensure that the bearing caps are on the same places than before.
- Install the NEW lower bearing (1) with the 2 bearing caps (2).
Caution: Refer to Fastener Caution in the Preface section.
- Install the 4 bearing caps bolts (3) and tighten a first pass to 25 N·m (18 lb ft).
Caution: Refer to Torque-to-Yield Fastener Caution in the Preface section.
- Tighten the 4 bearing caps bolts (3) a final pass to an additional 100 degrees, using the EN-45059 meter .
- Install the oil pan. Refer to Sump Replacement .
- Install the cylinder head. Refer to Cylinder Head Replacement .
| © Copyright Chevrolet. All rights reserved |


