Sump Replacement
Removal Procedure
- Remove the oil level indicator tube. Refer to Oil Level Indicator Tube Replacement .
- Raise and support the vehicle. Refer to Lifting and Jacking the Vehicle .
- Remove the drive belt. Refer to Drive Belt Replacement .
- Drain the engine oil. Refer to Engine Oil and Oil Filter Replacement .
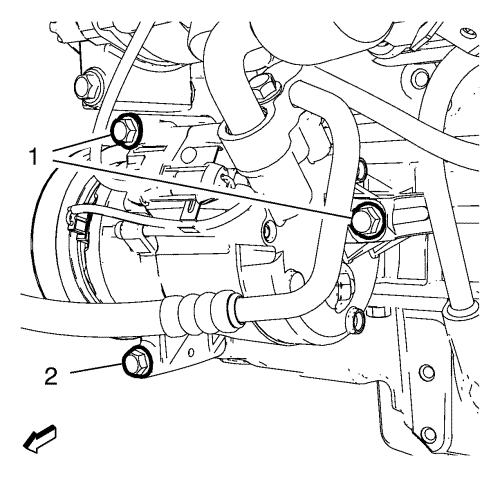
- Loosen the 3 A/C compressor bolts (1, 2).
- Remove the A/C compressor bolt (2) completely.
Note: Do not remove the A/C compressor.
- Pull the A/C compressor away from the engine block and oil pan in order to gain access to the oil pan.
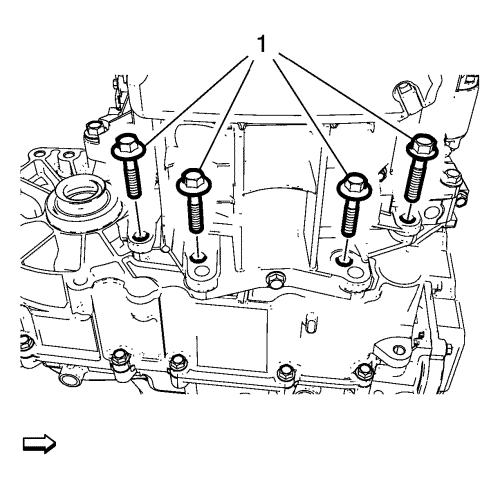
- Remove the 4 transmission bolts (1) from the transmission.
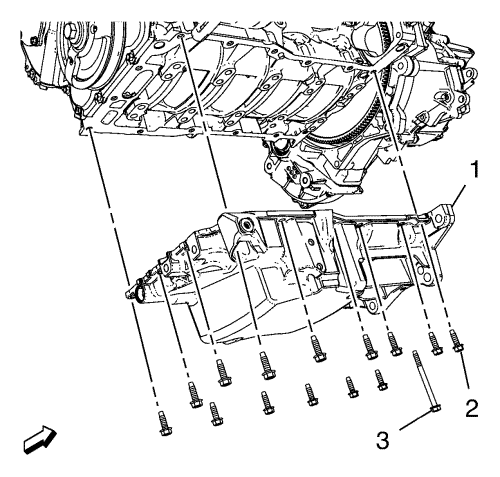
- Remove the long oil pan bolt (3).
- Remove the 14 short oil pan bolts (2).
Caution: Pry the oil pan carefully in order to prevent damage to the transaxle case or the oil pan sealing surfaces.
- Remove the sump (1).
Installation Procedure
- Clean the sealing surfaces.
Note: The complete installation procedure of the lower sump should be done in 10 minutes. Do not coat sealing compound on the oil pan bolt bores and threads.
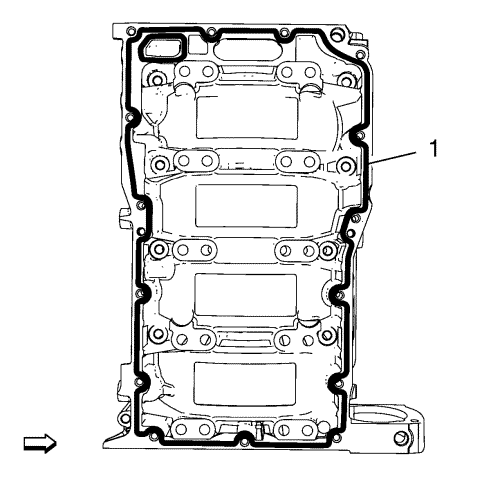
- Ensure that the sump and the sealing surface on the lower crankcase are free of all oil and debris.
- Apply a 2 mm (0.079 in) bead of suitable sealant (1) around the perimeter of the oil pan and the oil suction port opening. DO NOT over apply the sealant. More than a 2 mm (0.079 in) bead is not required.

- Install the sump (1).
- Loosely tighten the 14 short oil pan bolts (2).
- Loosely tighten the long oil pan bolt (3).
Caution: Refer to Fastener Caution in the Preface section.
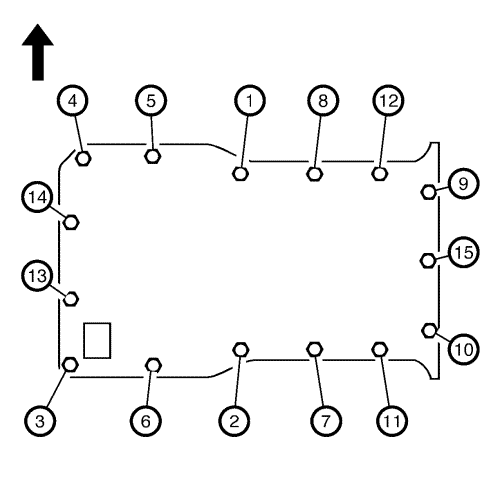
- Tighten the oil pan bolts in a sequence as shown in the graphic above to 25 N·m (18 lb ft).

- Tighten the 4 transmission bolts (1) to 45 N·m (33 lb ft).

- Reposition the A/C compressor and tighten the 3 A/C compressor bolts (1, 2) to 22 N·m (16 lb ft).
- Install the drive belt. Refer to Drive Belt Replacement .
- Lower the vehicle.
- Install the oil level indicator tube. Refer to Oil Level Indicator Tube Replacement .
- Fill up the engine oil. Refer to Engine Oil and Oil Filter Replacement .
| © Copyright Chevrolet. All rights reserved |


