SECTION 1A3
GENERAL ENGINE INFORMATION - HFV6 3.2L
Caution : Disconnect the negative battery cable before removing or installing any electrical unit or when a tool or equipment could easily come in contact with exposed electrical terminals. Disconnecting this cable will help to prevent personal injury and damage to the vehicle. The ignition must also be in LOCK unless otherwise noted.
SPECIFICATIONS
General Specifications
Application | Description |
Engine Performance | Engine | V6 |
Bore x Stroke | 89 x 85.6 mm (3.50 x 3.37 in.) |
Displacement | 3.195 cm³ (94.97 in³) |
Ignition Sequence | 1–2-3-4-5-6 |
Compression Ratio | 10.3 : 1 |
Maximum Power | 226.6 hp (169 kw) @ 6,600 rpm |
Maximum Torque | 219.1 lb-ft (297 N•m) @ 3,200 rpm |
Idle Speed | Air Conditioning System (ON/OFF) | 690 ± 25 rpm |
Engine Part | Ignition Type | Direct Ignition System (DIS) |
Starter | Type | PG 260D (M/T, A/T) |
. | Capacity | 1.4 kW (M/T, A/T) |
Spark–Plug | Type | HR7MPP302 (BOSCH) |
. | Gap | 1.1 mm |
Fuel Injector Type | Solenoid |
Fuel Pump Type | Electric Motor Pump |
Fuel Filter Type | Cartridge |
Lubricating Type | Forced Feed Type |
Oil Pump Type | Gerotor |
Cooling Type | Forced Water Circulation |
Radiator Type | Cross – Flow |
Water Pump Type | Centrifugal |
Thermostat Type | Wax Pallet |
Battery | Type | MF |
. | Rating (V-AH) | 12 - 70 |
. | Cold Cranking Ampere (CCA) | 770 |
Generator | Type | AD 237 |
. | Rating (V-A) | 14.6 ± 0.25 - 120 |
Engine Oil | Type | API SJ (ACEA A1) grade SAE 0W-30 |
. | Oil Change (Including Oil Filter) | 7.4 L |
. | Oil Change (Excluding Oil Filter) | 7.0 L |
Coolant | Type | Dexcool/Silicate Based Coolant |
. | Capacity | 10 L (10.57 qt) |
Fuel Tank Capacity | 65 L (17.2 gal) |
COMPONENT LOCATOR
Engine Compartment
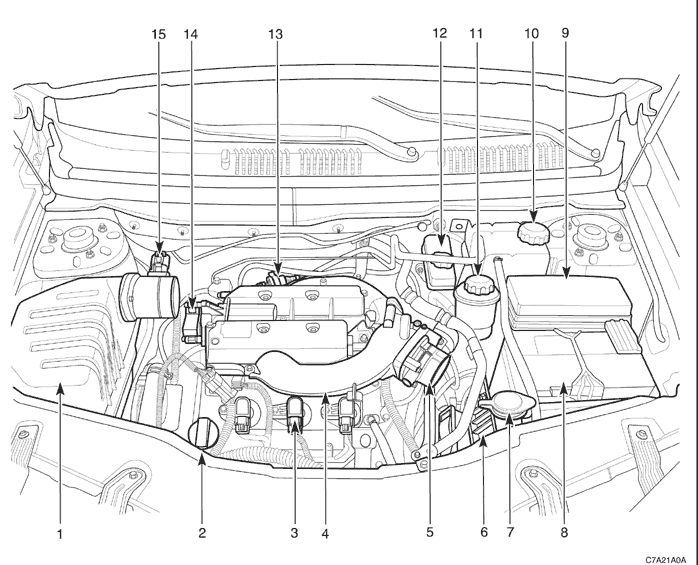


- Air Cleaner Assembly
- Engine Oil Filler Cap
- Ignition Coil
- Intake Manifold
- Throttle Body Assembly
- Engine Control Module (ECM)
- Washer Fluid Tank
- Battery
- Engine Fuse Block
- Surge Tank Cap
- Power Steering Fluid Reservoir Cap
- Brake Oil Tank Cap
- Evaporative (EVAP) Emission Canister Purge Solenoid
- Intake Manifold Tuning Control (IMTC)
- Mass Air Flow (MAF) Sensor
DIAGNOSIS
General Diagnosis
Condition | Probable Cause | Correction |
Hard Starting (With normal cranking) | Malfunction of IgnitionSystem | Faulty fuse. | Replace the fuse. |
. | Faulty spark plug. | Clean or replace the spark plug. |
. | Improper ignition timing. | Adjust the ignition timing. |
. | Faulty ignition coil. | Replace the ignition coil. |
Malfunction of Fuel System | Lock of fuel in the fuel tank. | Feed the fuel. |
. | Dirty or clogged fuel filter. | Replace the fuel pump assembly. |
. | Clogged fuel pipe. | Clean the fuel pipe. |
. | Malfunction of the fuel pump. | Replace the fuel pump assembly. |
. | Malfunction of the fuel injector. | Replace the injector. |
. | The foreign material in the fuel tank. | Clean the fuel tank and replace the fuel pump assembly. |
Decline of Compression Pressure | Poor tightening spark plug. | Tighten to the specified torque. |
. | Cracked cylinder head gasket. | Replace the gasket. |
. | Inadequate valve clearance. | Adjust the clearance. |
. | Interference of the valve stem. | Replace the valve or the valve guide. |
. | Low elasticity or damage of the valve spring. | Replace the valve spring. |
. | Abnormal interference of pistons and cylinders. | Replace the piston ring. |
. | Excessive wear of pistons, rings, or cylinders. | Replace the ring or the piston and boring or replace the cylinder. |
Others | Broken timing belt. | Replace the belt. |
. | Malfunction of Positive Crankcase Ventilation(PCV) valve. | Check and replace Positive Crankcase Ventilation(PCV) valve if needed. |
. | Loosening, damage or leakage of the vacuum hose. | Connect the hose correctly or replace it. |
. | Leakage of intake system. | Replace intake system. |
Condition | Probable Cause | Correction |
Lack of Engine Power | Decline of Compression Pressure | | |
Malfunction of Ignition System | Improper ignition timing. | Adjust the ignition timing. |
. | Faulty spark plug. | Adjust or replace the spark plug. |
Malfunction of Fuel System | Clogged fuel pipe. | Clean the pipe. |
. | Clogged or contaminated fuel filter. | Replace the fuel pump assembly. |
Others | Clogged exhaust system. | Check and repair the system. |
. | Clogged or contaminated air cleaner element. | Clean or replace the air cleaner element. |
. | Leak of the intake manifold gasket. | Replace the gasket. |
. | Dragging brakes. | Repair or replace the brakes. |
. | Slipping clutch. | Adjust or replace the clutch. |
Rough Engine Idling | Decline of Compression Pressure | | |
Malfunction of Fuel System | Clogged fuel pipe. | Clean the pipe. |
. | Clogged or contaminated fuel filter. | Replace the fuel pump assembly. |
Malfunction of Ignition System | Malfunction of the spark plug. | Adjust or replace the spark plug. |
. | Poor ignition timing. | Adjust the ignition timing. |
. | Malfunction of the ignition coil. | Replace the ignition coil. |
Others | Clogged or contaminated air cleaner element. | Clean or replace the air cleaner element. |
. | Leak of the intake manifold gasket. | Replace the gasket. |
. | Malfunction of PositiveCrankcase Ventilation(PCV) valve. | Check the valve or replace it if needed. |
. | Poor connection or damage or leakage of the vacuum hose. | Connect the hose correctly or replace it. |
Condition | Probable Cause | Correction |
Engine Hesitation (Upon pressing accelerating pedal, the engine makes delayed response. This situation is remarkable when cruising or starting.) | Decline of Compression Pressure | | |
Malfunction of Ignition System | Poor ignition timing. | Adjust the ignition timing. |
. | Poor spark plug or inadequate spark plug gap. | Replace the spark plug. |
Others | Malfunction of the air cleaner system. | Clean or replace the air cleaner system. |
. | Leak of the intake manifold gasket. | Replace the gasket. |
Engine Surging (Engine power makes fluctuation in a fixed speed and speed changes without operating the accelerating pedal.) | Decline of Compression Pressure | | |
Malfunction of Fuel System | Clogged fuel pipe. | Clean the pipe. |
. | Clogged or contaminated fuel filter. | Replace the fuel pump assembly. |
Malfunction of Ignition System | Malfunction of the spark plug. | Adjust or replace the spark plug. |
. | Poor ignition timing. | Adjust the ignition timing. |
Others | Leak of the intake manifold gasket. | Clean or replace the gasket. |
. | Leakage of the vacuum hose. | Connect the hose correctly or replace it. |
Excessive Detonation (According to the opening range of throttle valve, knocking sound of metallic is made with abnormal explosion.) | Overheated Engine | Refer to "Overheat" in this page. | Refer to "Overheat" in this page. |
Malfunction of Ignition System | Abnormal spark plug. | Replace the spark plug. |
. | Poor ignition timing. | Adjust the ignition timing. |
Malfunction of Fuel System | Clogged or contaminated fuel filter and fuel pipe. | Clean or replace the fuel pump assembly and the fuel pipe. |
Others | Leak of the intake manifold gasket. | Replace the gasket. |
. | Excessive carbon deposit due to abnormal combustion. | Remove the carbon. |
Condition | Probable Cause | Correction |
Overheat | Malfunction of Cooling System | Lack of coolant. | Refill coolant. |
. | Malfunction of the thermostat. | Replace the thermostat. |
. | Malfunction of the cooling fan. | Check or replace the cooling fan. |
. | Poor water pump performance. | Replace the pump. |
. | Clogged or leaky radiator. | Clean, repair or replace the radiator. |
Malfunction of Lubrication System | Poor engine oil. | Replace engine oil with the specified one. |
. | Blocking oil filter or strainer. | Clean or replace the oil filter or the strainer. |
. | Lack of engine oil. | Refill oil. |
. | Poor oil pump performance. | Replace the oil pump. |
Other | Leakage of oil. | Repair. |
. | Damaged cylinder head gasket. | Replace the gasket. |
Condition | Probable Cause | Correction |
Poor Fuel Consumption | Decline of Compression Pressure | | |
Malfunction of Fuel System | Leakage of the fuel tank or the fuel pipe. | Repair or replace the fuel tank or the fuel pipe. |
Malfunction of Ignition System | Improper ignition timing. | Adjust the ignition timing. |
. | Abnormal spark plug (Excessive carbon deposit, inadequate gap, burnt electrode). | Replace the spark plug. |
Malfunction of CoolingSystem | Malfunction of the thermostat. | Replace the thermostat. |
Others | Improperly installed valve. | Repair or replace the valve. |
. | Slipping clutch. | Repair or replace the clutch. |
. | Low pressure of tires. | Adjust the pressure of tires. |
Condition | Probable Cause | Correction |
Excessive Consumption of Engine Oil | Leakage of Engine Oil | Loosened oil drain plug. | Tighten the plug. |
. | Loosened oil pan bolt. | Tighten the bolt. |
. | Loosened oil filter. | Tighten the filter. |
. | Loosened oil pressure switch. | Tighten the switch. |
. | Leakage of camshaft front oil seal. | Replace the seal. |
. | Leakage of crankshaft front oil seal. | Replace the seal. |
. | Leakage at the cylinder head cover gasket. | Replace the gasket. |
. | Damage of the cylinder head gasket. | Replace the gasket. |
Oil Mixing in Combustion Chamber | Stuck piston ring. | Remove carbon and replace the ring. |
. | Worn piston or cylinder. | Replace the piston or the cylinder. |
. | Worn piston ring or ring groove. | Replace the piston or ring. |
. | Inadequate position of the piston ring cutting part. | Adjust the position. |
. | Abrasion or damage of the valve system. | Replace the valve system. |
Low Oil Pressure | Malfunction of Lubrication System | Inadequate oil viscosity. | Replace with the specified one. |
. | Loosening of the oil pressure switch. | Tighten the switch. |
. | Lack of engine oil. | Refill oil. |
. | Blocking oil strainer. | Clean the strainer. |
. | Lowered function of the oil pump. | Replace the pump. |
. | Abrasion or damage of the oil pump relief valve. | Replace the valve. |
Condition | Probable Cause | Correction |
Engine Noise | Valve Noise | Inadequate valve clearance. | Adjust the valve clearance. |
. | Abrasion of valve stem or guide. | Replace the valve stem or the guide. |
. | Weak valve spring. | Replace the spring. |
Piston, Ring, Cylinder Noise | Abrasion of the piston, the ring or the cylinder. | Boring the cylinder or replace the piston, the ring or the cylinder. |
Connecting Rod Noise | Abrasion of the connecting rod bearing. | Replace the bearing. |
. | Loosened the connecting rod nut. | Tighten to the specified torque. |
Crankshaft Noise | Abrasion of the crankshaft bearing. | Replace the bearing. |
. | Abrasion of the crankshaft journal. | Grind or replace the crankshaft journal. |
. | Loosened bearing cap bolt. | Tighten to the specified torque. |
. | Excessive clearance of the crankshaft thrust bearing. | Adjust or replace. |
. | Low oil pressure. | Refer to "Low Oil Pressure" in this section. |
Checking Engine Oil Level
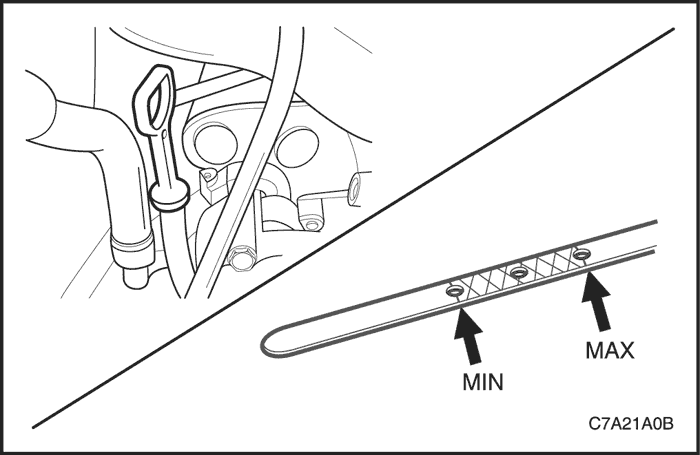
Check the engine oil level or condition. If needed, refill or replace the oil.
Check the engine oil level within normal engine operating temperature as follows ;
- After stopping the engine, wait for a few minutes to accumulate oil into the oil pan.
- After pulling out the oil level gauge, check the oil level.
- Clean the oil level gauge and insert the gauge into the guide.
- After pulling out the oil level gauge again, recheck the oil level and insert the gauge into guide again.
Important : Oil level should be between "MIN" mark and "MAX" mark.
- If oil level is below the "MIN" mark, refill the engine oil as much as the demanded quantity.
Important : If checking the oil level under the engine cold condition, oil is not accumulated into oil pan quickly and correct level checking cannot be performed. Therefore, wait until temperature reaches the normal operating condition and check the engine oil level.
Checking Engine Oil and Oil Filter
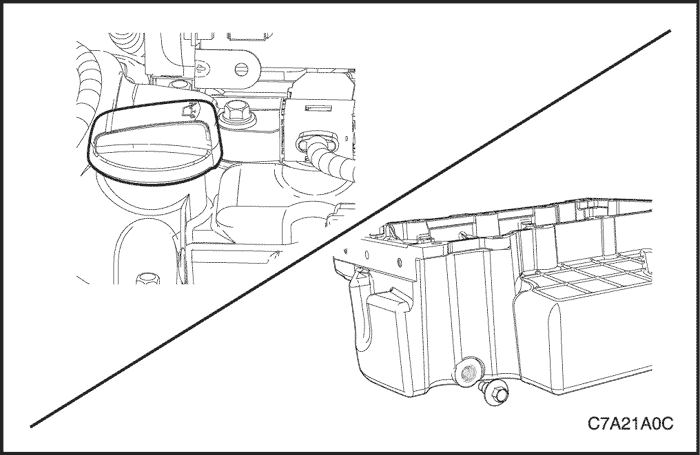
When checking engine oil level or condition, if needed, change the engine oil (including the oil filter) as follows ;
- After stopping the engine, wait for a few minutes to accumulate oil into the oil pan.
- Remove the oil filler cap.
- Remove the oil drain plug and drain the oil off.
- After draining the oil completely, tighten the oil drain plug to 25 N•m (18 lb-ft).
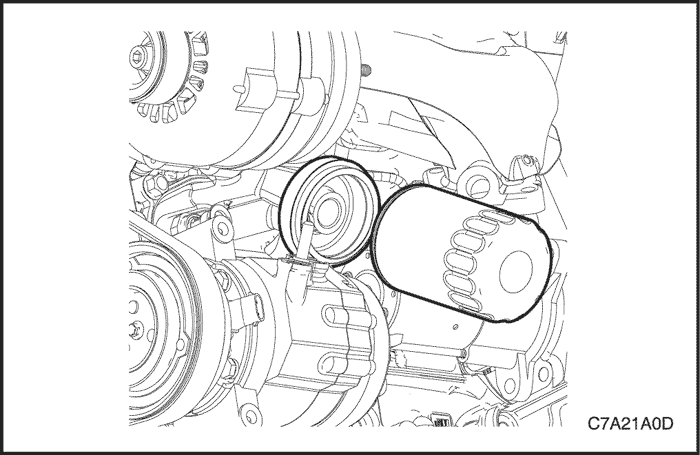
- Replace the oil filter using the oil filter wrench.
Important : Whenever changing the engine oil, replace the oil filter together. When replacing the new oil filter, apply the engine oil on the oil filter sealing.
Checking Accessory Drive Belt

After checking the accessory drive belt for looseness, crack, wear or tension, replace the belt if necessary.
- Inspect : Figures below show the various stages of belt wear to aid in belt replacement decisions. Condition of the belt ribs is best judged where the belt is bent over one of the larger accessory drive system pulleys.
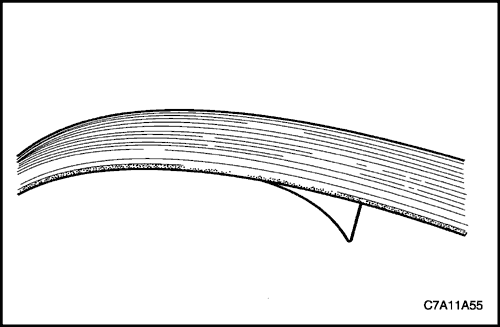
A - New belt
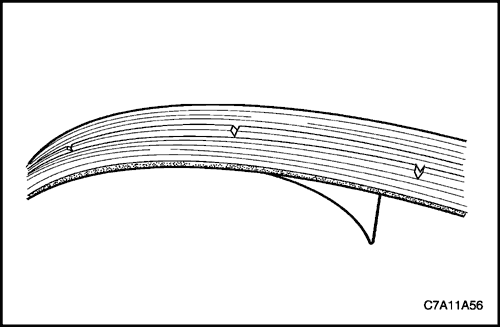
B - Moderately used belt : few cracks, some wear on ribs and in grooves. Replace is not required.
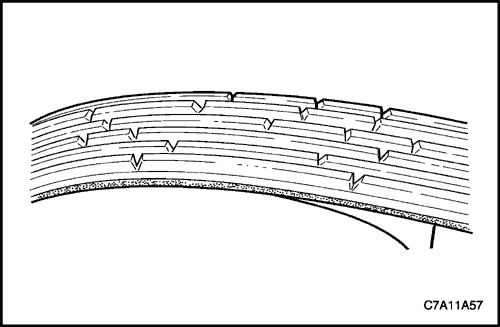
C - Severely used belt : several cracks per 30 mm. Should be replaced before chunking occurs.
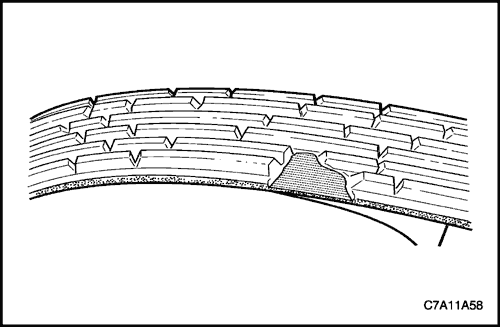
D - Failed belt : separation of rib material from the backing (chunking). Replace belt immediately.
Checking Spark Plug
Caution : Under no circumstances should the spark plug/s gap be adjusted. If the gap is not within specifications, replace the spark plug.
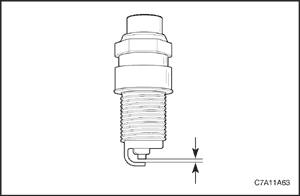
After checking the spark plug for bad clearance, excessive carbon deposit, worn electrode or damaged insulator, replace the new one if necessary.
Remove and check the spark plug as follows ;
- Pull the ignition wire cap portion and disconnect the ignition wires from the spark plug. If pulling the ignition wires, circuit could be disconnected. Therefore, the cap portion should be used.
- Remove the spark plugs from the cylinder head using a wrench.
- Measure the spark plug clearance with the filler gauge. If measured value is not within the specified value, adjust the grounding electrode. When installing a new spark plug, check the equality and then install it.
- Inspect the spark plug as below.
Poor Spark Plug Performance
A spark plug can perform poorly due to wear, dirt, carbon fouling, excessive electrode wear, a broken insulator or excessive gap.
Worn or Dirty Plugs
Worn or dirty plugs can give satisfactory operation while the vehicle is idling, but break down under load.This can cause :
- poor fuel economy,
- power loss,
- acceleration loss,
- difficult starting, or
- poor engine performance.
Carbon Fouling
Carbon fouling is indicated by black carbon deposits. The black deposits are usually the result of slow-speed driving and short runs. In these circumstances, the optimum engine operating temperature is seldom reached.Fouling can also be caused by :
- worn piston rings,
- faulty ignition,
- rich fuel mixture, or spark plugs that are rated too cold.
Excessive Electrode Wear
This often indicates :
- the engine is operating at high speeds,
- the engine is operating at levels that are consistently greater than normal,
- a plug that is rated too hot,
- excessively lean fuel mixture, or plug/s overheating due to insufficient tightening (caused by combustion gases leaking past the threads).
Broken Insulator
Broken insulators are usually the result of improper installation or carelessness.
Breaks in the upper insulator can result from a poor fitting spark plug socket or impact. The cracked insulator may not show up until oil or moisture penetrates the crack. The crack is often just below the crimped part of the shell and may not be visible.
Breaks in the lower insulator often result from careless re-gapping and are usually visible.
This can also result from the plug operating too hot. For example, in periods of high speed operation or under heavy loads.
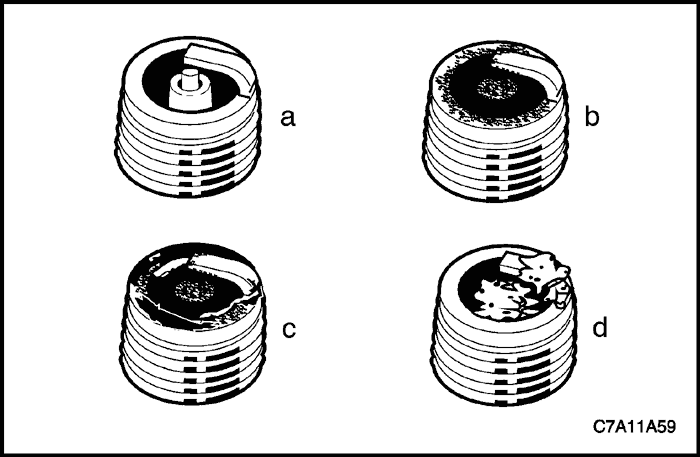
a - Normal : Brown or grayish-tan deposits and slight electrode wear indicate correct spark plug heat range and mixed periods of high and low speed driving.
b - Carbon Fouled : Dry, fluffy black carbon deposits possibly due to poor ignition output, a weak coil, excessive idling or slow speeds under light load. If spark plug temperatures remain too low for normal combustion, the deposits are not burned off.
c - Oil Fouled : Wet, oily deposits with minor electrode wear possibly due to oil leaking past worn piston rings. Breaking in a new or recently overhauled engine before the rings are fully seated may also result in this condition.
d - Deposit Fouling A : Red brown, yellow and white colored coatings on the insulator tip which are by-products of combustion. They come from fuel and lubricating oil which generally contain additives. Most powdery deposits have no adverse effect on spark plug operation, however, they may cause intermittent missing under severe operating conditions.
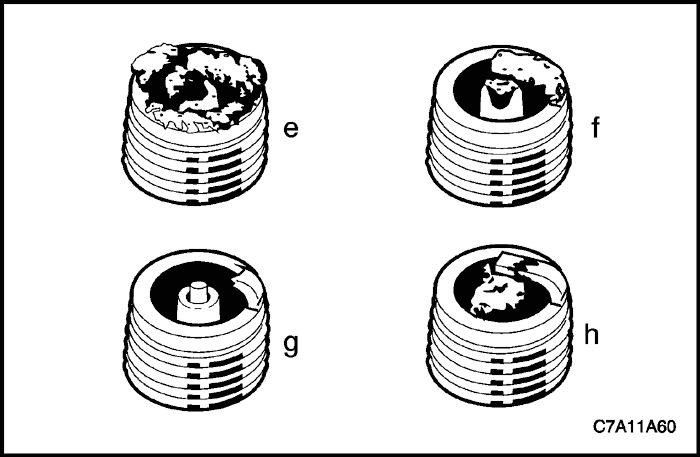
e - Deposit Fouling B : Deposits similar to those identified in deposit fouling A (4). These are also by-products of combustion from fuel and lubricating oil. Excessive valve stem clearances and / or defective intake valve seals allow too much oil to enter the combustion chamber. The deposits will accumulate on the portion of the spark plug that projects into the chamber and will be heaviest on the side facing the intake valve. If this condition is only detected in one or two cylinders, check the valve stem seals.
f - Deposit Fouling C : Most powdery deposits identified in deposit fouling A (4) have no adverse effect on the operation of the spark plug as long as they remain powdery. Under certain conditions of operation however, these deposits melt and form a shiny glaze coating on the insulator. When hot, this acts as a good electrical conductor allowing the current to flow along the deposit instead of sparking across the gap.
g - Detonation : Commonly referred to as engine knock or pinging, detonation causes severe shocks inside the combustion chamber causing damage to parts.
h - Pre-ignition : Burnt or blistered insulator tip and badly eroded electrodes probably due to the excessive heat. This is often caused by a cooling system blockage, sticking valves, improperly installed spark plugs or plugs that are the wrong heat rating (too hot). Sustained high speed with a heavy load can produce temperatures high enough to cause pre-ignition.
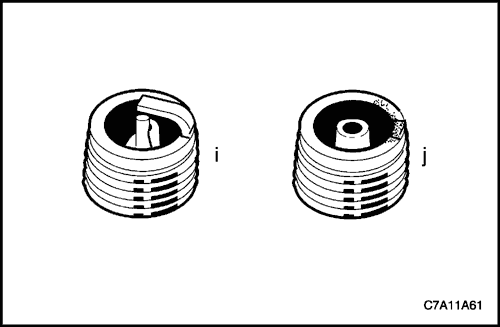
i - Heat Shock Failure : A rapid increase in spark plug tip temperature under severe operating conditions can cause heat shock and result in fractured insulators. This is a common cause of broken and cracked insulator tips.
j - Insufficient Installation Torque : Poor contact between the spark plug and the cylinder head seat. The lack of proper heat transfer that results from poor seat contact causes overheating of the spark plug. In many cases, severe damage occurs. Dirty threads in the cylinder head can cause the plug to seize before it is seated. Ensure the cylinder head and spark plug threads are free of deposits, burrs and scale before installation.
Checking Air Cleaner Element
If the air cleaner element becomes dirty, engine efficiency could be deteriorated. Be sure to check the element often and replace a new one within the specified period. Especially, if a vehicle frequently runs on a dusty road, check and replace the element often.
Checking Fuel System
Check the fuel system as follows ;
- Check the fuel line or line connection portion for damage or leakage.
- Check the fuel hose surface for damage
- Check the fuel cap for looseness.
Checking Hose System
Check the engine vacuum hoses, PCV hose or canister hose as follows ;
- Check the hose surface for damage by heat or machine.
- Check the hose for hardening, crack, tear or coming off.
GENERAL INFORMATION
Engine

The V6 engine features a closed vee, deep skirt die cast aluminium cylinder block with cast iron cylinder liners, internally balanced crankcase, full length water jackets and six bolt main bearing caps.
The cylinders are arranged in two banks of three with a 60 degree included angle between the two banks. The rear bank of cylinders consists of number 1-3-5 cylinders (BANK 1) and the front bank of cylinders consists of number 2-4-6 (BANK 2).
The engine firing order is 1-2-3-4-5-6. Each aluminium cylinder head is fitted with hardened valve seats and four valves per cylinder: two intake and two exhaust. The valves are operated by two camshafts (DOHC) per cylinder bank, one each for intake and exhaust valves. Variable camshaft timing is provided via four actuators fitted at the front of each camshaft.
The crankshaft is manufactured from forged steel. A reluctor wheel is pressed in place onto the rear of the crankshaft for the crankshaft position sensor.The connecting rods are manufactured from powdered metal and the rod cap is separated during the manufacturing process using the fractured method. This creates a stronger, visually seamless rod to cap union.
Cleanliness and Care
An automobile engine is a combination of many machined, honed, polished and lapped surfaces with tolerances that are measured in thousandths of a millimeter. When any material engine parts are serviced, care and cleanliness are important. A liberal coating of engine oil should be applied to friction areas during assembly, to protect and lubricate the surfaces on initial operation. Proper cleaning and protection of machined surfaces and friction areas is part of the repair procedure. This is considered standard shop practice even if not specifically stated.
Whenever valve train components are removed for service, they should be kept in order. They should be installed in the same locations and within the same mating surfaces, as when they were removed. Battery cables should be disconnected before any major work is performed on the engine. Failure to disconnect cables may result in damage to wire harness or other electrical parts.
On-Engine Service
Caution : Disconnect the negative battery cable before removing or installing any electrical unit or when a tool or equipment could easily come in contact with exposed electrical terminals. Disconnecting this cable will help to prevent personal injury and damage to the vehicle. The ignition must also be in LOCK unless otherwise noted.
Notice : Any time the air cleaner is removed, the intake opening should be covered. This will protect against accidental entrance of foreign material which could follow the intake passage into the cylinder and cause extensive damage when the engine is started.


