SECTION 8A
SEAT BELTS
Caution : Disconnect the negative battery cable before removing or installing any electrical unit or when a tool or equipment could easily come in contact with exposed electrical terminals. Disconnecting this cable will help prevent personal injury and damage to the vehicle. The ignition must also be in LOCK unless otherwise noted.
SPECIFICATIONS
Fastener Tightening Specifications
|
Application
|
N·m
|
Lb-Ft
|
Lb-In
|
|
Seat Belt Anchor Bolt
|
38
|
28
|
-
|
|
Seat Belt Height Adjuster Bolt
|
27
|
20
|
-
|
|
Seat Belt Retractor Bolt
|
38
|
28
|
-
|
|
Seat Belt Buckle Bolt
|
38
|
28
|
-
|
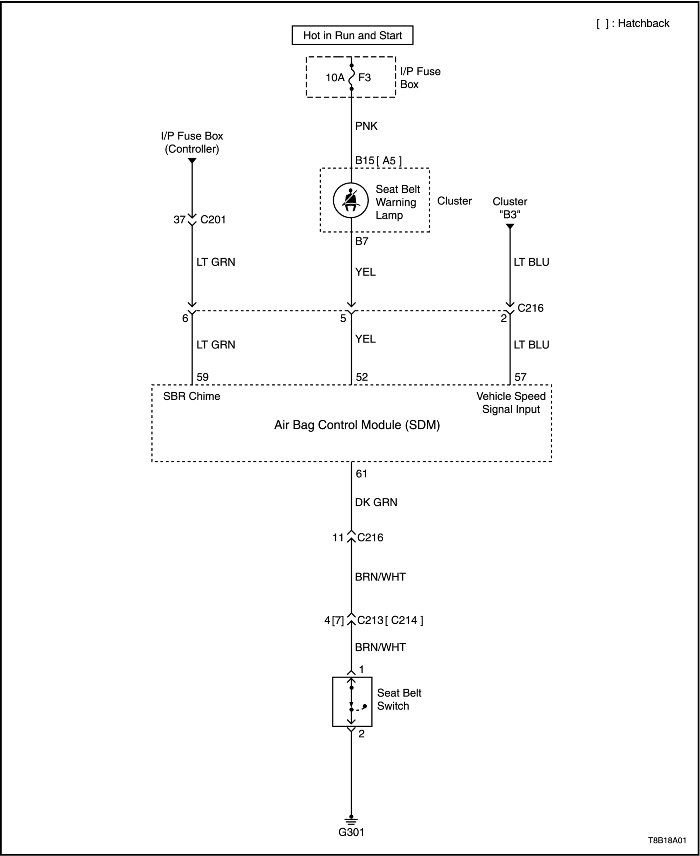
SCHEMATIC AND ROUTING DIAGRAMS
Driver Seat Belt Warning
DIAGNOSIS
Seat Belt Warning Lamp is Inoperative
Seat Belt Warning Lamp Is Inoperative
| Step |
Action |
Value(s) |
Yes |
No |
| 1 |
Check the seat belt warning fuse F3.
Is fuse F3 blown?
|
-
|
Go to Step 2
|
Go to Step 3
|
| 2 |
- Check for a short circuit and repair if necessary.
- Replace the fuse.
Is the repair complete?
|
-
|
System OK
|
-
|
| 3 |
- Turn the ignition ON.
- Check the voltage at fuse F3.
Is the voltage equal to the specified value?
|
11-14 v
|
Go to Step 5
|
Go to Step 4
|
| 4 |
Repair the open power supply circuit for fuse F3.
Is the repair complete?
|
-
|
System OK
|
-
|
| 5 |
- Disconnect the seat belt switch connector (located under the driver's seat).
- Connect a jumper between the terminals on the harness side of the seat belt switch connector.
- Turn the ignition ON.
Does the seat belt warning lamp turn on?
|
-
|
Go to Step 6
|
Go to Step 7
|
| 6 |
Replace the seat belt switch.
Is the repair complete?
|
-
|
System OK
|
-
|
| 7 |
- Remove the instrument cluster.
- Check the seat belt warning lamp bulb.
Is the bulb OK?
|
-
|
Go to Step 9
|
Go to Step 8
|
| 8 |
Replace the warning lamp bulb.
Is the repair complete?
|
-
|
System OK
|
-
|
| 9 |
Repair the open circuit between instrument cluster terminal B7 and ground.
Is the repair complete?
|
-
|
System OK
|
-
|
MAINTENANCE AND REPAIR
ON-VEHICLE SERVICE
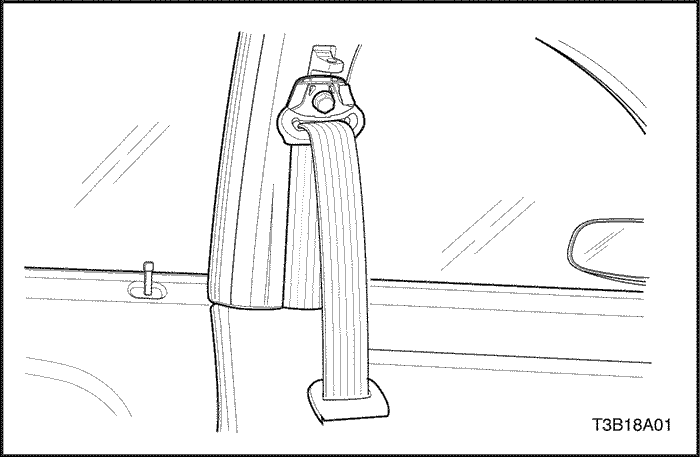


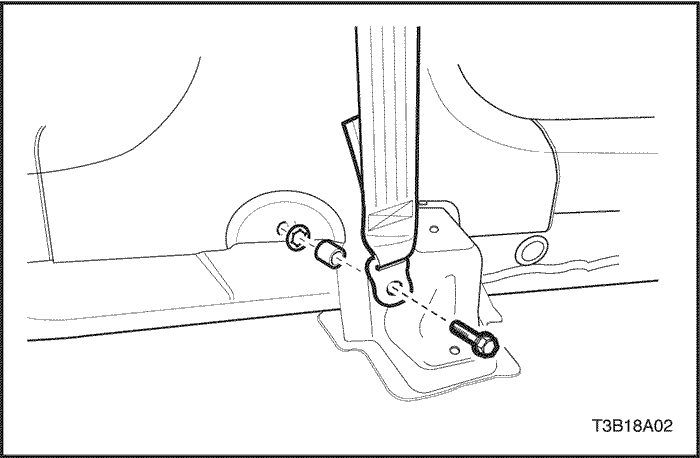
Pretensioner Front Seat Belt
Removal Procedure
- Disconnect the negative battery cable.
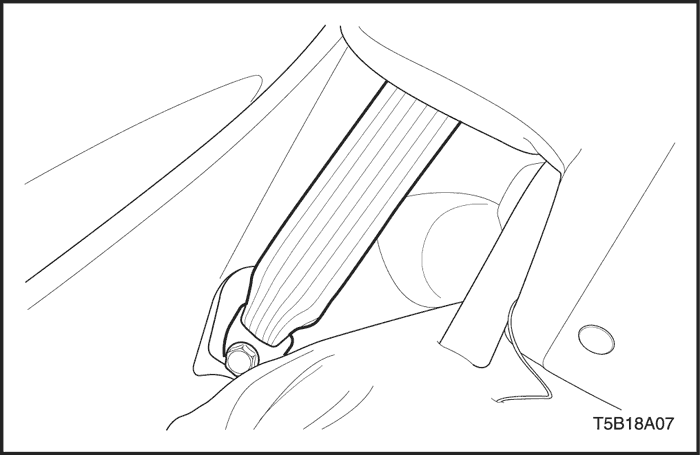
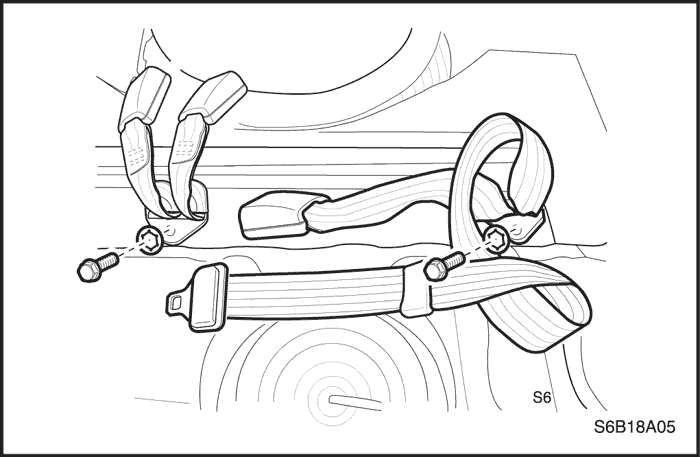
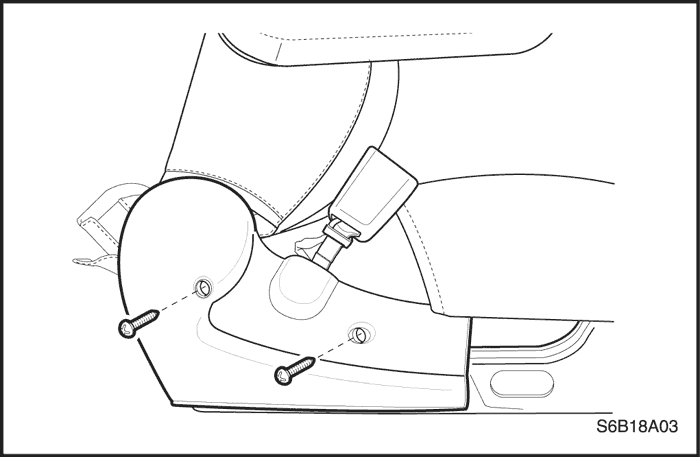
- Remove the bolt and the seat belt anchor on the upper B-pillar.
- Remove the lower B-pillar trim panel. Refer to Section 9G, InteriorTrim.
- Remove the bolt and the seat belt anchor on the lower B-pillar.
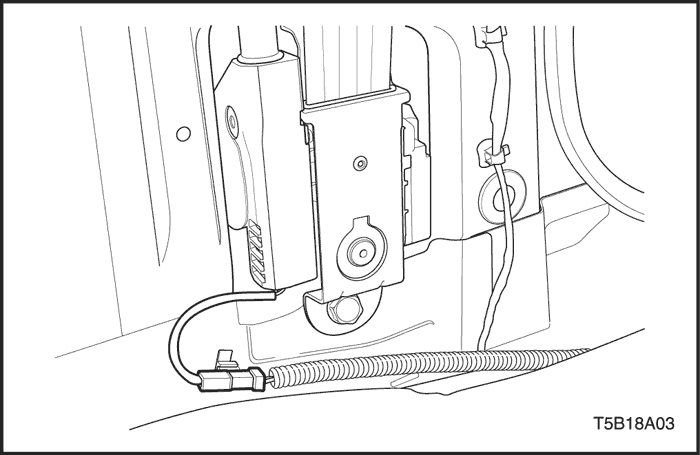
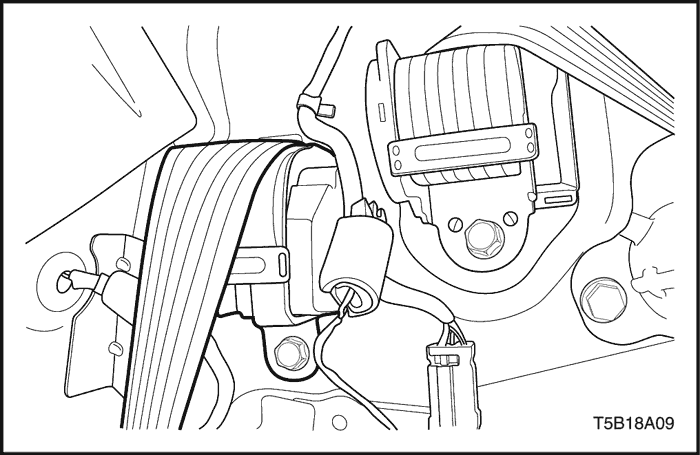
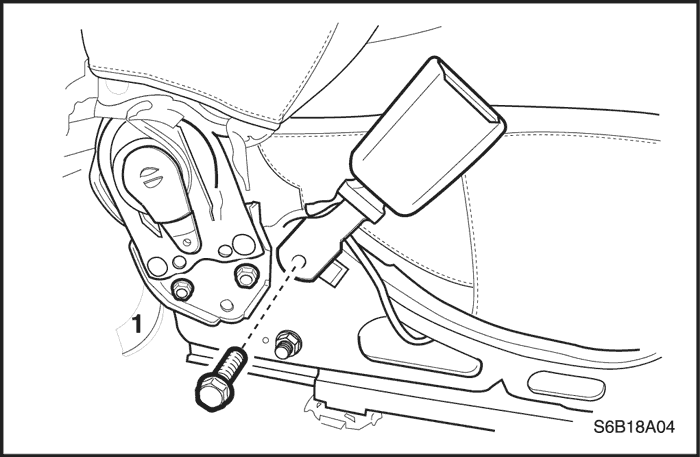
- Disconnect the connector of belt pretensioner, if equipped.
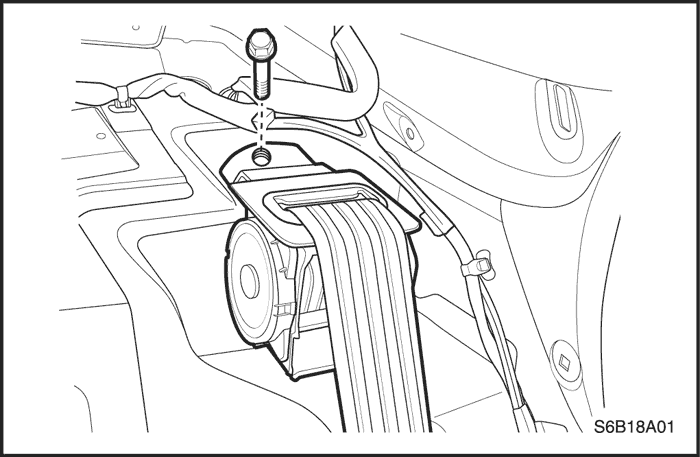
- Remove the bolt and the seat belt retractor.
Installation Procedure
Notice : Dissimilar metals in direct contact with each other may corrode rapidly. Make sure to use the correct fasteners to prevent premature corrosion.
- Install the seat belt retractor with the bolt.
Tighten
Tighten the seat belt retractor bolt to 38 N•m (28 lb-ft).
- Connect the connector of belt pretensioner, if equipped.
- Install the seat belt anchor to the upper B-pillar with the bolt.
Tighten
Tighten the seat belt anchor bolt to 38 N•m (28 lb-ft).
- Install the lower B-pillar trim panel. Refer to Section 9G, InteriorTrim.
- Install the seat belt anchor to the lower B-pillar with the bolt.
Tighten
Tighten the seat belt anchor bolt to 38 N•m (28 lb-ft).
- Connect the negative battery cable.

Front Seat Belt Height Adjuster
Removal Procedure
- Remove the upper B-pillar trim panel. Refer to Section 9G, Interior Trim.
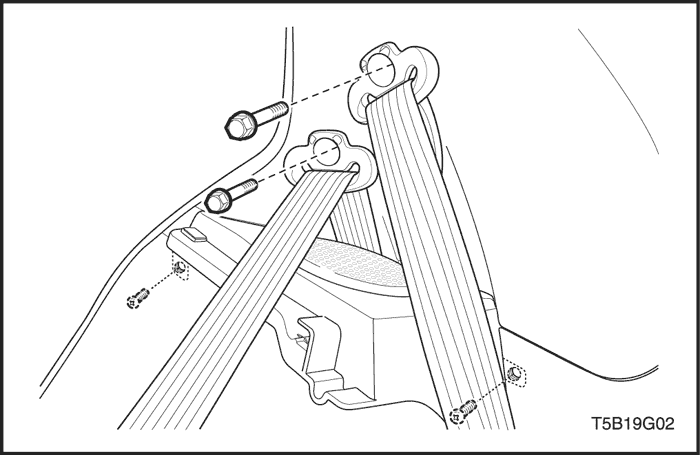
- Remove the bolts and the seat belt height adjuster.
Installation Procedure
Note : Dissimilar metals in direct contact with each other may corrode rapidly. Make sure to use the correct fasteners to prevent premature corrosion.
- Install the seat belt height adjuster with the bolts.
Tighten
Tighten the seat belt height adjuster bolts to 27 N•m (20 lb-ft).
- Install the upper B-pillar trim panel. Refer to Section 9G, Interior Trim.
Three-Point Rear Seat Belt - Notchback -
Removal Procedure
- Remove the bolt and the seat belt anchor on the wheelhouse trim panel.
- Remove the upper back panel shelf. Refer to Section 9G, Interior Trim.
- Remove the bolt and the seat belt retractor.
Installation Procedure
- Install the seat belt retractor with bolt.
Tighten
Tighten the seat belt retractor bolt to 38 N•m (28 lb-ft).
- Install the upper back panel shelf. Refer to Section 9G, Interior Trim.
- Install the seat belt retractor with bolt.
Tighten
Tighten the seat belt anchor bolt to 38 N•m (28 lb-ft).
Three-Point Rear Center or Outboard Seat Belt - Hatchback -
Removal Procedure
- Remove the bolt and the seat belt lower anchor in case of outboard seat belt.
- Open the luggage compartment.
- Remove the luggage compartment wheel house trim panel. Refer to Section 9G, Interior Trim.
- Remove the bolt and the seat belt retractor in the luggage compartment.
- Remove the screws and the load floor rear compartment cover. Refer to
- Remove the bolt and the seat belt anchor.
Installation Procedure
- Install the bolt and the seat belt retractor in the luggage compartment with bolt.
Tighten
Tighten the seat belt retractor bolt to 38 N•m (28 lb-ft).
- Install the seat belt anchor on the C-pillar.
Tighten
Tighten the seat belt anchor bolt to 38 N•m (28 lb-ft).
- Install the load floor rear compartment cover with screws.
- Install the luggage compartment wheelhouse trim panel. Refer to Section 9G, Interior Trim.
Two-Point Rear Center Seat Belt and Buckle
Removal Procedure
- Remove the rear seat cushion. Refer to Section 9H, Seats.
- Remove the bolt and the seat belt, buckle.
Installation Procedure
- Install the seat belt and buckle with bolt.
Tighten
Tighten the seat belt retractor bolt to 38 N•m (28 lb-ft).
- Install the rear seat cushion. Refer to Section 9H, Seats.
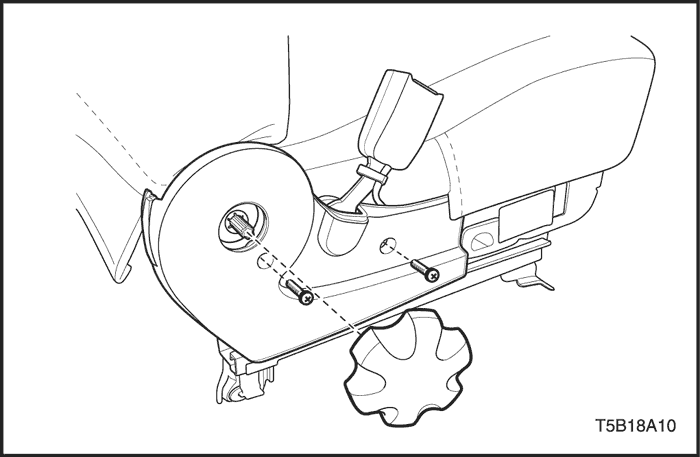
Front Seat Belt Buckle - Equipped with Seat Recliner of Dial Type
Removal Procedure
- Remove the seat recliner lever.
- Remove the screw and the buckle cover.
- Remove the bolt and the seat belt buckle.
- For driver side, disconnect the electrical connector.
Installation Procedure
- Install the seat belt buckle with bolt.
Tighten
Tighten the seat belt buckle bolt to 38 N•m (28 lb-ft).
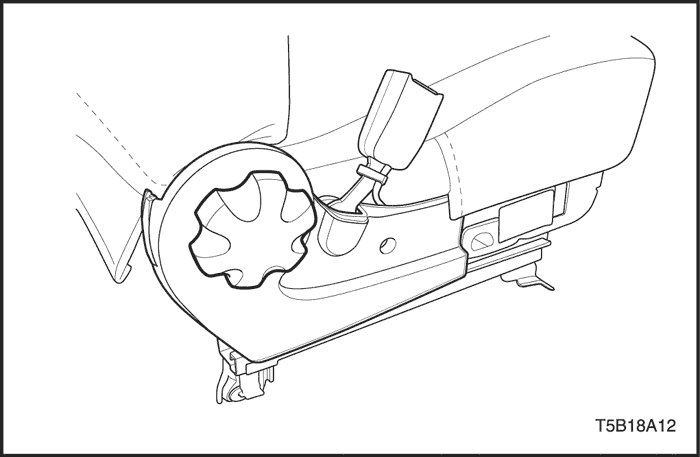
- Install the buckle cover and the seat recliner lever.
- For driver side, connect the electrical connector.
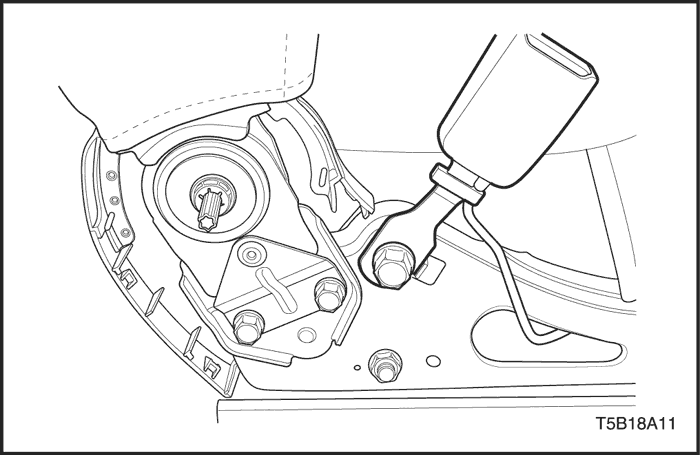
Front Seat Belt Buckle - Equipped with Seat Recliner of Lever Type
Removal Procedure
- Remove the screw and the buckle cover.
- Remove the bolt and the seat belt buckle.
- For driver side, disconnect the electrical connector.
Installation Procedure
- Install the seat belt buckle with bolt.
Tighten
Tighten the seat belt buckle bolt to 38 N•m (28 lb-ft).
- Install the buckle cover with screws.
- For driver side, connect the electrical connector.
Rear Seat Belt Buckle
Removal Procedure
- Remove the rear seat cushion. Refer to Section 9H, Seats.
- Remove the seat belt buckle with bolt.
Installation Procedure
- Install the seat belt buckle with bolt.
Tighten
Tighten the seat belt buckle bolt to 38 N•m (28 lb-ft).
- Install the rear seat cushion. Refer to Section 9H, Seats.
GENERAL DESCRIPTION AND SYSTEM OPERATION
Driver Seat Belt Warning
The seat belt reminder system is a system alerting with sound and light when the seat belt is unbelted.
The severity of warning level depends on the vehicle status and is signalized for driver with an seat belt warning lamp and sound.
Once the ignition turn on, seat belt warning lamp will turn on for 5 seconds and turn off for 2 seconds regardless of seat belt wearing. After this if the seat belt is unbelted, warning lamp will flash for 90 seconds and then illuminate until the seat belt is belted. At this time if the seat belt is belted, warning lamp will turn off at once.
The seat belt reminder after this will follow the below process according to vehicle status.
Vehicle Status
|
Warning Lamp
|
Warning Sound
|
|
Unbelted and vehicle speed < 22km/h
|
Flashes(1Hz)
|
OFF
|
|
Unbelted and vehicle speed ≥ 22km/h
|
Flashes(1Hz)
|
ON
|
Pretensioner Front Seat Belt - Only Western Europe -
The pretensioner front seat belt is standard. It contains a mechanically controlled pyrotechnical retractor which reduces the seat belt slack when it is activated in a head-on or angled front collision. The pretensioner front seat belt must be replaced after an accident that causes its activation.
Three-Point ELR Front and Rear Seat Belt
The three-point emergency locking retractor (ELR) seat belt is always unlocked, allowing the passenger freedom of movement, except in emergencies (rapid deceleration, rapid acceleration, or hard cornering maneuvers).
Two-Point LAP Rear Center Seat Belt
The two-point lap rear center seat belt is a single continuous length of webbing. The webbing is routed from the anchor through a latch plate and into a single retractor.
Operational and Functional Checks
Caution :
- Keep sharp objects and potentially damaging objects away from the seat belts.
- Avoid bending or damaging any portion of the buckle or the latch plate.
- Do not bleach or dye the belt webbing. Use only mild soap and water in order to clean the belts.
- When installing the seat belt anchor bolts and the screws, start the bolts and the screws by hand in order to prevent crossthreading.
- Do not attempt any repairs on the retractor mechanisms or the covers. Replace any defective assemblies with new assemblies.
- Replace any belts that are cut or damaged in any way.
- Inspect all seat belt anchor bolts and the screws in order to verify that they are secure.
- Inspect the seat belt buckle. The buckle must lock and unlock easily.
- After inserting the latch into the buckle, tug sharply on the belt. The buckle must remain locked.
- Fully extend the shoulder belt portion to make sure that there is no twisting or tears in the belt.
- Let the shoulder belt retract fully. The belt should retract easily.