Brake Drum Surface and Wear Inspection
Special Tools
GE 572 Dial Indicator
For equivalent regional tools, refer to Special Tools .
Warning: Refer to Brake Dust Warning in the Preface section.
- Remove brake drum. Refer to Brake Drum Replacement .
- Inspect the braking surface of the brake drum for the following braking surface conditions:
| • | Heavy rust and/or pitting |
| | Light surface rust can be removed with an abrasive disc; heavy surface rust and/or pitting must be removed by refinishing the drum. |
| • | Cracks and/or heat spots |
| • | Excessive blueing discolouration |
| • | Missing balance weights |

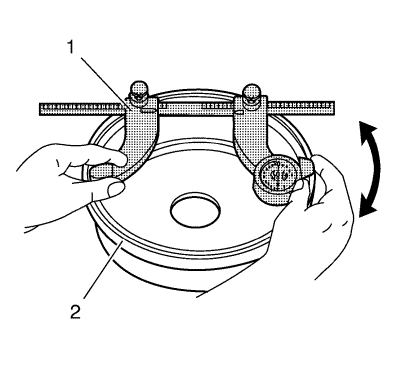
- Using a brake drum micrometre (1) calibrated in thousandths-of-an-inch, measure and record any grooves present on the drum braking surface.
Ensure that the measurements are only taken within the brake shoe lining contact area.
- Compare the groove, or scoring depth recorded to brake drum component specification. Refer to Drum Brake Component Specifications .
- If the brake drum scoring depth exceeds the specification, or if an excessive amount of scoring is present, the drum requires refinishing or replacement. Refer to Brake Drum Replacement or Rear Brake Drum Refinishing .
- Mount the brake drum on a brake lathe.

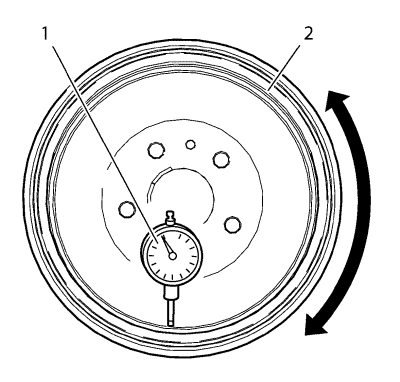
- Mount a dial indicator, GE 572 dial indicator (1) or equivalent, and position the indicator button so it contacts the braking surface of the brake drum (2) at a 90 degree angle, approximately 19 mm (0.75 in) from the outer edge of the drum.
- Measure and record the radial runout of the brake drum.
| 8.1. | Rotate the drum until the lowest reading is displayed on the indicator dial, then zero the dial. |
| 8.2. | Rotate the drum until the highest reading is displayed on the dial. |
| © Copyright Chevrolet. All rights reserved |

