Engine Oil and Oil Filter Replacement
Removal Procedure
- Remove engine cover. Refer to Engine Cover Replacement .
- Remove air cleaner assembly. Refer to Air Cleaner Assembly Replacement .

Note: Check the engine oil maintenance interval and replace the engine oil filter according to the interval. Also, you can check the engine oil remaining life in the scan tool.
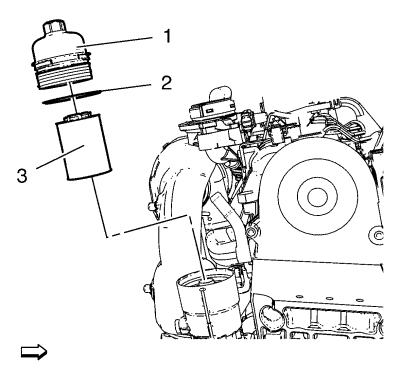
- Remove oil filter cap (1).
- Remove the oil filter cap seal (2)
- Remove and properly dispose of the oil filter insert (3).
- Raise the vehicle by its full height. Refer to Lifting and Jacking the Vehicle .
- Remove the front compartment insulator. Refer to Front Compartment Insulator Replacement .
- Drain the engine oil into collecting basin.

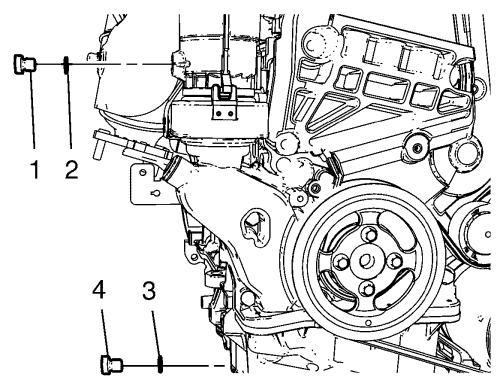
- Remove the sump oil drain bolt (4) with sump oil drain bolt gasket (3).
- Remove the oil filter housing oil drain bolt (1) with oil filter housing drain gasket (2) and drain the engine oil in the oil filter housing.
Installation Procedure
- Clean the sump oil drain bolt thread and the sump thread.
- Clean the oil filter housing drain bolt thread and the oil filter housing thread.

- Install an NEW sump oil drain bolt gasket (3).
Caution: Refer to Fastener Caution in the Preface section.
- Install the sump oil drain bolt (4) and tighten to 35 N·m (26 lb ft).
- Install an NEW oil filter housing oil drain bolt gasket (3).
- Install the sump housing oil drain bolt (1) and tighten to 10 N·m (89 lb in).
- Install the front compartment insulator. Refer to Front Compartment Insulator Replacement .
- Lower the vehicle full height.

- Install a NEW the oil filter insert (3).
- Install a NEW oil filter cap seal (2)
- Install the oil filter cap (1) and tighten to 25 N·m (19 lb ft).
Note: Use specified type of engine oil with the specified viscosity class. Refer to Adhesives, Fluids, Lubricants, and Sealers .
- Fill in NEW engine oil.
- Start the engine and allow it to run until the oil pressure control indicator goes off.
- Inspect the engine oil level with oil level indicator.
- After changing the engine oil, reset ECM program by using the scan tool.
| © Copyright Chevrolet. All rights reserved |


