Cruze |
||||||||
|
|
|
|||||||
| Table 1: | 3-5 Reverse Clutch Plates Installation |
| Table 2: | Reluctor Wheel and Piston Installation |
| Table 3: | 4-5-6 Clutch Piston Installation |
| Table 4: | 4-5-6 Clutch Fluid Dam Installation |
| Table 5: | 4-5-6 Clutch Plates Installation |
| Table 6: | Turbine Shaft Installation |
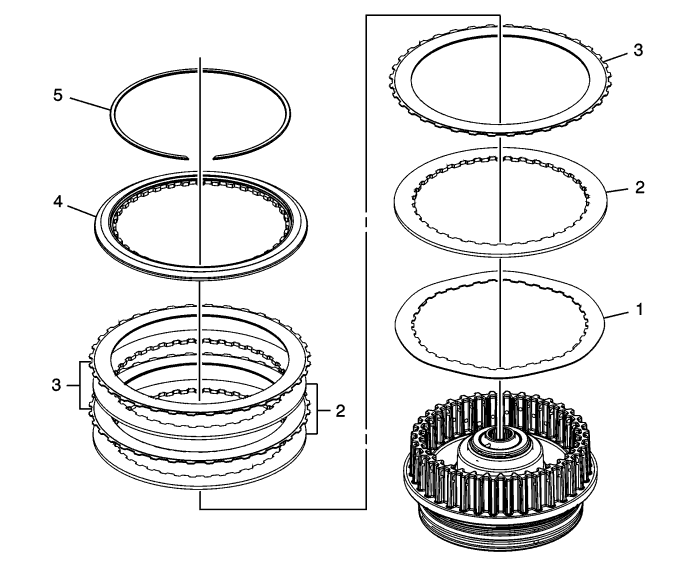
Callout | Component Name |
|---|---|
1 | 3-5 Reverse Clutch Apply Plate (Waved) |
2 | 3-5 Reverse Clutch Plate (Qty: 3) |
3 | 3-5 Reverse Clutch Plate Assembly (Qty: 3) |
4 | 3-5 Reverse Clutch Backing Plate |
5 | 3-5 Reverse Clutch Backing Plate Ring Retainer Ring |
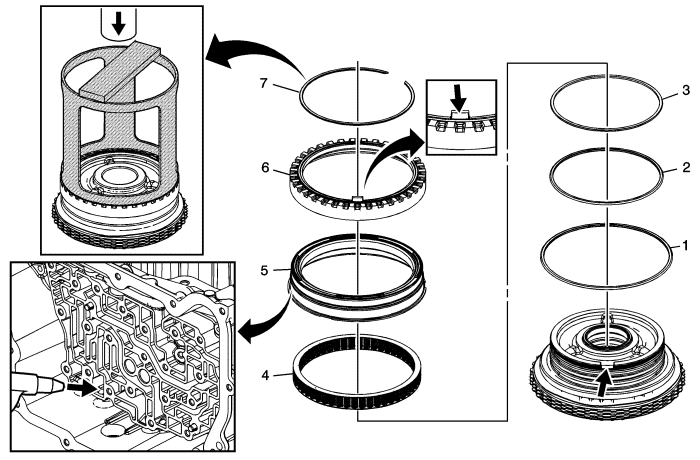
Callout | Component Name |
|---|---|
1 | 3-5 Reverse Clutch Piston Dam Seal (Black) |
2 | 3-5 Reverse Clutch Piston Inner Seal |
3 | 3-5 Reverse Clutch Piston Inner (Reluctor) Seal (Yellow) |
4 | 3-5 Reverse Clutch Piston Return Spring Assembly |
5 | 3-5 Reverse Clutch Piston |
6 | Input Shaft Speed Sensor Reluctor Wheel |
7 | Input Shaft Speed Sensor Reluctor Ring Retainer Ring Caution: Compress the reluctor wheel just enough to clear the retainer. Over compressing the reluctor wheel will break the alignment tab and the clutch housing. Caution: Regulate the air pressure to 40 psi maximum. High pressure could cause the piston to over travel and damage the piston seals. Tip Special ToolDT-48866 Piston Spring Compressor For equivalent regional tools, refer to Special Tools . |
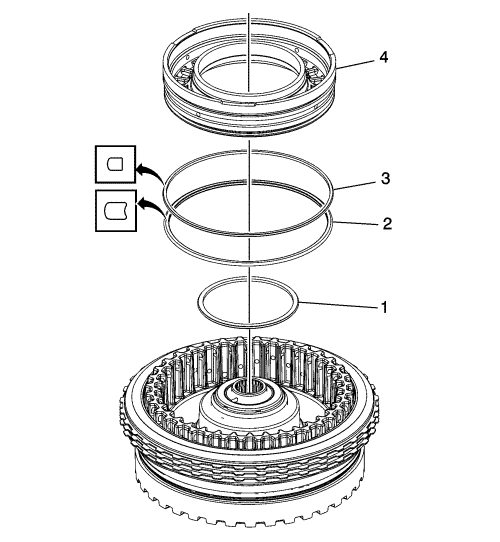
Callout | Component Name | ||||
|---|---|---|---|---|---|
1 | 4-5-6 Clutch Piston Inner Seal | ||||
2 | 4-5-6 Clutch Piston Outer Seal (Large) (Rounded) | ||||
3 | 4-5-6 Clutch Piston Outer Seal (Green) (Stepped) | ||||
4 | 4-5-6 Clutch Piston Tip
Special ToolsDT-48903 Spring Compressor For equivalent regional tools, refer to Special Tools . |
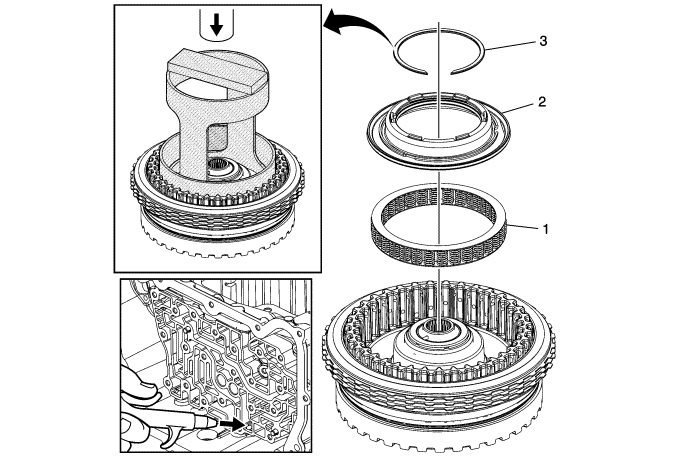
Callout | Component Name | ||||
|---|---|---|---|---|---|
1 | 4-5-6 Clutch Piston Return Spring Assembly | ||||
2 | 4-5-6 Clutch Piston Fluid Dam Assembly Tip | ||||
3 | 4-5-6 Clutch Dam Retaining Ring Caution: Regulate the air pressure to 40 psi maximum. High pressure could cause the piston to over travel and damage the piston seals. Procedure
Special ToolDT-48903 Spring Compressor For equivalent regional tools, refer to Special Tools . |
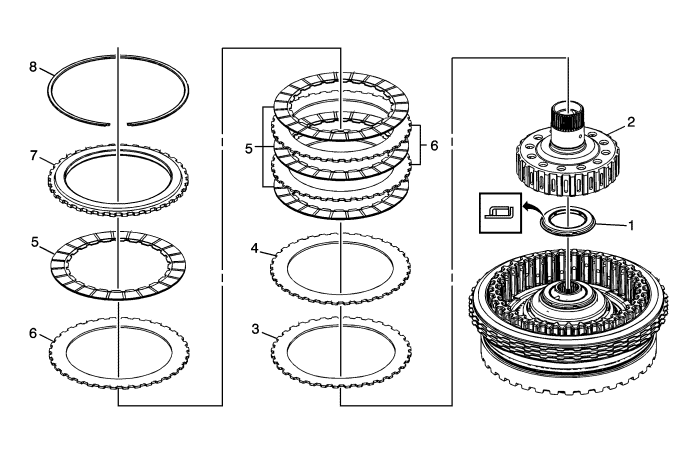
Callout | Component Name |
|---|---|
1 | Reaction Carrier Hub Thrust Bearing Assembly |
2 | Reaction Carrier Hub Assembly |
3 | 4-5-6 Clutch Wave Plate |
4 | 4-5-6 Clutch Apply Plate |
5 | 4-5-6 Clutch Plate Assembly (Qty: 4) |
6 | 4-5-6 Clutch Plate (Qty: 3) |
7 | 4-5-6 Clutch Backing Plate |
8 | 4-5-6 Clutch Backing Plate Retaining Ring |
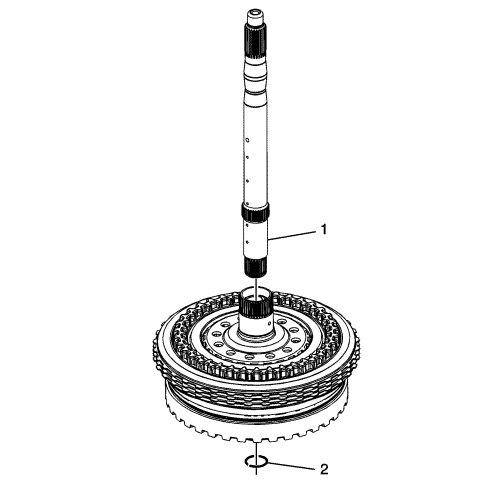
Callout | Component Name |
|---|---|
1 | Turbine Shaft |
2 | Turbine Shaft Retainer Ring Tip Special ToolsGE 5586-A Circlip Pliers or equivalent |
| © Copyright Chevrolet. All rights reserved |