Cruze |
||||||||
|
|
|
|||||||

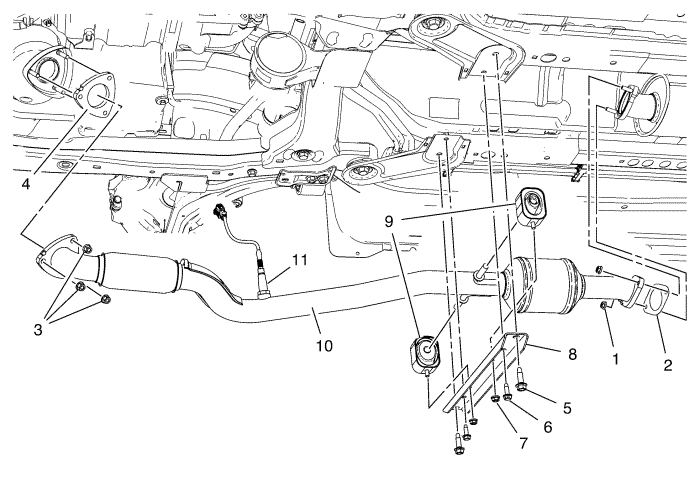
Callout | Component Name |
|---|---|
|
Warning: In order to avoid being burned, do not service the exhaust system while it is still hot. Service the system when it is cool. Warning: Always wear protective goggles and gloves when removing exhaust parts as falling rust and sharp edges from worn exhaust components could result in serious personal injury. Caution: Do not bend the exhaust flex pipe more than 10 degrees in any direction. Bending of more than 10 degrees or twisting in a range of ±0.5 degrees will damage the exhaust flex decoupler. Preliminary Procedures
| |
1 | Exhaust Front Pipe to Exhaust Silencer Nut (Qty: 2) Caution: Refer to Fastener Caution in the Preface section. Caution: Refer to Torque-to-Yield Fastener Caution in the Preface section. Procedure
Tighten |
2 | Exhaust Front Pipe Gasket to Exhaust Silencer |
3 | Catalytic Converter to Exhaust Front Pipe Nuts (Qty: 3) ProcedureInstall NEW nuts, do NOT reuse old nuts. Tighten |
4 | Catalytic Converter to Exhaust Front Pipe Gasket |
5 | Drivetrain and Front Suspension Frame Support Bolts - M10 (Qty: 2) ProcedureInstall NEW bolts, do NOT reuse old bolts. Tighten |
6 | Exhaust Pipe Front Hanger Bracket Bolts - M8 (Qty: 2) Tighten |
7 | Exhaust Pipe Front Hanger Insulator Nuts (Qty: 2) Tighten |
8 | Exhaust Pipe Front Hanger Bracket |
9 | Exhaust Silencer Insulator (Qty: 2) |
10 | Exhaust Front Pipe Assembly |
11 | Heated Oxygen Sensor Tighten |
| © Copyright Chevrolet. All rights reserved |