To the top of the document
Cruze
   
GMDE Start Page Load static TOC Load dynamic TOC Help?

Exhaust Particulate Filter Replacement - 1.7L Diesel LPL and LPV

Removal Procedure

  1. Remove the front compartment insulator. Refer to Front Compartment Insulator Replacement .

  2. 2191960

    Warning: In order to avoid being burned, do not service the exhaust system while it is still hot. Service the system when it is cool.

    Note: Avoid Cable or wiring damage when removing the heated oxygen sensor.
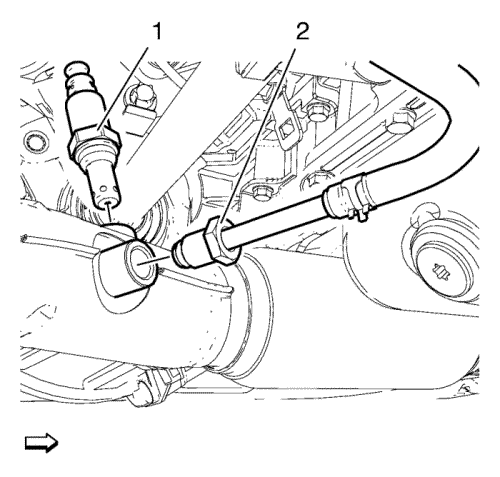
  3. Remove the heated oxygen sensor (1) and hang to one side.
  4. Remove the exhaust pressure sensor (2) and hang to one side.

  5. 2191961
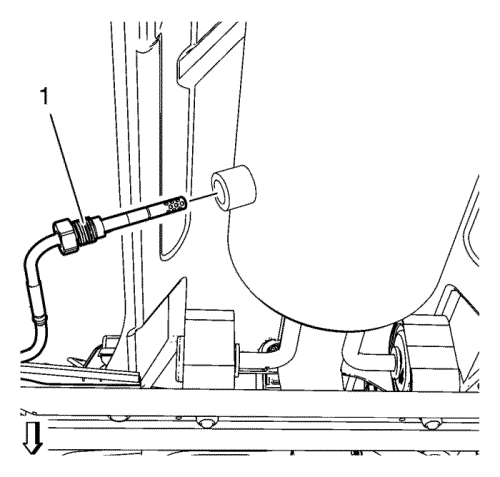
  6. Remove the exhaust temperature sensor (1) and hang to one side.
  7. Caution: Refer to Exhaust Flexible Pipe Bending Caution in the Preface section.

    2192121
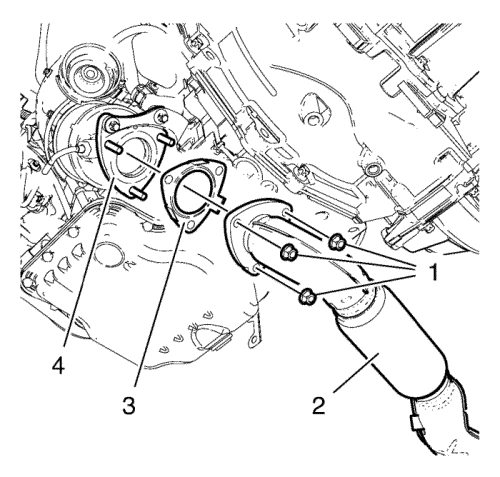
  8. Remove the 3 nuts (1) and fix the flex pipe in order to avoid damage.
  9. Separate the exhaust front pipe and particulate filter assembly (2) from the catalytic converter (4) and remove the exhaust front pipe and particulate filter assembly gasket (3).

  10. 2192116
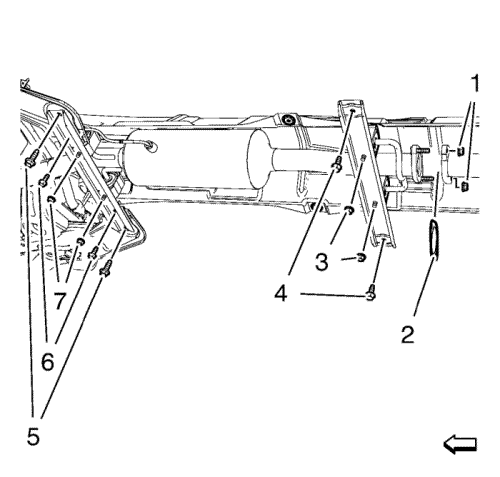
  11. Remove the 2 nuts (1) and the gasket (2).
  12. Remove and DISCARD the 2 bolts (4).
  13. Remove the 2 nuts (3).
  14. Remove the 2 nuts (7).
  15. Remove and DISCARD the 2 bolts (5).
  16. Remove the 2 bolts (6).
  17. Remove the exhaust front pipe and particulate filter assembly.

Installation Procedure

    Caution: Refer to Exhaust Flexible Pipe Bending Caution in the Preface section.
  1. Install the exhaust front pipe and particulate filter assembly.

  2. 2192116
  3. Install a NEW gasket (2).
  4. Caution: Refer to Fastener Caution in the Preface section.

  5. Install the 2 nuts (1) and tighten to 22 N·m (16 lb ft)
  6. Caution: Refer to Torque-to-Yield Fastener Caution in the Preface section.

  7. Install 4 NEW bolts (4, 5) and tighten in two passes:
  8. • First pass: 60 N·m (44 lb ft)
    • Second pass: +30°-45°
  9. Install the 2 nuts (3) and tighten to 22 N·m (16 lb ft)
  10. Install the 2 nuts (7) and tighten to 22 N·m (16 lb ft).
  11. Install the 2 bolts (6) and tighten to 22 N·m (16 lb ft).

  12. 2192121
  13. Install a NEW gasket (3).
  14. Install the exhaust front pipe and particulate filter assembly (2) to the catalytic converter (4).
  15. Install the 3 nuts (1) and tighten to 25 N·m (18 lb ft).

  16. 2191961
  17. Install the exhaust temperature sensor (1) and tighten to 45 N·m (33 lb ft).

  18. 2191960

    Warning: In order to avoid being burned, do not service the exhaust system while it is still hot. Service the system when it is cool.

    Note: Avoid Cable or wiring damage when installing the heated oxygen sensor.

  19. Install the heated oxygen sensor (1) and tighten to42 N·m (31 lb ft).
  20. Install the exhaust pressure sensor (2) and tighten to 45 N·m (33 lb ft).
  21. Install the front compartment insulator. Refer to Front Compartment Insulator Replacement .
  22. Note: After the replacement of the exhaust particulate filter, use a scan tool to perform the appropriate reset function. Refer to Engine Control Module Programming and Setup : LNP → LUW, LUJ → LLW → LXT → LXV, 2H0 .

  23. Lower the vehicle.


© Copyright Chevrolet. All rights reserved