Inlet Manifold Replacement
Special Tools
| • | EN-34730-91 Fuel Pressure Gauge |
For equivalent regional tools, refer to Special Tools .
Removal Procedure
Warning: Petrol or petrol vapours are highly flammable. A fire could occur if an ignition source is present. Never drain or store petrol or diesel fuel in an open container, due to the possibility of fire or explosion. Have a dry chemical (Class B) fire extinguisher nearby.
Warning: Always wear safety goggles when working with fuel in order to protect the eyes from fuel splash.
- Open the bonnet.
- Disconnect the battery negative cable. Refer to
Battery Negative Cable Disconnection and Connection : without Start/Stop System .
- Remove the dash upper extension panel opening cover. Refer to Dash Upper Extension Panel Opening Cover Replacement .
- Place a drip pan underneath.
- Relieve the fuel pressure, using the test connection with EN-34730-91 gauge .
- Remove the air cleaner outlet duct. Refer to Air Cleaner Outlet Duct Replacement .
- Raise and support the vehicle. Refer to Lifting and Jacking the Vehicle .
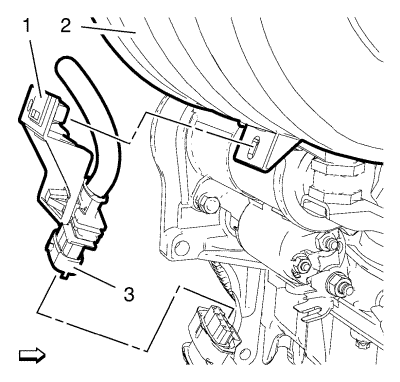
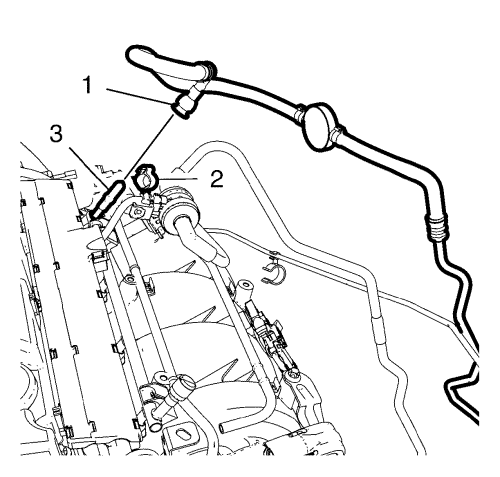
- Disconnect the oxygen wiring harness (3).
- Remove the wiring harness bracket (1) from the inlet manifold (2).
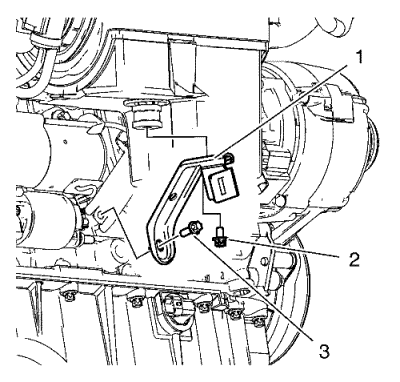
- Remove the 2 intake manifold brace bolts (2, 3).
- Remove the intake manifold brace (1).
- Lower the vehicle.
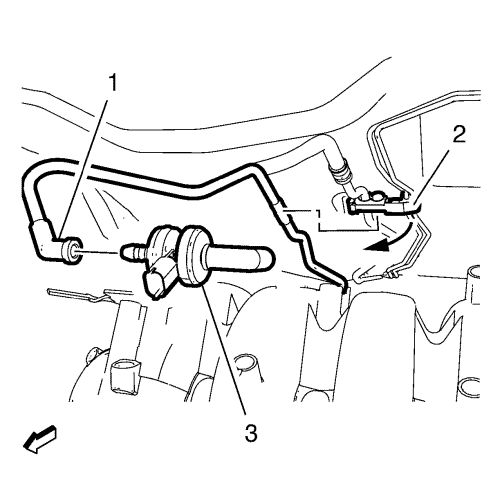
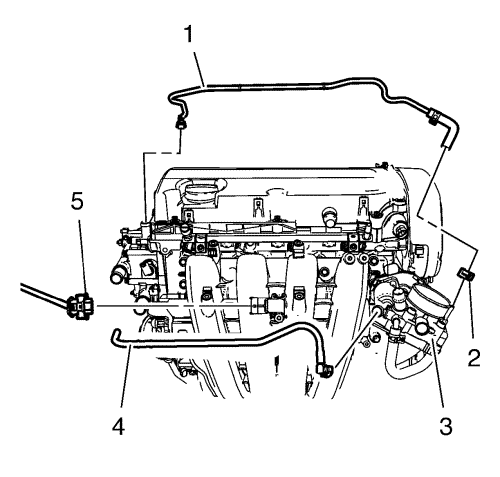
- Remove the fuel tank vent pipe (1) from the evaporative emission canister purge solenoid valve (3). Refer to Plastic Collar Quick Connect Fitting Service .
- Close the fuel tank vent pipe (1) with EN-6015 closure plugs .
- Disconnect wiring harness plug (3).
- Disconnect the pipe (5) from the evaporative emission canister purge solenoid valve (2) to intake manifold (4). Refer to Plastic Collar Quick Connect Fitting Service .
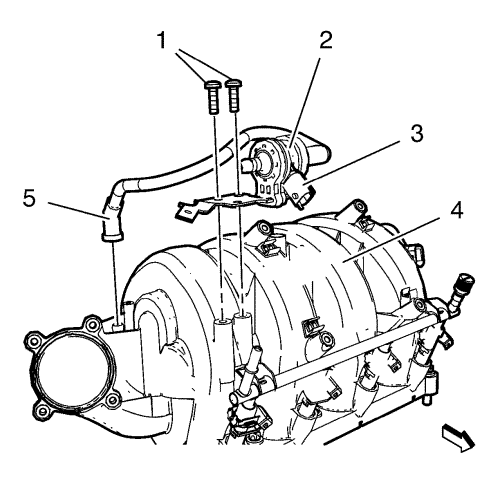
- Remove the 2 evaporative emission canister bracket bolts (1).
- Remove the evaporative emission canister purge solenoid valve (2) and the rubber mounting from the intake manifold (4).
- Close the fuel tank vent pipe with EN-6015 closure plugs .
- Unclip the fuel feed pipe (1) from the fuel feed pipe clip (2). Refer to Plastic Collar Quick Connect Fitting Service .
- Release the fuel feed pipe (1) from the multiport fuel injection fuel rail (3).
- Close the fuel feed pipe (1) and the multiport fuel injection fuel rail (3) with CH-807 closure plugs .
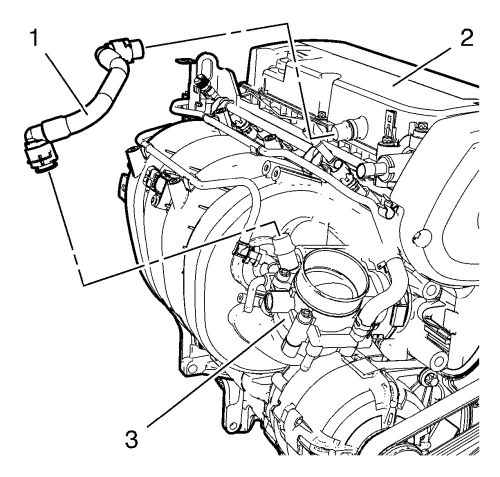
- Remove the positive crankcase ventilation tube (1) from throttle body (3) and the camshaft cover (2). Refer to Plastic Collar Quick Connect Fitting Service .
- Disconnect the manifold absolute pressure sensor wiring harness plug (5).
- Remove the clamp (2) and remove the throttle body heater inlet hose (1) from the throttle body (3). Refer to Plastic Collar Quick Connect Fitting Service .
- Disconnect the throttle body heater outlet hose (4) from the throttle body (3). Refer to Plastic Collar Quick Connect Fitting Service .
- Remove the engine management wiring harness and the fuel injectors wiring harness.
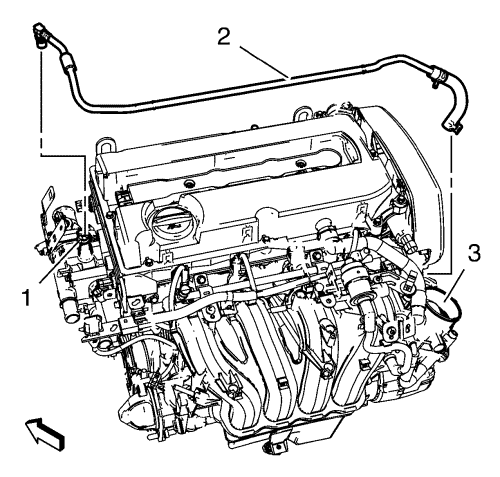
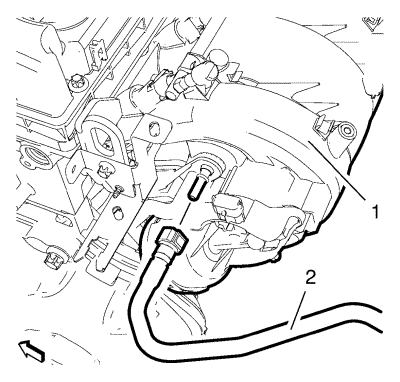
- Disconnect the throttle body heater inlet hose connector from the engine coolant thermostat housing (1). Refer to Plastic Collar Quick Connect Fitting Service .
- Remove the throttle body heater inlet hose (2).
- Remove the throttle body assembly. Refer to
Throttle Body Assembly Replacement : 1.6L LDE, LXV, 1.8L 2H0, and LUW .
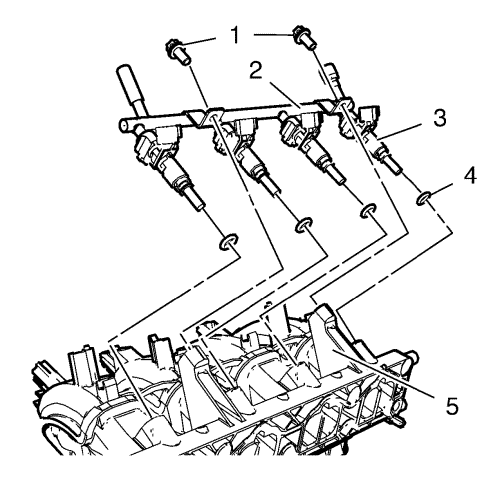
- Remove the 2 multiport fuel injection fuel rail bolts (1).
- Remove the multiport fuel injection fuel rail (2) and the fuel injectors (4) from the inlet manifold (5).
- Remove the 4 multiport fuel injector seals (4).
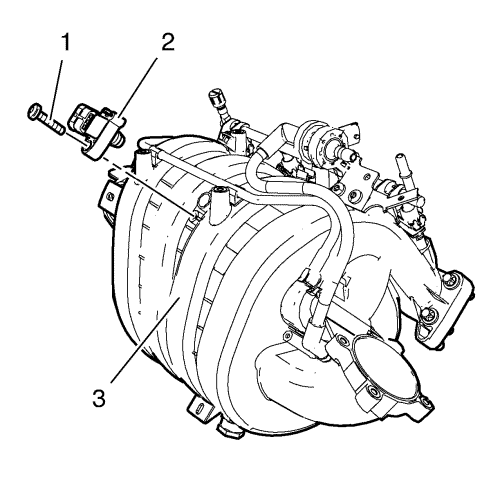
- Remove the manifold absolute pressure sensor bolt (1).
- Remove the manifold absolute pressure sensor (2) from the intake manifold (3).
- Disconnect the servo unit vacuum pipe (2) from the inlet manifold (1).
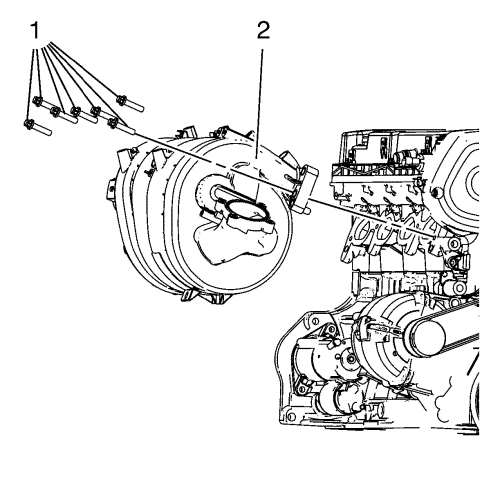
- Remove the 7 intake manifold bolts (1).
- Remove the intake manifold (2).
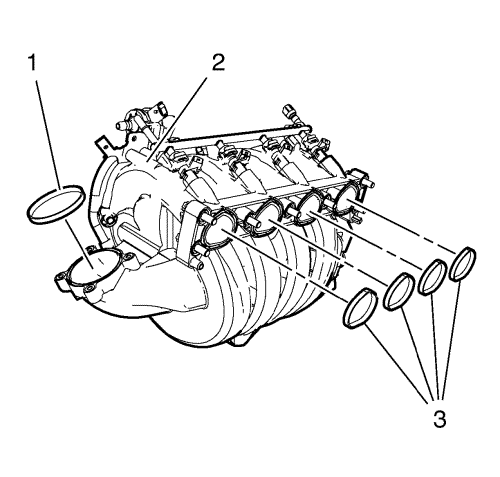
- Remove the inlet manifold gaskets (1, 3) from the inlet manifold (2).

- Remove the rubber bracket (2) from the inlet manifold (1).
Cleaning and Inspection Procedure
Clean and inspect the intake manifold. Refer to
Inlet Manifold Cleaning and Inspection : LDE, LED, LFJ, LXV, 2H0, LUW, LFH .
Installation Procedure
- Clean the sealing surfaces.
- Install the rubber bracket (2) to the inlet manifold (1).
- Install the NEW gaskets (1, 3) to the inlet manifold (2).
Caution: Refer to Fastener Caution in the Preface section.
- Install the intake manifold (2) and the 7 intake manifold bolts (1) and tighten to 20 N·m (15 lb ft).
- Install the manifold absolute pressure sensor (2) to the intake manifold (3).
- Install the manifold absolute pressure sensor bolt (1) and tighten to 6 N·m (53 lb in).
- Install the 4 multiport fuel injector seals (4).
- Install the multiport fuel injection fuel rail (2) and the fuel injectors (3) to the intake manifold (5).
- Install the 2 multiport fuel injection fuel rail bolts (1) and tighten to 8 N·m (71 lb in).
- Connect the servo unit vacuum pipe (2) to the inlet manifold (1).
- Install the throttle body assembly. Refer to
Throttle Body Assembly Replacement : 1.6L LDE, LXV, 1.8L 2H0, and LUW .
- Install the throttle body heater inlet hose (2).
- Connect the throttle body heater inlet hose (2) to the engine coolant thermostat housing (1). Refer to Plastic Collar Quick Connect Fitting Service .
- Connect the throttle body heater outlet hose (4) to the throttle body (3). Refer to Plastic Collar Quick Connect Fitting Service .
- Install the throttle body heater inlet hose (1) to the throttle body (3) install the clamp (2).
- Connect the manifold absolute pressure sensor wiring harness plug (5).
- Install the engine management wiring harness and the fuel injectors wiring harness.
- Install the positive crankcase ventilation tube (1) to the throttle body (3) and to the camshaft cover (2). Refer to Plastic Collar Quick Connect Fitting Service .
- Remove the CH-807 closure plugs from the fuel feed pipe (1) and the multiport fuel injection fuel rail (3).
- Install the fuel feed pipe (1) to the multiport fuel injection fuel rail (3). Refer to Plastic Collar Quick Connect Fitting Service .
- Clip the fuel feed pipe (1) into the fuel feed pipe clip (2).
- Install the evaporative emission canister purge solenoid valve (2) and the rubber mounting to the inlet manifold (4).
- Install the 2 evaporative emission canister bracket bolts (1) and tighten to 8 N·m (71 lb in).
- Connect the pipe (5) to the evaporative emission canister purge solenoid valve (2) and to the inlet manifold (4). Refer to Plastic Collar Quick Connect Fitting Service .
- Connect wiring harness plug (3).
- Remove the EN-6015 closure plug from the fuel tank vent pipe (1).
- Install the fuel tank vent pipe (1) to the evaporative emission canister purge solenoid valve (3). Refer to Plastic Collar Quick Connect Fitting Service .
- Raise the vehicle.
- Install the intake manifold brace (1).
- Install the 2 intake manifold brace bolts (2; 3) and tighten to 8 N·m (71 lb in).
- Install the wiring harness bracket (1) to the inlet manifold (2).
- Connect the oxygen wiring harness (3).
- Lower the vehicle.
- Install the air cleaner outlet duct. Refer to Air Cleaner Outlet Duct Replacement .
- Install the dash upper extension panel opening cover. Refer to Dash Upper Extension Panel Opening Cover Replacement .
- Connect the battery negative cable. Refer to
Battery Negative Cable Disconnection and Connection : without Start/Stop System .
- Close the bonnet.
| © Copyright Chevrolet. All rights reserved |
| © Copyright Chevrolet. All rights reserved |


