To the top of the document
Captiva
   
GMDE Start Page Load static TOC Load dynamic TOC Help?

Fuel Tank Filler Pipe Replacement

Removal Procedure


    1885419
  1. Drain the fuel tank until the level in the tank is less than 1/4 full. Refer to Fuel Tank Draining .
  2. Disconnect the negative battery cable. Refer to Battery Negative Cable Disconnection and Connection .
  3. Remove the fuel fill cap.
  4. Remove the fuel tank fill pipe housing to fuel tank fill pipe screws (1).

  5. 1885420
  6. Remove the right rear wheelhouse liner. Refer to Rear Wheelhouse Panel Liner Replacement .
  7. Remove the fuel fill pipe upper bracket nut (1).

  8. 1884596
  9. Disconnect the fill pipe vent line quick connect fitting (4) from the fuel tank fresh air line (3). Refer to Plastic Collar Quick Connect Fitting Service .
  10. Disconnect the fuel tank vapour line quick connect fitting (2) from the fill pipe recirculation line (5). Refer to Plastic Collar Quick Connect Fitting Service .
  11. Loosen the fuel fill pipe hose clamp (1) at the fuel tank.
  12. Remove the fuel fill pipe (6) from the fuel tank.

Installation Procedure


    1884596

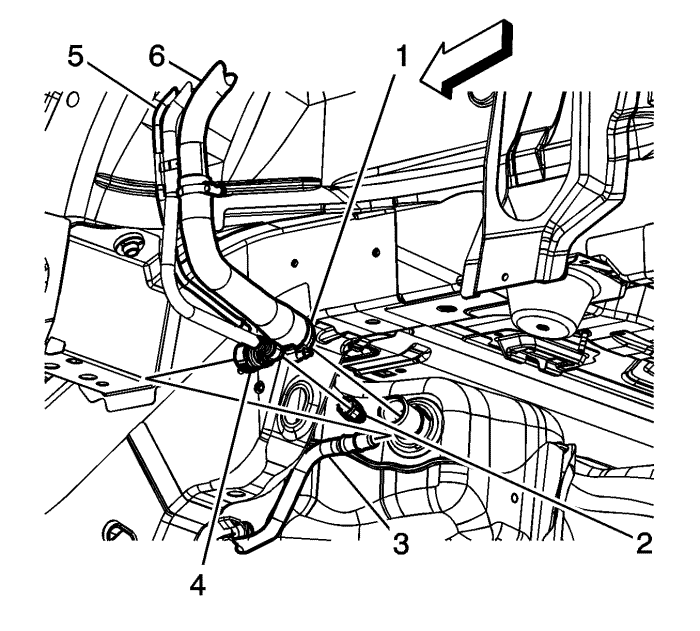
    Note: Ensure that the notch in the fuel fill pipe hose aligns with the locating tab on the fuel tank.

  1. Install the fuel fill pipe (6) to the fuel tank.
  2. Caution: Refer to Fastener Caution in the Preface section.

  3. Tighten the fuel fill pipe hose clamp (1) to 5 N·m (44 lb in) at the fuel tank.
  4. Connect the fuel tank vapour line quick connect fitting (2) to the fill pipe recirculation line (5). Refer to Plastic Collar Quick Connect Fitting Service .
  5. Connect the fill pipe vent line quick connect fitting (4) to the fuel tank fresh air line (3). Refer to Plastic Collar Quick Connect Fitting Service .

  6. 1885420
  7. Install the fuel fill pipe upper bracket nut (1) to 4 N·m (35 lb in).
  8. Install the right rear wheelhouse liner. Refer to Rear Wheelhouse Panel Liner Replacement .

  9. 1885419
  10. Install the fuel tank fill pipe housing to fuel tank fill pipe screws (1) and tighten to 10 N·m (89 lb in).
  11. Install the fuel fill cap.
  12. Connect the negative battery cable. Refer to Battery Negative Cable Disconnection and Connection .


© Copyright Chevrolet. All rights reserved