To the top of the document
Captiva
   
GMDE Start Page Load static TOC Load dynamic TOC Help?

Evaporative Emission Canister Purge Solenoid Valve Replacement - LE5 or LE9

Removal Procedure


    1578477
  1. Remove the intake manifold cover. Refer to Intake Manifold Cover Replacement : LE5 or LE9 .
  2. Disconnect the engine wiring harness electrical connector from the evaporative emission (EVAP) canister purge valve.

  3. 1571757
  4. Disconnect the EVAP canister purge valve tube. Refer to Plastic Collar Quick Connect Fitting Service .
  5. Disconnect the chassis EVAP vapour line from the EVAP canister purge valve. Refer to Plastic Collar Quick Connect Fitting Service .

  6. 1578478
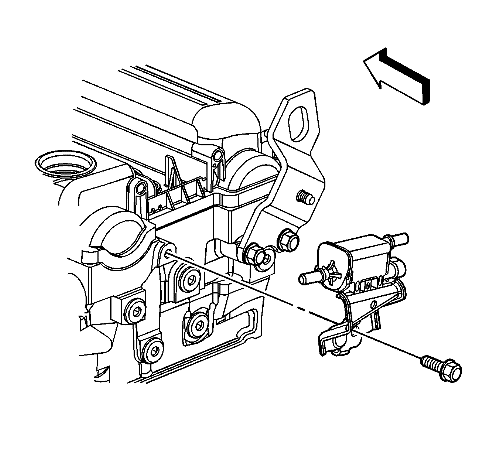
  7. Remove the EVAP canister purge valve bracket bolt.
  8. Remove the EVAP canister purge valve with bracket.
  9. Remove the EVAP canister purge valve from the bracket.
  10. Inspect for carbon release in the EVAP canister purge valve ports. If there is any loose carbon, replace the EVAP canister and any components necessary to remove the carbon particles.

Installation Procedure


    1578478
  1. Install the EVAP canister purge valve to the bracket.
  2. Position the EVAP canister purge valve with bracket to the cylinder head.
  3. Caution: Refer to Fastener Caution in the Preface section.

  4. Install the EVAP canister purge valve bracket bolt.
  5. Tighten
    Tighten the bolt to 25 N·m (18 lb ft).


    1571757
  6. Connect the EVAP canister purge valve tube. Refer to Plastic Collar Quick Connect Fitting Service .
  7. Connect the chassis EVAP vapour line to the EVAP canister purge valve. Refer to Plastic Collar Quick Connect Fitting Service .

  8. 1578477
  9. Connect the engine wiring harness electrical connector to the EVAP canister purge valve.
  10. Install the inlet manifold cover. Refer to Intake Manifold Cover Replacement : LE5 or LE9 .


© Copyright Chevrolet. All rights reserved