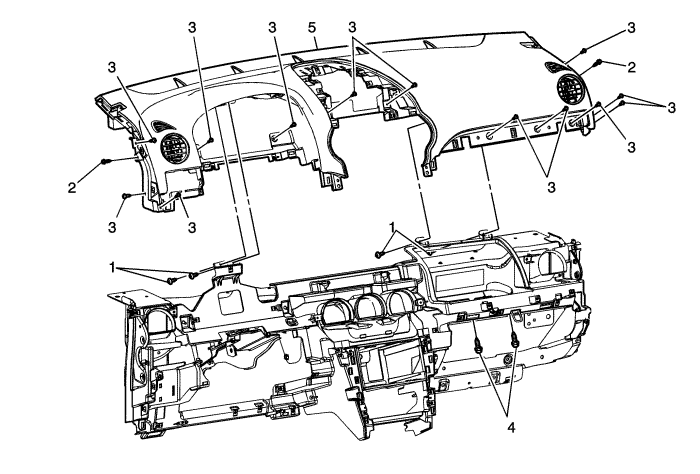
Callout
| Component Name
|
|
Caution: To avoid damage to the vehicle and/or the components of the instrument panel because of hidden fasteners and retainers the instrument panel must be removed from the vehicle as an assembly.
Preliminary Procedures
- Remove the instrument panel assembly. Refer to
Instrument Panel Assembly Replacement : Long Body → Short Body .
- Remove the instrument panel compartment. Refer to
Instrument Panel Compartment Replacement : Long Body → Short Body .
- Remove the HVAC module assembly . Refer to Air Conditioning and Heater Module Assembly Removal and Installation .
- Remove the right instrument panel moulding. Refer to
Instrument Panel Molding Replacement - Passenger Side : Long Body → Short Body .
- Remove the radio front speaker. Refer to
Radio Front Speaker Replacement : Long Body → Short Body .
- Remove the drivers information display assembly. Refer to
Driver Information Display Replacement : Long Body → Short Body .
|
1
| Instrument Panel Trim Panel Screw (Qty: 4)
Caution: Refer to Fastener Caution in the Preface section.
Tip
These 4 screws are driven from the front of car rearward, and are not clearly accessible.
Tighten
2 N·m (18 lb in) |
2
| Instrument Panel Trim Panel Bolt (Qty: 2)
Tighten
10 N·m (89 lb in) |
3
| Instrument Panel Trim Panel Screw (Qty: 13)
Tighten
2 N·m (18 lb in) |
4
| Instrument Panel Inflatable Restraint Lower Bolt (Qty: 2)
Tighten
10 N·m (89 lb in) |
5
| Instrument Panel Trim Panel Assembly
Procedure
- Note the location and routing of the electrical harness to ensure proper re-installation.
- Disconnect the electrical connections.
- When replacing the instrument panel trim panel assembly, transfer all necessary components.
Tip
Left hand drive vehicle shown, right hand drive vehicle similar. |