Instrument Panel Assembly Replacement - Long Body
Removal Procedure
Note: Left hand drive vehicle is shown in this procedure, right hand drive vehicle is serviced the same.
- Disable the SIR system. Refer to SIR Disabling and Enabling .
- Disconnect the battery negative cable. Refer to Battery Negative Cable Disconnection and Connection .
- Remove the front floor console extension panel assembly. Refer to
Front Floor Console Extension Panel Replacement : Short Body → Long Body .
- Remove the windscreen pillar garnish mouldings. Refer to
Windscreen Pillar Garnish Moulding Replacement : Long Body → Short Body .
- Remove the steering column assembly. Refer to Steering Column Replacement .
- Remove the instrument panel cluster assembly. Refer to
Instrument Cluster Replacement : Long Body → Short Body .
- Remove the radio. Refer to
Radio Replacement : Short Body → Long Body .
- Remove the heater and air conditioning control. Refer to
Heater and Air Conditioning Control Replacement : Short Body → Long Body .
- Remove the body control module. Refer to Body Control Module Replacement .
- Remove the instrument panel upper compartment assembly. Refer to
Instrument Panel Upper Compartment Replacement : Long Body .
- Remove the instrument panel centre compartment assemblies, if equipped. Refer to
Instrument Panel Centre Compartment Replacement : Long Body with Large Compartment → Long Body with Small Compartment .
- Remove the drivers information display assembly, if equipped. Refer to
Driver Information Display Replacement : Long Body → Short Body .
- Remove the navigation display, if equipped. Refer to Navigation Information Display Replacement .
- Remove the instrument panel compartment. Refer to
Instrument Panel Compartment Replacement : Long Body → Short Body .
- Remove the right instrument panel moulding. Refer to
Instrument Panel Molding Replacement - Passenger Side : Long Body → Short Body .
- Remove the right instrument panel outer air outlet. Refer to
Instrument Panel Outer Air Outlet Replacement - Right Side : Long Body .
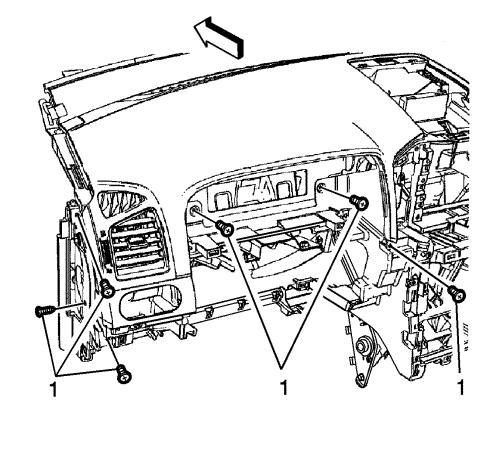
- In order to get access to the nuts behind the I/P cluster loosen the lower I/P from the upper I/P by removing screws (1).
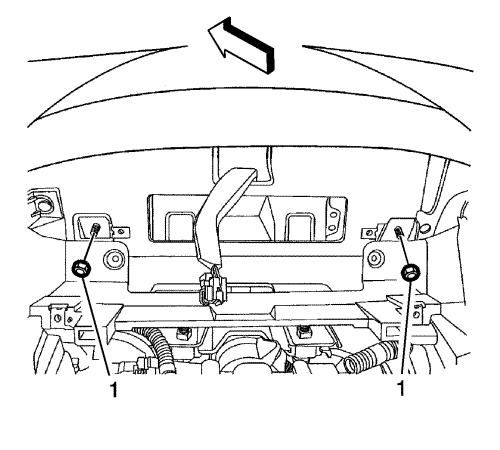
- Pull the lower I/P and remove the securing nuts (1) behind the I/P cluster.
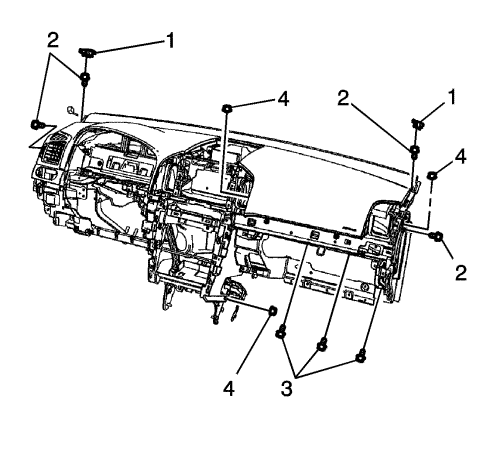
- Remove the instrument panel bolt covers (1).
- Remove the instrument panel bolts (2) and (3).
- Remove the instrument panel nuts (4).
- With the aid of an assistant remove the instrument panel assembly from the vehicle.
- Once the assembly is outside the vehicle, adequately support the assembly to avoid damage.
Installation Procedure
- Position the instrument panel in the vehicle.
Caution: Refer to Fastener Caution in the Preface section.
- Install the instrument panel bolts (2) and tighten to 23 N·m (17 lb ft).
- Install the instrument panel bolt covers (1).
- Install the instrument panel bolts (3) and tighten to 10 N·m (7 lb ft).
- Install the instrument panel nuts (4) and tighten to 8 N·m (71 lb in).
- Install the instrument panel nuts (1) and tighten to 8 N·m (71 lb in).
- Install the instrument panel screws (1) and tighten to 2 N·m (18 lb in).
- Install the right instrument panel outer air outlet. Refer to
Instrument Panel Outer Air Outlet Replacement - Right Side : Long Body .
- Install the right instrument panel moulding. Refer to
Instrument Panel Molding Replacement - Passenger Side : Long Body → Short Body .
- Install the instrument panel compartment. Refer to
Instrument Panel Compartment Replacement : Long Body → Short Body .
- Install the navigation display, if equipped. Refer to Navigation Information Display Replacement .
- Install the drivers information display assembly, if equipped. Refer to
Driver Information Display Replacement : Long Body → Short Body .
- Install the instrument panel centre compartment assemblies, if equipped. Refer to
Instrument Panel Centre Compartment Replacement : Long Body with Large Compartment → Long Body with Small Compartment .
- Install the instrument panel upper compartment assembly. Refer to
Instrument Panel Upper Compartment Replacement : Long Body .
- Install the body control module. Refer to Body Control Module Replacement .
- Install the heater and air conditioning control. Refer to
Heater and Air Conditioning Control Replacement : Short Body → Long Body .
- Install the radio. Refer to
Radio Replacement : Short Body → Long Body .
- Install the instrument panel cluster assembly. Refer to
Instrument Cluster Replacement : Long Body → Short Body .
- Install the steering column assembly. Refer to Steering Column Replacement .
- Install the windscreen pillar garnish mouldings. Refer to
Windscreen Pillar Garnish Moulding Replacement : Long Body → Short Body .
- Install the front floor console extension panel assembly. Refer to
Front Floor Console Extension Panel Replacement : Short Body → Long Body .
- Connect the battery negative cable. Refer to Battery Negative Cable Disconnection and Connection .
- Enable the SIR system. Refer to SIR Disabling and Enabling .
- If necessary, reprogram the HVAC system, radio and body control module. Refer to Control Module References .
| © Copyright Chevrolet. All rights reserved |


