Captiva |
||||||||
|
|
|
|||||||
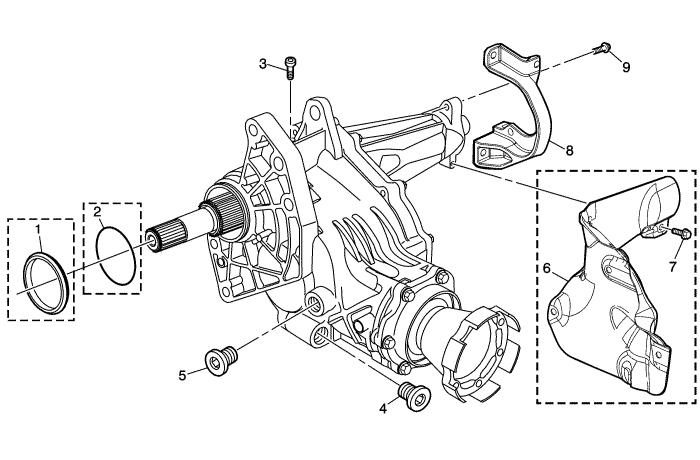
Callout | Component Name |
|---|---|
1 | Transfer Case Intermediate Drive Shaft |
2 | Transfer Case Intermediate Drive Shaft Bearing Retainers (Qty: 2) |
3 | Transfer Case Intermediate Drive Shaft Bearing Assembly Tip Special ToolsDT-22912-B/KM-307-B Rear Pinion and Axle Bearing Remover For equivalent regional tools, refer to Special Tools |
4 | O-ring |
5 | Half Shaft Retainer |
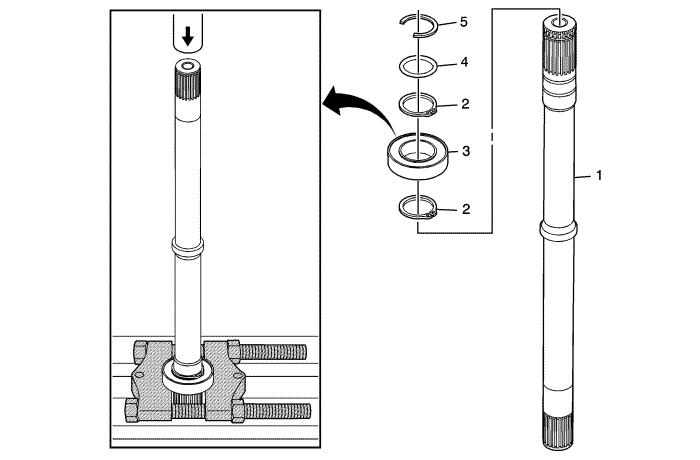
Callout | Component Name |
|---|---|
1 | Transfer Case Rear Output Shaft |
2 | Transfer Case Rear Output Shaft Bearing Spacer |
3 | Transfer Case Rear Output Shaft Housing |
4 | Transfer Case Rear Output Shaft Bearing Assembly Tip Special ToolsJ-5590 Pinion Bearing Race Installer - Rear For equivalent regional tools, refer to Special Tools |
5 | Transfer Case Rear Output Shaft Seal Tip Special ToolsDT-48075 Output Shaft Seal Installer For equivalent regional tools, refer to Special Tools |

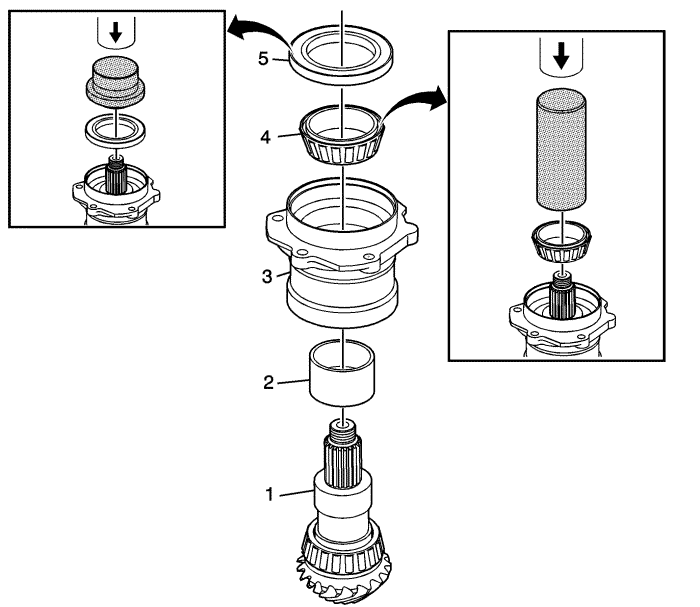
Callout | Component Name | ||||
|---|---|---|---|---|---|
1 | Transfer Case Rear Output Shaft Oil Slinger Tip Special ToolsDT-48077 Output Shaft Slinger Installer For equivalent regional tools, refer to Special Tools | ||||
2 | Transfer Case Rear Output Shaft Flange Tip Special ToolsJ-5590 Pinion Bearing Race Installer - Rear For equivalent regional tools, refer to Special Tools | ||||
3 | Transfer Case Rear Output Shaft Nut Caution: Refer to Fastener Caution in the Preface section. Tip
Tighten Special ToolsDT-08614-A Pinion Flange Holder and Remover For equivalent regional tools, refer to Special Tools |
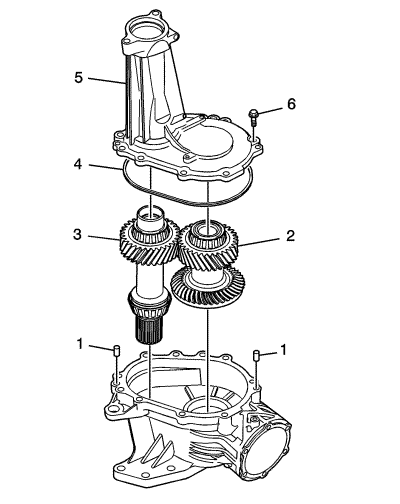
Callout | Component Name |
|---|---|
1 | Transfer Case Half Locating Pins |
2 | Transfer Case Input Shaft Tip |
3 | Transfer Case Rear Output Drive Shaft |
4 | Transfer Case Seal to the Transfer Case - Right |
5 | Transfer Case - Right |
6 | Transfer Case Half Bolts (Qty: 12) Caution: Refer to Fastener Caution in the Preface section. Tighten |
Callout | Component Name | ||||||
|---|---|---|---|---|---|---|---|
1 | Transfer Case Rear Output Shaft Housing Seal O-ring | ||||||
2 | Transfer Case Rear Output Shim | ||||||
3 | Transfer Case Rear Output Shaft Housing Caution: Do not use a drive hammer when the splines are not engaged. Use of a drive hammer when the splines are not engaged will damage the output shaft teeth. Tip
Special ToolsEL-25070 Heat Gun - 500-750F For equivalent regional tools, refer to Special Tools | ||||||
4 | Transfer Case Rear Output Shaft Housing Bolts (Qty: 6) Caution: Refer to Fastener Caution in the Preface section. Tighten |
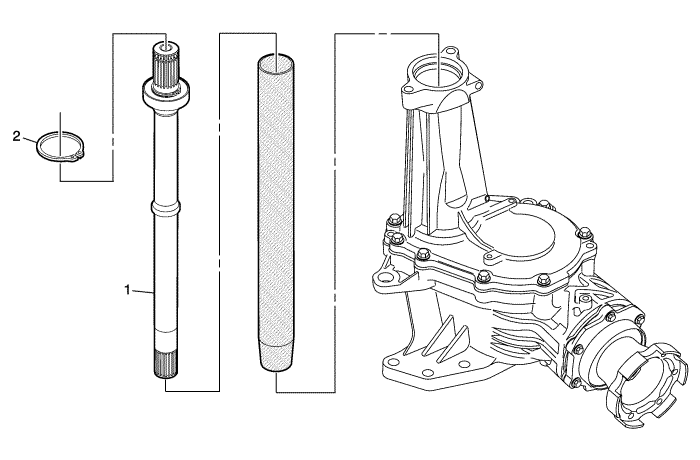
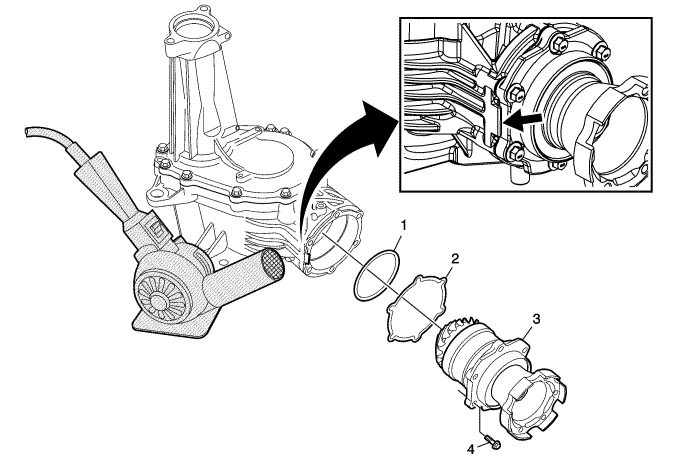
Callout | Component Name |
|---|---|
1 | Front Wheel Drive Intermediate Shaft Caution: DT-48094 must be used over the intermediate shaft prior to installation in order to protect the intermediate shaft seal from damage. Special ToolsDT-48094 Installation Guide Shaft For equivalent regional tools, refer to Special Tools |
2 | Front Wheel Drive Retainer |
Callout | Component Name |
|---|---|
1 | Transfer Case Input Shaft Face Seal - RPO MHC Only |
2 | Transfer Case O-ring Seal - RPO MH4 Only |
3 | Transfer Case Vent Assembly Tip |
4 | Drain Plug Caution: Refer to Component Fastener Tightening Caution in the Preface section. Tighten |
5 | Fill Plug Tighten |
6 | Transfer Case Heat Shield - Model Dependent |
7 | Transfer Case Heat Shield Bolts (Qty: 3) - Model Dependent Caution: Refer to Fastener Caution in the Preface section. Tighten |
8 | Transfer Case Bracket |
9 | Transfer Case Bracket Bolts (Qty: 2) Tip |
| © Copyright Chevrolet. All rights reserved |


