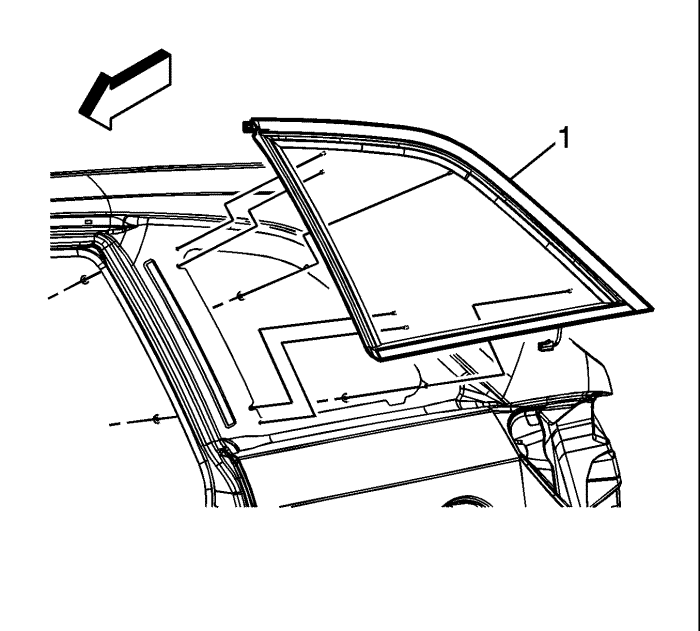
Quarterlight Replacement - Brazil
Special Tools
| • | S-0201964 Bonded, Glass Removing Device |
| • | Glass Handling Suction Cups |
| • | Use an auto-adhesive that is approved by GM |
For equivalent regional tools, refer to Special Tools Special Tools.
Removal Procedure
Warning: Refer to Cracked Window Warning in the Preface section.
Note: Before cutting out a quarterlight, apply a double layer of masking tape around the perimeter of the painted surfaces and the interior trim.
- Remove the quarterlight from the auto-adhesive as follows:
| • | Leave a base of auto-auto-adhesive approximately 2 mm (0.078 in) on the pinch-weld flange. |
| • | The only suitable lubrication is clear water. |
| • | Use S-0201964 Bonded, Glass Removing Device . |
- Protect the following parts from broken glass, seats and carpeting.
Note: Use care when removing the window not to cut off the locator pins in the left and right upper corners. If the locating pins are cut off it will be necessary to use masking tape to tape the window in place until the auto-adhesive cures.
- Start the cut between the centre of the quarterlight and the "B" pillar.
| 3.1. | Do this from inside the vehicle, insert the tool S-0201964 Bonded, Glass Removing Device (1) between the quarterlight and the "B" pillar. thus perforating the adhesive. |
| 3.2. | Move the cutting wire along the outside edge of the window. |
| 3.3. | Remove the tool S-0201964 Bonded, Glass Removing Device . |
| 3.4. | Do this from inside the vehicle, install the cutting wire special tool S-0201964 Bonded, Glass Removing Device (1). |
| 3.5. | Do this from outside the vehicle, install the cutting wire special tool S-0201964 Bonded, Glass Removing Device (2). |
| 3.6. | With an assistant, use the special tool S-0201964 Bonded, Glass Removing Device (1) to hold the cutting wire, pull it starting from the outside, back and forth releasing the window from the adhesive. |
| 3.7. | While cutting the window reposition the cutting wire and special tools, so as to cut the adhesive along the window completely. |
- Remove the window from the vehicle.
Installation Procedure
- If reusing or replacing the window, use the appropriate tool, remove the auto-adhesive bead on the window surface and pinch-weld flange to approximately 2 mm (0.078 in).
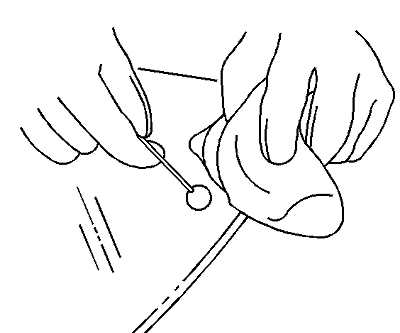
- Clean the bonding area on the window.

- Apply bonded-glass primer and let dry per auto-adhesive instructions by the manufacturer's.

- Apply the auto-adhesive primer-application (2) around the perimeter of the rear window (1) and let dry per auto-adhesive instructions by the manufacturer's.
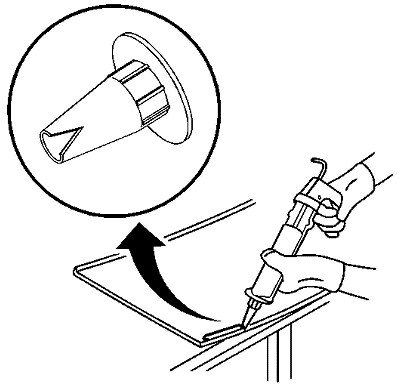
- Cut the applicator nozzle to provided a V cut to apply the auto-auto-adhesive.
Note: If the locating pins were cut off it will be necessary to tape the window in place until the auto-adhesive cures per auto-adhesive instructions by the manufacturer's.
- Gently press the quarterlight into the auto-adhesive bead until it fully seats evenly in the open.
- Use masking tape to hold the window in the position until the auto-adhesive completely cures.
- Make sure to observe the auto-adhesive curing time before releasing the vehicle per auto-adhesive instructions by the manufacturer's.
Note: Following the auto-adhesive installation instructions, using nafta to remove any excess of auto-adhesive within 30 minutes, otherwise it will not be possible to remove the auto-adhesive excess unless using mechanical means.
- Remove the double layer of masking tape around the perimeter of the painted surfaces and the interior trim.
Note: Do not direct a hard stream of high pressure water to the freshly applied auto-adhesive.
- Use a soft spray of warm water in order to immediately water test the window.
- Inspect the window for leaks.
- If any leaks are found, use a plastic paddle in order to apply extra auto-adhesive at the leak point.
- Retest the window for leaks.
- Maintain the following conditions in order to properly cure the auto-adhesive:
| • | Partially lower a door window in order to prevent pressure buildups when closing doors before the auto-adhesive cures. |
| • | Do not drive the vehicle until the auto-adhesive is cured. Refer to the above curing times. |
| • | Do not use compressed air in order to dry the auto-adhesive. |
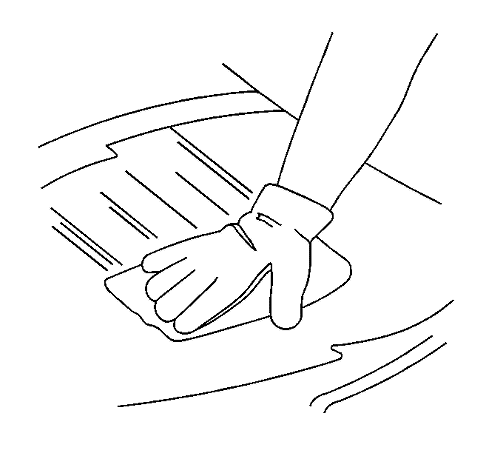
- Clean any excess auto-adhesive from the body.
| © Copyright Chevrolet. All rights reserved |


