Volt |
||||||||
|
|
|
|||||||
| • | EL-38125-10 Splice Sleeve Crimping Tool |
| • | EL-38125-5 Ultra Torch Special Tool |
| • | J-38125-8 Splice Sleeve Crimping Tool |
| • | DuraSeal splice sleeves, in order to repair the SIR/SRS wiring |
For equivalent regional tools, refer to Special Tools .
Danger: In order to reduce the risk of personal injury, loss of high-voltage isolation to earth and higher system impedance, do not attempt to repair any HV wiring, connector or terminal that is damaged. High-voltage coaxial type cables are not repairable. Never attempt to repair a coaxial type cable. The entire cable/harness or component must be replaced. In order to maintain system integrity and personal safety, never attempt to repair any high-voltage wiring, cables or terminals. Performing this procedure on high-voltage circuits may result in serious injury or death.
Note: Use only DuraSeal splice sleeves. Other splice sleeves may not protect the splice from moisture or provide a good electrical connection.
Use DuraSeal splice sleeves to form a one-to-one splice on all types of insulation, except Tefzel and coaxial. Use DuraSeal splice sleeves where there are special requirements such as moisture sealing. Follow the instructions below in order to splice copper wire using DuraSeal splice sleeves.
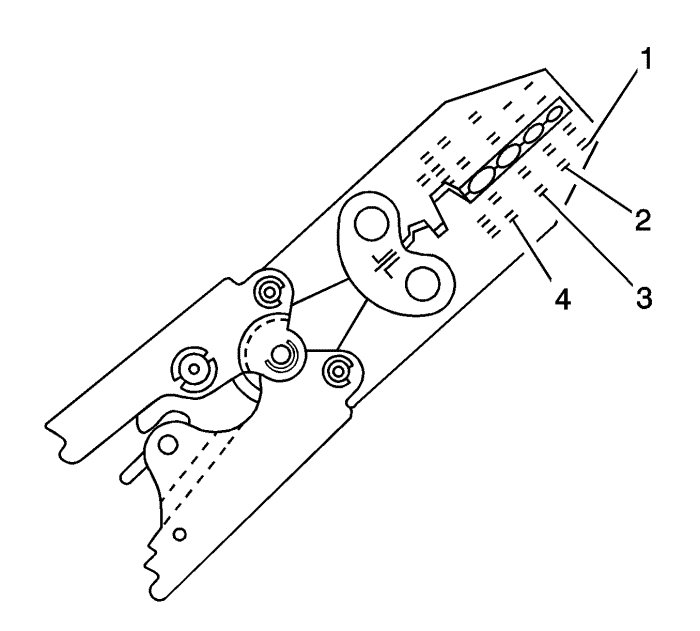
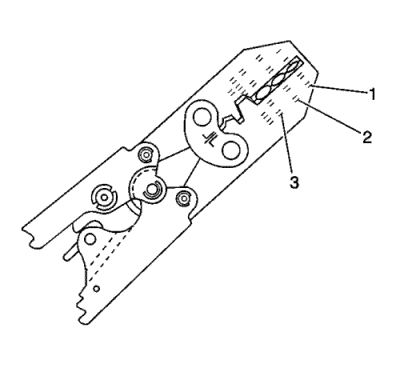
Splice Sleeve Colour | Crimp Tool Nest Colour | Wire gauge mm² / (AWG) | |
|---|---|---|---|
3 Crimp Nests | 4 Crimp Nests | ||
Salmon (Yellow-Pink) 19168446 | Red (1) or Red/Green (1) | Red (2) | 0.5-0.8/(18-20) |
Blue 19168447 | Blue (2) | Blue (3) | 1.0-2.0/(14-16) |
Yellow 19168448 | Yellow (3) | Yellow (4) | 3.0-5.0/(10-12) |
Note: You must perform the following procedures in the listed order. Repeat the procedure if any wire strands are damaged. You must obtain a clean strip with all of the wire strands intact.
| • | Use a sewing seam ripper, available from sewing supply stores, in order to cut open the harness in order to avoid wire insulation damage. |
| • | Use the DuraSeal splice sleeves on all types of insulation except Tefzel and coaxial. |
| • | Do not use the crimp and DuraSeal splice sleeve to form a splice with more than 2 wires coming together. |
Adjust splice locations so that each splice is at least 40 mm (1.5 in) away from the other splices, harness branches, or connectors.
| • | When adding a length of wire to the existing harness, use the same size wire as the original wire. |
| • | Perform one of the following items in order to find the correct wire size: |
| - | Find the wire on the schematic and convert to regional wiring gauge size. |
| - | If you are unsure of the wire size, begin with the largest opening in the wire stripper and work down until achieving a clean strip of the insulation. |
| • | Strip approximately 5.0 mm (0.20 in) of insulation from each wire to be spliced. |
| • | Do not nick or cut any of the strands. Inspect the stripped wire for nicks or cut strands. |
| • | If the wire is damaged, repeat this procedure after removing the damaged section. |
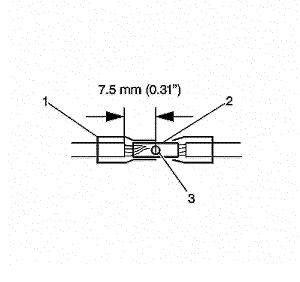
The crimper handles will not open until you apply the proper amount of pressure to the DuraSeal splice sleeve. Repeat steps 4 and 6 for the opposite end of the splice.

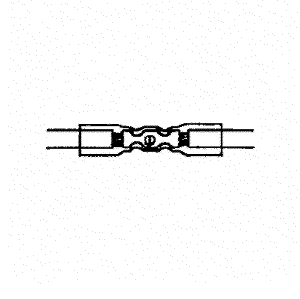
| • | The tubing will shrink completely as the heat is moved along the insulation. |
| • | A small amount of sealant will come out of the end of the tubing when sufficient shrinkage is achieved. |
Use the following procedures to perform high temperature wiring repairs:
| • | The tubing will shrink completely as the heat is moved along the insulation. |
| • | A small amount of sealant will come out of the end of the tubing when sufficient shrinkage is achieved. |
| ©© Copyright Chevrolet. All rights reserved |


