|
Danger: Always perform the High-Voltage Disabling procedure prior to servicing any High Voltage component or connection. Personal Protection Equipment (PPE) and proper procedures must be followed. The High-Voltage Disabling procedure will perform the following tasks:
| • | Identify how to disable high voltage. |
| • | Identify how to test for the presence of high voltage. |
| • | Identify conditions under which high voltage is always present and personal protection equipment (PPE) and proper procedures must be followed. |
| • | Safety goggles with appropriate side shields when within 15 metres (50 feet) of the vehicle, either indoors or outdoors. |
| • | Certified and up-to-date Class "0" Insulation gloves rated at 1000 V with leather protectors. |
| - | Visually and functionally inspect the gloves before use. |
| - | Wear the Insulation gloves with leather protectors at all times when working with the high-voltage battery assembly, whether the system is energised or not. |
Danger: The Volt Battery Pack will utilise an exchange program. Please consult the most recent revision of bulletin/PI #PIP4841, available in Service Information (SI), for a list of approved Volt Battery Pack service procedures. Components that may be removed and serviced without exchanging the complete battery pack are identified in the bulletin/PI. Please contact the GM Technical Assistance Centre (1-877-446-8227) if you have any questions.
Preliminary Procedures
- Disable the high-voltage system. Refer to High Voltage Disabling .
- Remove the left front wheelhouse rear liner. Refer to Front Wheelhouse Rear Liner Replacement .
- Disengage the cable end from the charge port door actuator.
- Using needle nose pliers, pinch the back of the retainer tabs to disengage the charge port door actuator harness retainer from the edge of the fender.
- Disconnect the electrical connector for the charge port door ajar indicator switch assembly.
- Remove the charge port door. Refer to Charge Port Door Replacement .
- Remove the charge port housing bezel. Refer to Charge Port Housing Bezel Replacement .
|
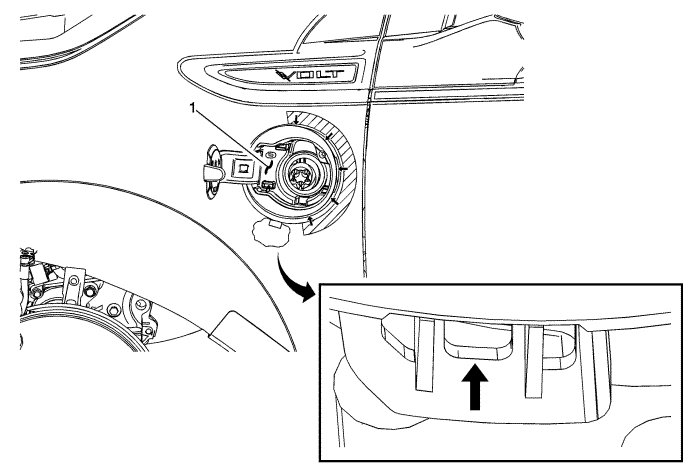
1
| Charge Port Housing Assembly
Caution: Refer to Exterior Trim Emblem Removal Caution in the Preface section.
Procedure
- From inside the wing, release the lower tab to the charge port housing assembly.
- Push outwards on the assembly housing.
- Using a plastic trim-type stick, at the arrows, gently pry outwards while pulling outwards on the rear edge of the housing.
- Rotate the rear edge of the housing forwards, pull the housing and seal from the front wing centre reinforcement bracket.
- Remove the charge port housing assembly along with the electrical harness for the charge port door ajar indicator switch assembly and charge port door actuator cable assembly.
- Transfer the charge port door ajar indicator switch assembly. Refer to Charge Port Door Ajar Indicator Switch Replacement .
- Transfer the charge port door actuator cable. Refer to Charge Port Door Actuator Cable Replacement .
Tip
Upon the final assembly of the charge port housing into the front wing centre reinforcement bracket, ensure to re-seat the charge port housing seal around the entire circumference of the charge port receptacle. Use a blunt tool such as a rounded plastic trim tool to push the seal into position around the charge port receptacle. - Enable the high-voltage system. Refer to High-Voltage Enabling .
|