Volt |
||||||||
|
|
|
|||||||
Callout | Component Name | ||||||||||||||
|---|---|---|---|---|---|---|---|---|---|---|---|---|---|---|---|
|
Danger: Always perform the High-Voltage Disabling procedure prior to servicing any High Voltage component or connection. Personal Protection Equipment (PPE) and proper procedures must be followed. The High-Voltage Disabling procedure will perform the following tasks:
Danger: The Volt Battery Pack will utilise an exchange program. Please consult the most recent revision of bulletin/PI #PIP4841, available in Service Information (SI), for a list of approved Volt Battery Pack service procedures. Components that may be removed and serviced without exchanging the complete battery pack are identified in the bulletin/PI. Please contact the GM Technical Assistance Centre (1-877-446-8227) if you have any questions. Preliminary Procedures
| |||||||||||||||
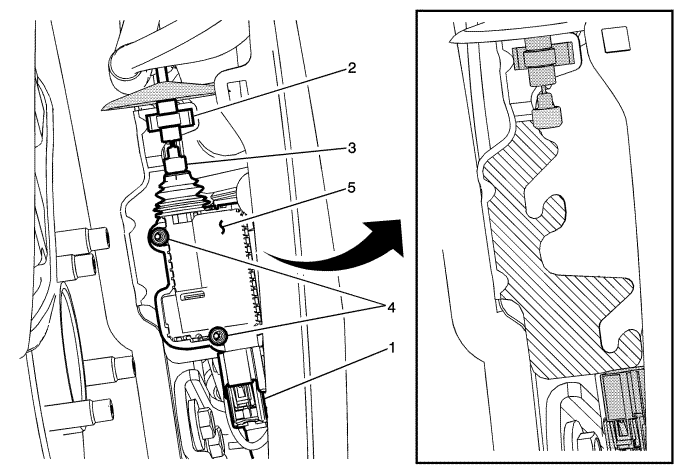
1 | Charge Port Door Actuator Electrical Connector ProcedureDisconnect the electrical connector from the actuator assembly. | ||||||||||||||
2 | Charge Port Door Actuator Retainer ProcedurePinch the backside of the retainer with needle nose pliers and remove the retainer from the inner front wing bracket. | ||||||||||||||
3 | Charge Port Door Actuator Cable Collar ProcedureUsing a small flat-bladed tool, release the collar from the charge port actuator button end. | ||||||||||||||
4 | Charge Port Door Actuator Screw (Qty: 2) Caution: Refer to Fastener Caution in the Preface section. ProcedureFrom the front side, inside the wheelhouse area, use a E4 TORX® and turn the screws clockwise in order to LOOSEN, Do Not Remove, from the front side of the charge port door actuator. Tighten | ||||||||||||||
5 | Charge Port Door Actuator Procedure
| ||||||||||||||
| ©© Copyright Chevrolet. All rights reserved |


