Trim Height Inspection
Trim Height Measurement
Trim height is a predetermined measurement relating to vehicle ride height. Incorrect trim heights can cause the vehicle to bottom out over bumps, damage to the suspension components and symptoms similar to wheel alignment problems. Check the trim heights when diagnosing suspension concerns and before checking the wheel alignment.
Perform the following before measuring the trim heights:
| | Note: One U.S. gallon of petrol weighs approximately 6.5 lbs. One litre of petrol weighs approximately 0.7 kg. |
| • | Check the fuel level. Add additional weight if necessary to simulate a full tank. |
| • | Make sure the passenger and rear compartments are empty, except for the spare tyre. |
| • | Make sure the vehicle is on a flat and level surface, such as an alignment rack. |
| • | Check that all the vehicle doors are securely closed. |
| • | Check that the vehicle bonnet and rear deck lids are securely closed. |
| • | Check for installed after market accessories or modifications that could affect trim height measurement: |
| • | Larger or smaller than production wheels and tyres. |
| • | Lifting or Lowering Kits |
| • | Wheel Opening Flares or Ground Affects |
Measuring the P and R Dimension
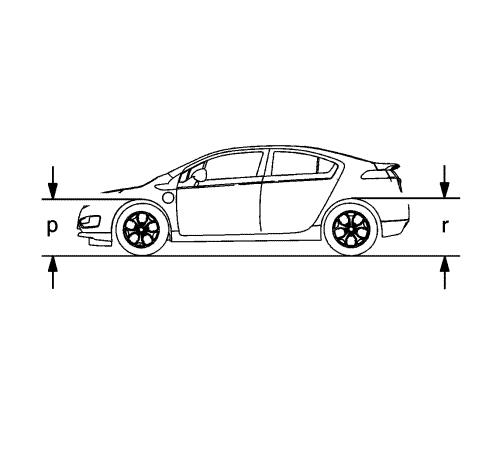
Measurement Definitions
P Height: The vertical distance from the ground to the top of the wheel opening through the centreline of the front wheel.
R Height: The vertical distance from the ground to the top of the wheel opening through the centreline of the rear wheel.
Use the following procedures to measure the P and R dimensions:
Note:
| • | Measure from the centre of the wheel well opening to the ground. |
| • | The left and right P and R height differences should be no more than 10 mm (0.39 in). |
- Push the front bumper down a minimum of 25 mm (1 in) and release. Perform this step three times.
- Measure and record the trim height per the "Measurement Definitions" above.
- Lift the bumper up a minimum of 25 mm (1 in) and release. Perform this step three times.
- Measure and record the trim height per the "Measurement Definitions" above.
- The true P height measurement is the average of the measurements taken in step 2 and 4. Refer to Trim Height Specifications
- Repeat the above steps at the rear of the vehicle for the R heights.
- If the P and R heights are outside of the specifications, measure the Z & D heights.
Measuring the Z Dimension
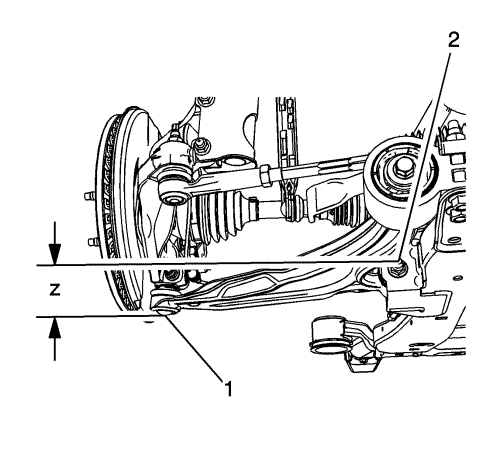
Measurement Definitions
The Z Height: The vertical distance from the forward front lower control arm (2) attachment bolt tip to the centre of the ball joint cup (1).
Use the following procedures to measure the Z dimensions:
Note: The left and right Z height differences should be no more than 10 mm (0.39 in).
- Push the front bumper down a minimum of 25 mm (1 in) and release. Perform this step three times.
- Measure and record the trim height per the "Measurement Definitions" above.
- Lift the front bumper a minimum of 25 mm (1 in) and release. Perform this step three times.
- Measure and record the trim height per the "Measurement Definitions" above.
- The true Z height dimension is the average of the measurements taken in steps 2 and 4. Refer to Trim Height Specifications .
- If these measurements are out of specifications, inspect for the following conditions:
| • | Worn or damaged suspension components |
D Height Measurement
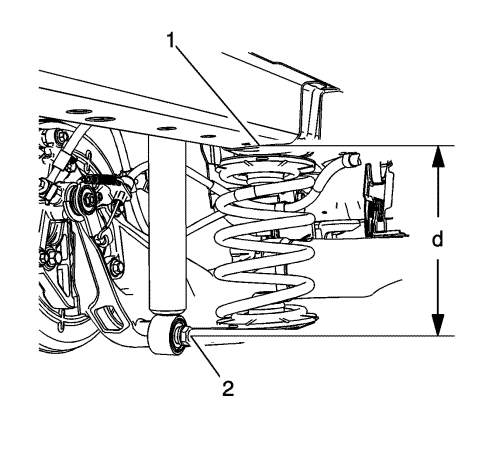
Measurement Definitions
The D Height: The vertical distance from the bottom surface of the body side rail (1) to the centre of the lower shock attaching bolt head (2).
Use the following procedure to check the D dimension:
Note: The left and right D height difference should be no more than 10 mm (0.39 in).
- Push the rear bumper down a minimum of 25 mm (1 in) and release. Perform this step three times.
- Measure and record the trim height per the "Measurement Definitions" above.
- Lift the rear bumper up a minimum of 25 mm (1 in) and release. Perform this step three times.
- Measure and record the trim height per the "Measurement Definitions" above.
- The true D height is the average of the measurements taken in steps 2 and 4. Refer to Trim Height Specifications .
- If these measurements are out of specifications, inspect for the following conditions:
| • | Worn or damaged suspension components |
| ©© Copyright Chevrolet. All rights reserved |


