Volt |
||||||||
|
|
|
|||||||

Callout | Component Name | ||||||
|---|---|---|---|---|---|---|---|
Preliminary ProcedureDanger: Always perform the High Voltage Disabling procedure prior to servicing any High Voltage component or connection. Personal Protection Equipment (PPE) and proper procedures must be followed. The High Voltage Disabling procedure will perform the following tasks:
Remove the control valve body cover. Refer to Control Valve Body Cover Replacement . | |||||||
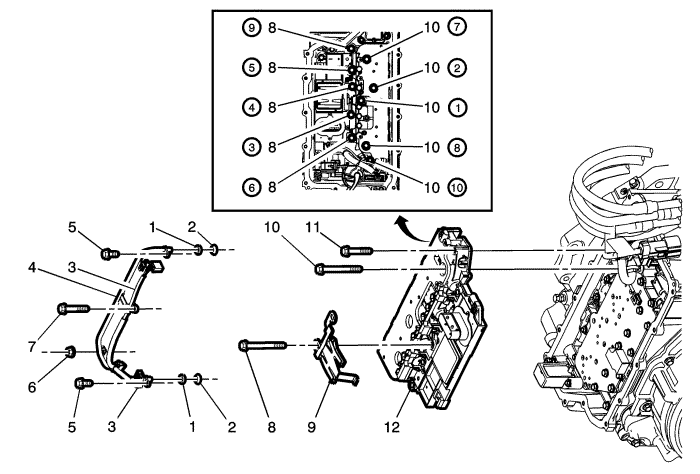
1 | Transmission Fluid Cooler Outlet Washer | ||||||
2 | Transmission Fluid Cooler Outlet Seal Tip | ||||||
3 | A/Trans Wiring Extension Harness Assembly ProcedureMake sure you connect all four connectors on the wiring harness in the appropriate locations. Tip | ||||||
4 | Transmission Fluid Cooler Outlet Pipe Assembly | ||||||
5 | Fluid Cooler Outlet Pipe Assembly Bolt M5 x 16 mm (Qty: 2) Caution: Refer to Fastener Caution in the Preface section. Tighten | ||||||
6 | Transmission Fluid Cooler Pipe Nut Tighten | ||||||
7 | Control Valve Body Bolt M6 x 80 mm (Qty: 1) Tighten | ||||||
8 | Control Valve Body Bolt M6 x 65 mm (Qty: 5) ProcedureTighten the bolt in sequence shown. Tighten | ||||||
9 | Control Solenoid Valve Spring | ||||||
10 | Control Valve Body Bolt M6 x 75 mm (Qty: 4) ProcedureTighten the bolt in sequence shown. Tighten | ||||||
11 | Control Valve Body Bolt M6 x 42 mm (Qty: 1) Tighten | ||||||
12 | Control Solenoid (w/Body and TCM) TEHCM Valve Assembly ProcedureProgram the control solenoid valve and transmission control module assembly. Refer to Control Solenoid Valve and Transmission Control Module Assembly Programming and Setup : 4ET50 . | ||||||
| ©© Copyright Chevrolet. All rights reserved |