Fuel Tank Replacement
Special Tools
For equivalent regional tools, refer to
Special Tools : Diagnostic Tools .
Removal Procedure
Danger: To avoid any vehicle damage, serious personal injury or death when major components are removed from the vehicle and the vehicle is supported by a hoist, support the vehicle with jack stands at the opposite end from which the components are being removed and strap the vehicle to the hoist.
Warning: Refer to Petrol/Petrol Vapours Warning in the Preface section.
Warning: Refer to Safety Glasses Warning in the Preface section.
- Drain the fuel tank. Refer to Fuel Tank Draining .
- Remove the rear axle. Refer to Rear Axle Replacement .
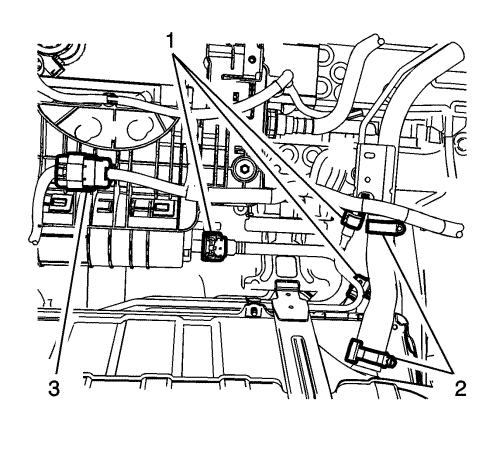
- Disconnect the evaporative emission and fuel pipe connectors (1). Refer to Plastic Collar Quick Connect Fitting Service .
- Close the fuel tank vent pipe and the evaporative emission hose with the CH-807 plugs .
- Close the fuel feed pipe and the fuel pump feed hose with the EN-6015 plugs .
- Loosen the hose clamps (2) and slide the filler tube away from the fuel tank.
- Disconnect the fuel tank harness electrical connector (3).
Warning: To help avoid personal injury, always use jack stands when you are working on or under any vehicle that is supported only by a jack.
Caution: When you are jacking or lifting a vehicle at the frame side rails or other prescribed lift points, be certain that the lift pads do not contact the catalytic converter, the brake pipes or the fuel lines. If such contact occurs, vehicle damage or unsatisfactory vehicle performance may result.
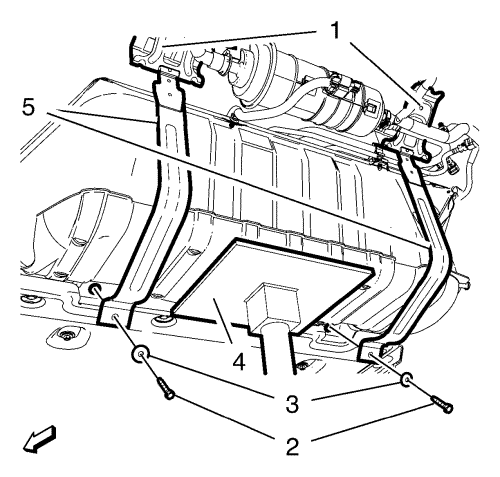
- Support the fuel tank with a suitable adjustable jack (4) as shown in the graphic.
- Remove the 2 fuel tank strap bolts (2) and the 2 fuel tank strap washers (3).
- Remove the 2 fuel tank straps (5) from the 2 fuel tank strap rear brackets (1).
Note: A second technician is required.
- Move the fuel tank (2) rearwards and lower the fuel tank slowly using the suitable adjustable jack (1).
Disassemble Procedure
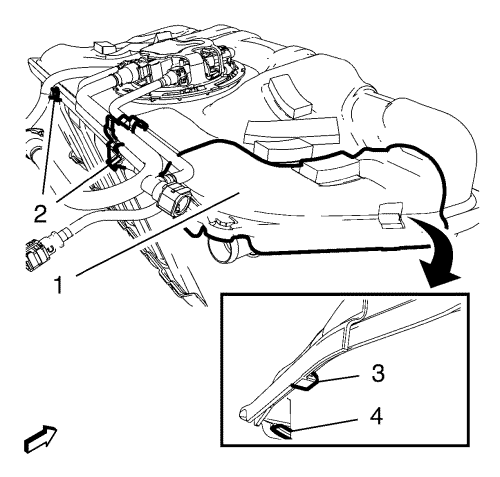
- Unclip the 2 wiring harness clips (2) from the fuel tank.
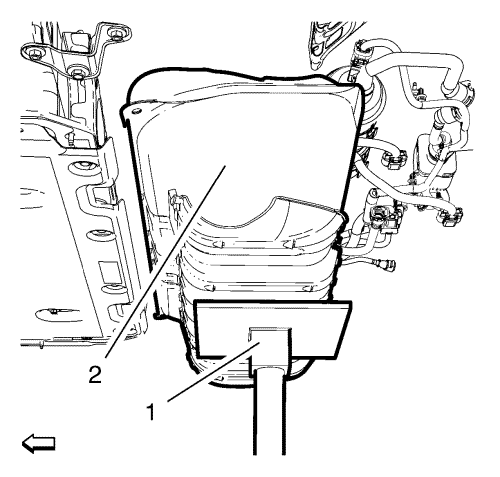
- Unclip the 2 fuel tank upper shield clips (3) and (4) and remove the fuel tank upper shield (1) from the fuel tank.
- Remove the fuel tank fuel pump module. Refer to Fuel Tank Fuel Pump Module Replacement .
Assemble Procedure
- Install the fuel tank fuel pump module. Refer to Fuel Tank Fuel Pump Module Replacement .
- Install the fuel tank upper shield (1) to the fuel tank and attach the 2 fuel tank upper shield clips (3, 4).
- Clip the 2 wiring harness clips (2) to the fuel tank.
Installation Procedure
Note: A second technician is required.
- Raise the fuel tank slowly using a suitable adjustable jack (1) and move the fuel tank (2) forwards.
- Install the 2 fuel tank straps (5) to the 2 fuel tank strap rear brackets (1).
Caution: Refer to Fastener Caution in the Preface section.
- Install the 2 fuel tank strap bolts (2) with the 2 fuel tank strap washers (1) and tighten to 20 N·m (15 lb ft).
- Remove the suitable adjustable jack (4) from the fuel tank.
- Connect the fuel tank harness electrical connector (3).
- Remove the CH-807 plugs from the fuel tank vent pipe and the evaporative emission hose.
- Remove the EN-6015 plugs from the fuel feed pipe and the fuel pump feed hose.
- Slide the filler hose onto the tank and tighten the hose clamps (2) to 4 N·m (35 lb in).
- Connect the evaporative emission and fuel pipe connectors (1). Refer to Plastic Collar Quick Connect Fitting Service .
- Install the rear axle. Refer to Rear Axle Replacement .
- Refill the fuel tank.
| ©© Copyright Chevrolet. All rights reserved |


