Aveo |
||||||||
|
||||||||
|
Application
|
N•m
|
Lb-Ft
|
Lb-In
|
|
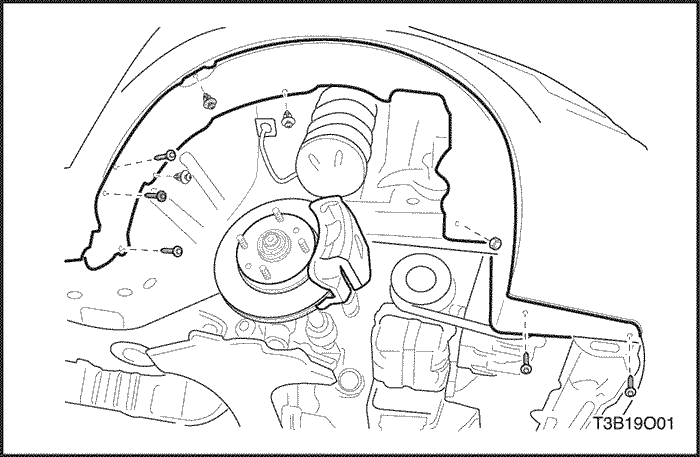
Front Wheel Well Splash Shield Screws
|
1.5
|
-
|
13
|
|
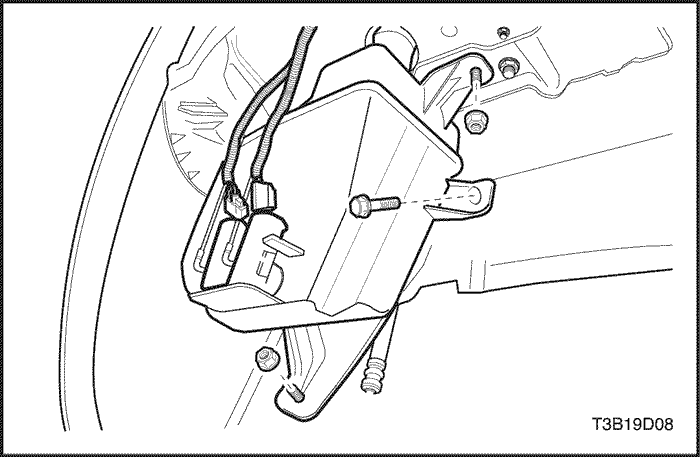
Washer Fluid Reservoir Bolts and Nuts
|
9
|
-
|
80
|
|
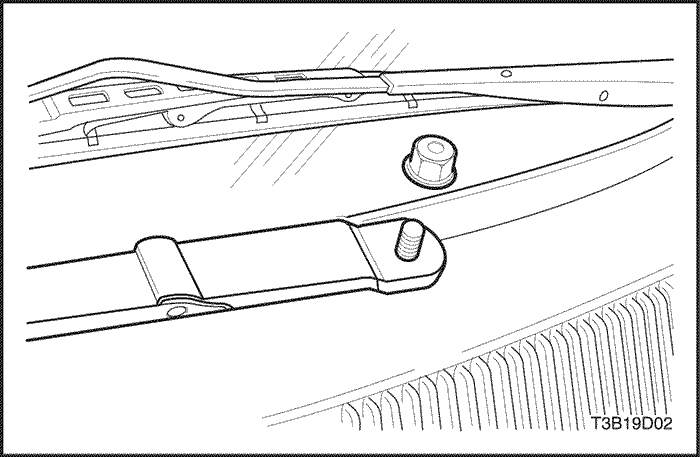
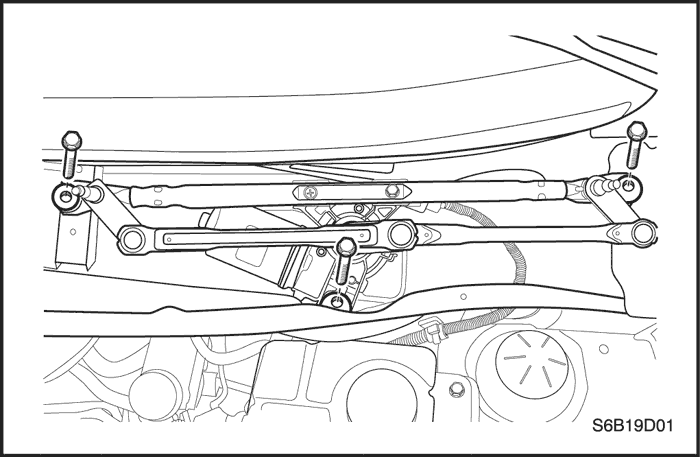
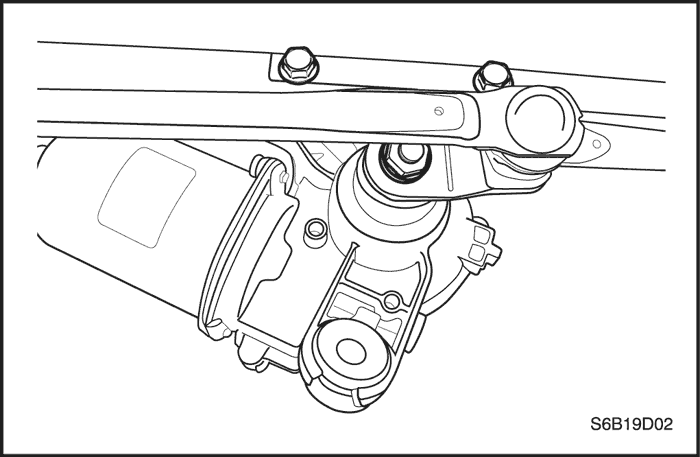
Wiper Arm Linkage Nut
|
10
|
-
|
88
|
|
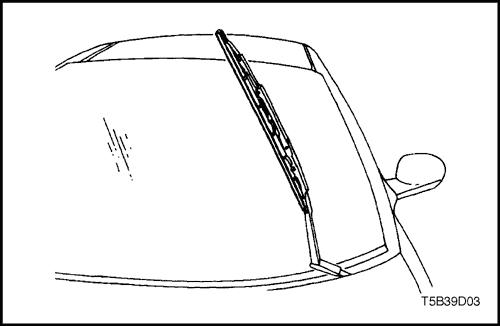
Wiper Arm Nut
|
22
|
-
|
195
|
|
Wiper Motor Bolts
|
10
|
-
|
88
|
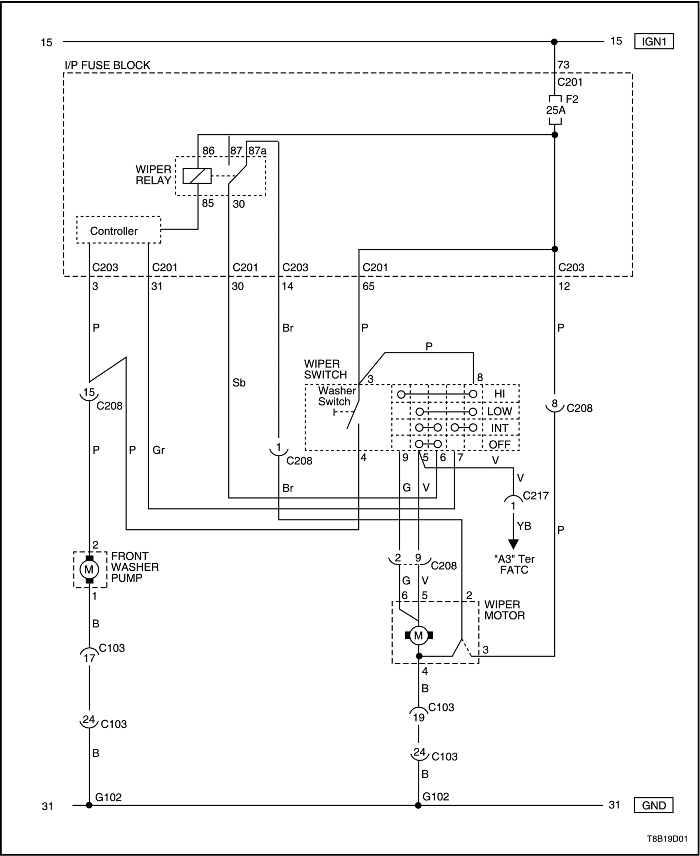
| Step | Action | Value(s) | Yes | No |
| 1 |
Check fuse F2.
Is fuse F2 blown?
|
-
|
Go to Step 2
|
Go to Step 3
|
| 2 |
Is the repair complete?
|
-
|
System OK
|
-
|
| 3 |
Check the battery voltage at fuse F2.
Is battery voltage available at fuse F2?
|
11-14 v
|
Go to Step 5
|
Go to Step 4
|
| 4 |
Repair the open in the power supply circuit to fuse F2.
Is the repair complete?
|
-
|
System OK
|
-
|
| 5 |
Is battery voltage available at wiper motor connector terminal 6?
|
11-14 v
|
Go to Step 6
|
Go to Step 7
|
| 6 |
Replace the faulty wiper motor.
Is the repair complete?
|
-
|
System OK
|
-
|
| 7 |
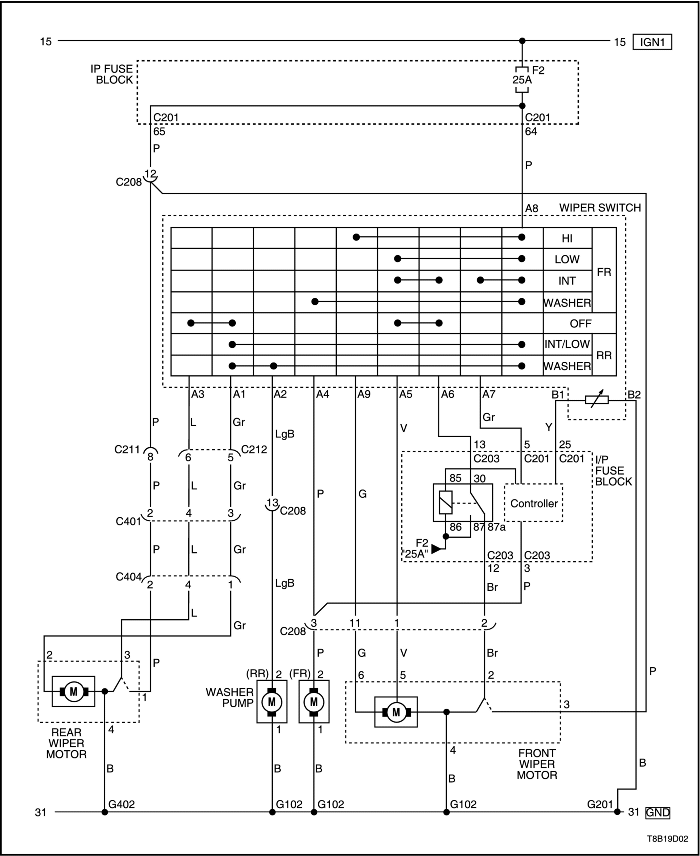
Is battery voltage available at the wiper switch connector terminal 3 (A8 in Hatchback)?
|
11-14 v
|
Go to Step 9
|
Go to Step 8
|
| 8 |
Repair the open circuit between wiper switch connector terminal 3 (A8 in Hatchback) and fuse F2.
Is the repair complete?
|
-
|
System OK
|
-
|
| 9 |
Is there continuity between terminals 3 and 9 (A8 and A9 in Hatchback)?
|
0 Ω
|
Go to Step 11
|
Go to Step 10
|
| 10 |
Replace the faulty wiper switch.
Is the repair complete?
|
-
|
System OK
|
-
|
| 11 |
Repair the open circuit between the wiper switch and the wiper motor.
Is the repair complete?
|
-
|
System OK
|
-
|
| Step | Action | Value(s) | Yes | No |
| 1 |
Is battery voltage available at wiper motor connector terminal 6?
|
11-14 v
|
Go to Step 2
|
Go to Step 3
|
| 2 |
Replace the faulty wiper motor.
Is the repair complete?
|
-
|
System OK
|
-
|
| 3 |
Is there continuity between terminals 8 and 9?
|
0 Ω
|
Go to Step 5
|
Go to Step 4
|
| 4 |
Replace the faulty wiper switch.
Is the repair complete?
|
-
|
System OK
|
-
|
| 5 |
Repair the open circuit between wiper switch connector terminal 9 (A9 in Hatchback) and wiper motor connector terminal 6.
Is the repair complete?
|
-
|
System OK
|
-
|
| Step | Action | Value(s) | Yes | No |
| 1 |
Is battery voltage available at wiper motor connector terminal 5?
|
11-14 v
|
Go to Step 2
|
Go to Step 3
|
| 2 |
Replace the faulty wiper motor.
Is the repair complete?
|
-
|
System OK
|
-
|
| 3 |
Is there continuity between terminals 8 and 5?
|
0 Ω
|
Go to Step 5
|
Go to Step 4
|
| 4 |
Replace the faulty wiper switch.
Is the repair complete?
|
-
|
System OK
|
-
|
| 5 |
Repair the open circuit between the wiper switch connector terminal 5 (A5 in Hatchback) and the wiper motor connector terminal 5.
Is the repair complete?
|
-
|
System OK
|
-
|
| Step | Action | Value(s) | Yes | No |
| 1 |
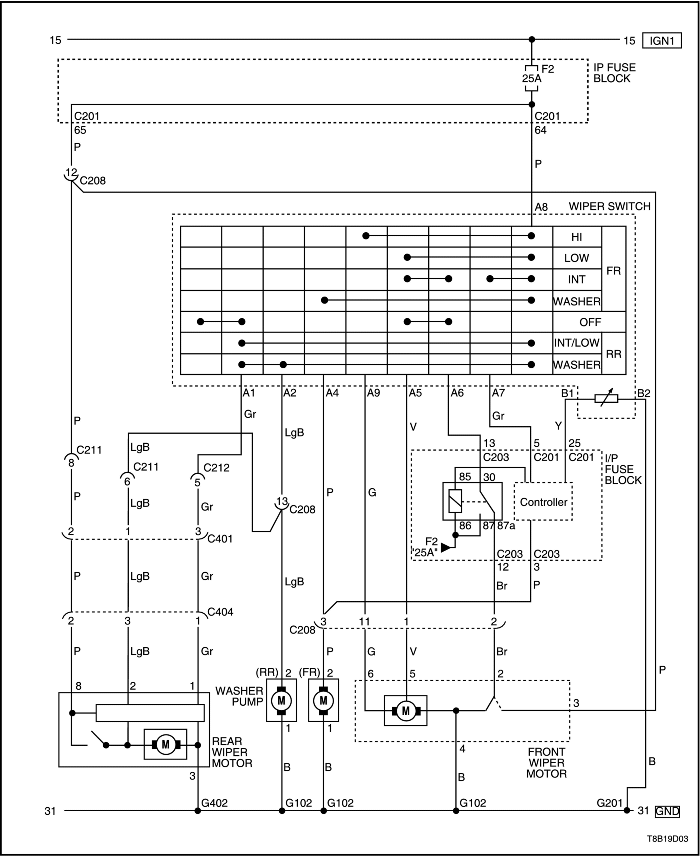
Is battery voltage available at connector terminal 30?
|
11-14 v
|
Go to Step 3
|
Go to Step 2
|
| 2 |
Repair the open circuit between the wiper relay connector terminal 30 and fuse F2.
Is the repair complete?
|
-
|
System OK
|
-
|
| 3 |
Using a voltmeter, is battery voltage available at the wiper relay connector terminal I?
|
11-14 v
|
Go to Step 7
|
Go to Step 4
|
| 4 |
Using a voltmeter, is battery voltage available at wiper switch connector terminal 6 (A6 in Hatchback)?
|
11-14 v
|
Go to Step 6
|
Go to Step 5
|
| 5 |
Replace the wiper switch.
Is the repair complete?
|
-
|
System OK
|
-
|
| 6 |
Repair the open circuit between the wiper switch connector terminal 6 (A6 in Hatchback) and the wiper relay connector terminal 30.
Is the repair complete?
|
-
|
System OK
|
-
|
| 7 |
Using a voltmeter, is battery voltage pulsing at wiper relay connector terminal 30?
|
11-14 v
|
Go to Step 11
|
Go to Step 8
|
| 8 |
Using an ohmmeter, check the wiper motor ground circuit.
Is the ground circuit OK?
|
0 Ω
|
Go to Step 10
|
Go to Step 9
|
| 9 |
Repair the open ground circuit.
Is the repair complete?
|
-
|
System OK
|
-
|
| 10 |
Replace the wiper relay.
Is the repair complete?
|
-
|
System OK
|
-
|
| 11 |
Is there continuity between terminals 5 and 6 (A5 and A6 in Hatchback)?
|
0 Ω
|
Go to Step 13
|
Go to Step 12
|
| 12 |
Replace the faulty wiper switch.
Is the repair complete?
|
-
|
System OK
|
Go to Step 14
|
| 13 |
Repair the open circuit between the wiper switch and the wiper relay.
Is the repair complete?
|
-
|
System OK
|
-
|
| 14 |
Replace the controller (SJB).
Is the repair complete?
|
-
|
System OK
|
-
|
| Step | Action | Value(s) | Yes | No |
| 1 |
Is battery voltage available at wiper motor connector terminal 3?
|
11-14 v
|
Go to Step 3
|
Go to Step 2
|
| 2 |
Repair the open circuit between the wiper motor and fuse F2.
|
-
|
System OK
|
-
|
| 3 |
Is a pulse of battery voltage available at the wiper motor connector terminal 5 when the wiper switch is turned OFF?
|
11-14 v
|
Go to Step 5
|
Go to Step 4
|
| 4 |
Replace the faulty wiper motor.
Is the repair complete?
|
-
|
System OK
|
-
|
| 5 |
Is a pulse of battery voltage available at the wiper relay connector terminal 87a when the wiper switch is turned OFF?
|
11-14 v
|
Go to Step 7
|
Go to Step 6
|
| 6 |
Repair the open circuit between the wiper motor and the wiper relay.
Is the repair complete?
|
-
|
System OK
|
-
|
| 7 |
Is there continuity between wiper relay connector terminals 30 and 87a?
|
0 Ω
|
Go to Step 9
|
Go to Step 8
|
| 8 |
Replace the faulty wiper relay.
Is the repair complete?
|
-
|
System OK
|
-
|
| 9 |
Replace the faulty wiper switch.
Is the repair complete?
|
-
|
System OK
|
-
|
| Step | Action | Value(s) | Yes | No |
| 1 |
Do the windshield wipers operate when the washer switch is activated?
|
-
|
Go to Step 4
|
Go to Step 2
|
| 2 |
Is battery voltage available at the windshield wiper switch connector terminal 4 (A4 in Hatchback)?
|
11-14 v
|
Go to Step 8
|
Go to Step 3
|
| 3 |
Replace the windshield wiper switch.
Is the repair complete?
|
-
|
System OK
|
-
|
| 4 |
Is there washer fluid in the windshield washer fluid reservoir?
|
-
|
Go to Step 6
|
Go to Step 5
|
| 5 |
Fill the windshield washer fluid reservoir.
Is the repair complete?
|
-
|
System OK
|
-
|
| 6 |
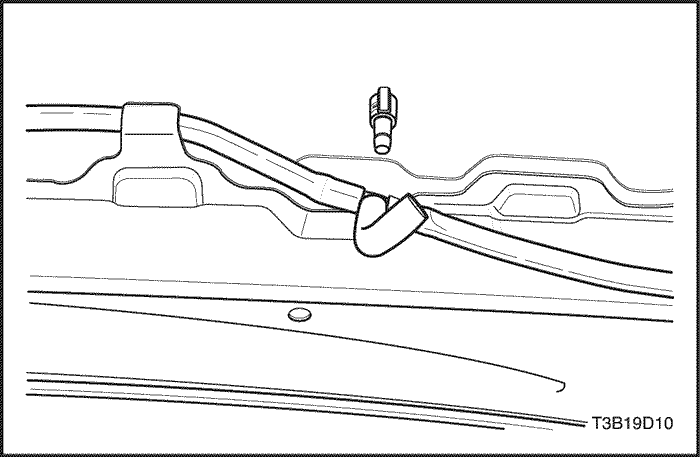
Are the windshield washer hoses or the nozzles clogged or damaged?
|
-
|
Go to Step 7
|
Go to Step 8
|
| 7 |
Repair the washer hoses and the nozzles.
Is the repair complete?
|
-
|
System OK
|
-
|
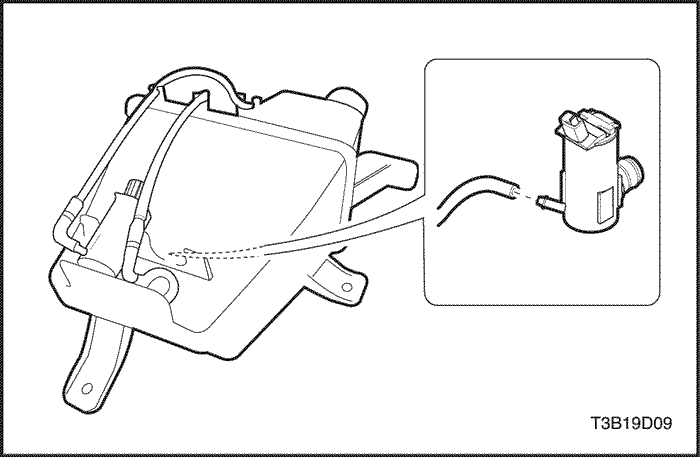
| 8 |
Is battery voltage available at the windshield washer pump ?
|
11-14 v
|
Go to Step 10
|
Go to Step 9
|
| 9 |
Repair the open circuit between the windshield washer pump and the windshield wiper switch.
Is the repair complete?
|
-
|
System OK
|
-
|
| 10 |
Use an ohmmeter to check the ground circuit at the windshield washer pump.
Is the ground circuit OK?
|
0 Ω
|
Go to Step 12
|
Go to Step 11
|
| 11 |
Repair the windshield washer pump ground circuit.
Is the repair complete?
|
-
|
System OK
|
-
|
| 12 |
Replace the windshield washer pump.
Is the repair complete?
|
-
|
System OK
|
Go to Step 11
|
| 13 |
Replace the controller (SJB).
Is the repair complete?
|
-
|
System OK
|
-
|
| © Copyright Chevrolet Europe. All rights reserved |


