To the top of the document
Captiva
   
GMDE Start Page Load static TOC Load dynamic TOC Help?

Timing Chain Idler Sprocket Replacement - Left Side

Removal Procedure

  1. Remove the spark plugs in order to ease crankshaft/engine rotation. Refer to Spark Plug Replacement .

  2. 946216
  3. Remove the engine front cover. Refer to Engine Front Cover Replacement .
  4. Remove the right bank secondary camshaft drive chain tensioner. Refer to Secondary Timing Chain Tensioner Removal - Right Side .
  5. Remove the right bank secondary camshaft drive chain shoe. Refer to Secondary Camshaft Drive Chain Shoe Removal - Right Side .
  6. Remove the right bank secondary camshaft drive chain guide. Refer to Secondary Timing Chain Guide Removal - Right Side .
  7. Remove the right bank secondary camshaft drive chain. Refer to Secondary Camshaft Intermediate Drive Chain Removal - Right Side .
  8. Remove the primary camshaft drive chain tensioner. Refer to Primary Camshaft Intermediate Drive Chain Tensioner Removal .
  9. Remove the primary upper camshaft drive chain guide. Refer to Primary Timing Chain Guide Removal - Upper .
  10. Remove the primary camshaft drive chain. Refer to Primary Camshaft Intermediate Drive Chain Removal .
  11. Remove the right bank camshaft intermediate drive chain idler. Refer to Timing Chain Idler Sprocket Removal - Right Side .

  12. 946212
  13. If you are servicing the left bank camshaft intermediate drive chain idler, perform the following steps:
  14. 11.1. Remove the left bank secondary camshaft drive chain tensioner. Refer to Secondary Timing Chain Tensioner Removal - Left Side .
    11.2. Remove the left bank secondary camshaft drive chain shoe. Refer to Secondary Camshaft Drive Chain Shoe Removal - Left Side .
    11.3. Remove the left bank secondary camshaft drive chain guide. Refer to Secondary Timing Chain Guide Removal - Left Side .
    11.4. Remove the left bank secondary camshaft drive chain. Refer to Secondary Camshaft Intermediate Drive Chain Removal - Left Side .
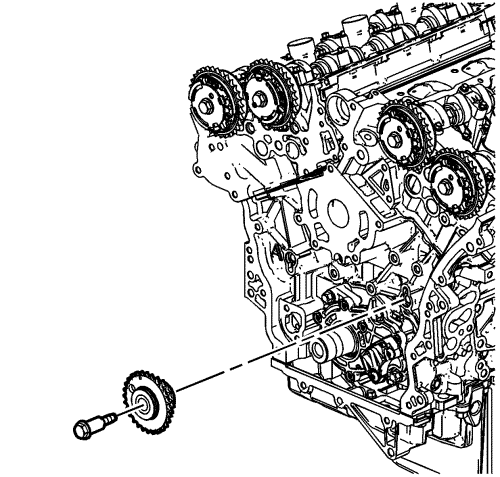
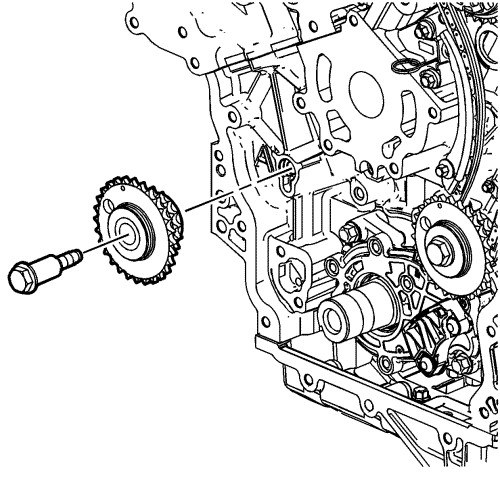
    11.5. Remove the left bank camshaft intermediate drive chain idler. Refer to Timing Chain Idler Sprocket Removal - Left Side .

Installation Procedure


    946212
  1. If you are servicing the left bank idler sprocket, perform the following steps:
  2. 1.1. Install the left bank camshaft intermediate drive chain idler. Refer to Timing Chain Idler Sprocket Installation - Left Side .
    1.2. Install the left bank secondary camshaft drive chain. Refer to Secondary Camshaft Intermediate Drive Chain Installation - Left Side .
    1.3. Install the left bank secondary camshaft drive chain guide. Refer to Secondary Timing Chain Guide Installation - Left Side .
    1.4. Install the left bank secondary camshaft drive chain shoe. Refer to Secondary Camshaft Drive Chain Shoe Installation - Left Side .
    1.5. Install the left bank secondary camshaft drive chain tensioner. Refer to Secondary Timing Chain Tensioner Installation - Left Side .

    946216
  3. Install the right bank camshaft intermediate drive chain idler. Refer to Timing Chain Idler Sprocket Installation - Right Side .
  4. Install the primary camshaft drive chain. Refer to Primary Camshaft Intermediate Drive Chain Installation .
  5. Install the primary upper camshaft drive chain guide. Refer to Primary Timing Chain Guide Installation - Upper .
  6. Install the primary camshaft drive chain tensioner. Refer to Primary Camshaft Intermediate Drive Chain Tensioner Installation .
  7. Install the right bank secondary camshaft drive chain. Refer to Secondary Camshaft Intermediate Drive Chain Installation - Right Side .
  8. Install the right bank secondary camshaft drive chain guide. Refer to Secondary Timing Chain Guide Installation - Right Side .
  9. Install the right bank secondary camshaft drive chain shoe. Refer to Secondary Camshaft Drive Chain Shoe Installation - Right Side .
  10. Install the right bank secondary camshaft drive chain tensioner. Refer to Secondary Timing Chain Tensioner Installation - Right Side .
  11. Install the spark plugs. Refer to Spark Plug Replacement .
  12. Install the engine front cover. Refer to Engine Front Cover Replacement .


© Copyright Chevrolet. All rights reserved